I was going to say something here like, “wow, it’s been ____ since I’ve posted a tutorial!” But then I started scrolling back and decided the fill-in-the-blank was too embarrassing to put in type. So let’s just say: awhile!
So here it is, my first tutorial in WAY too long, and my first ever pattern made available just for you fine Crafterhours readers, for the low low price of FREE!
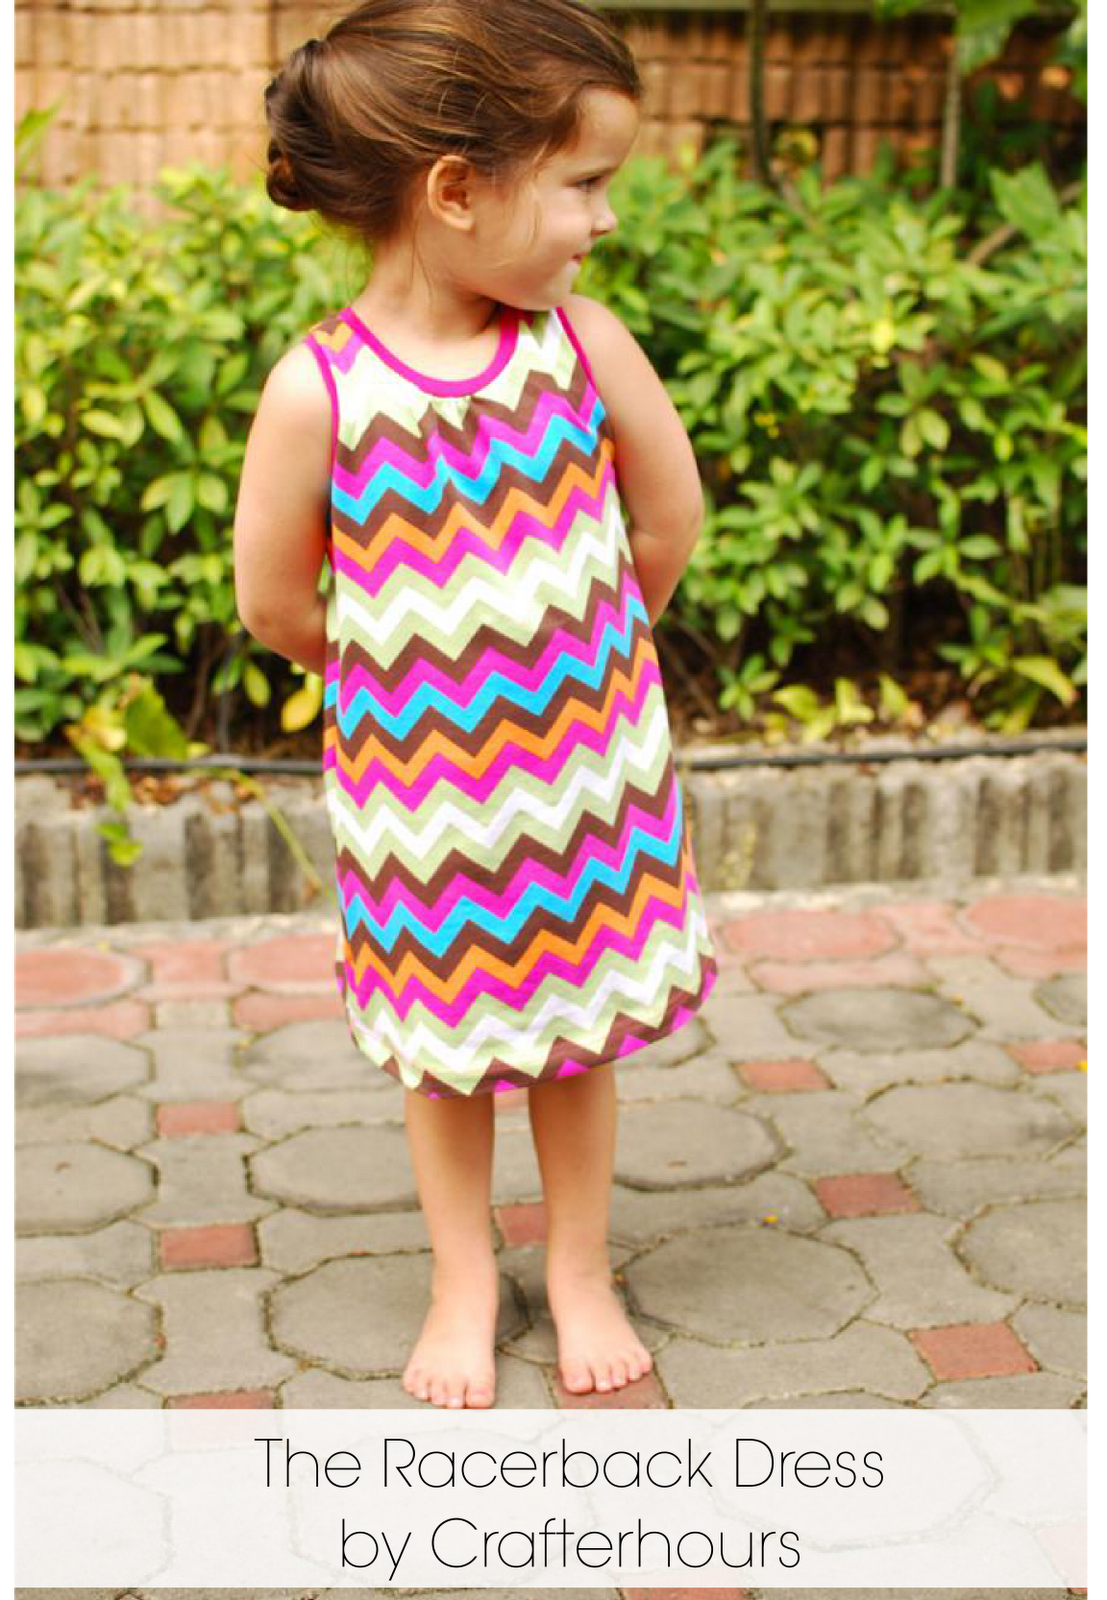
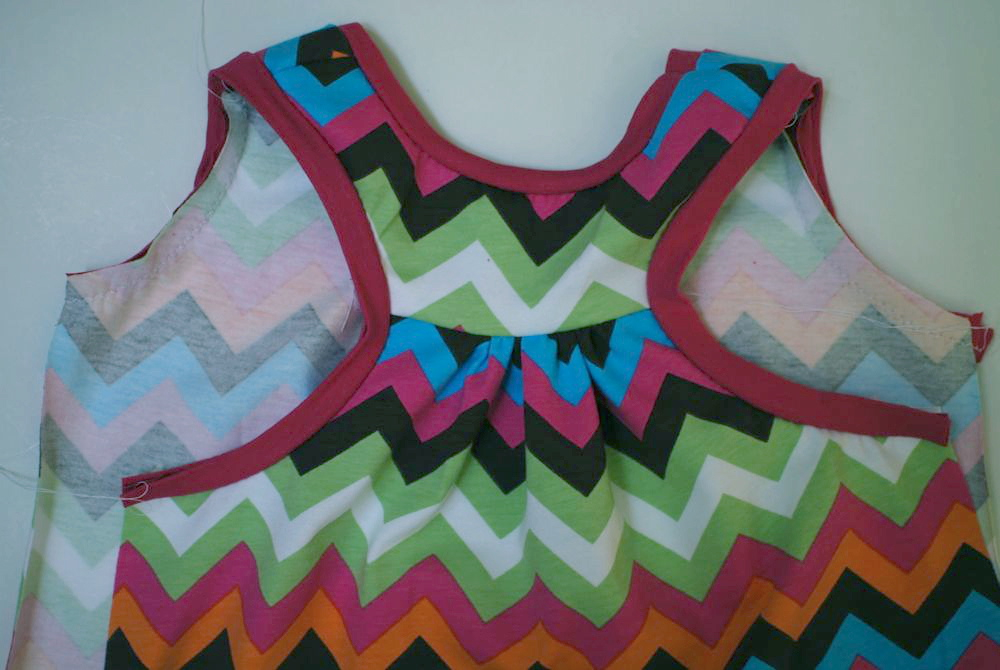
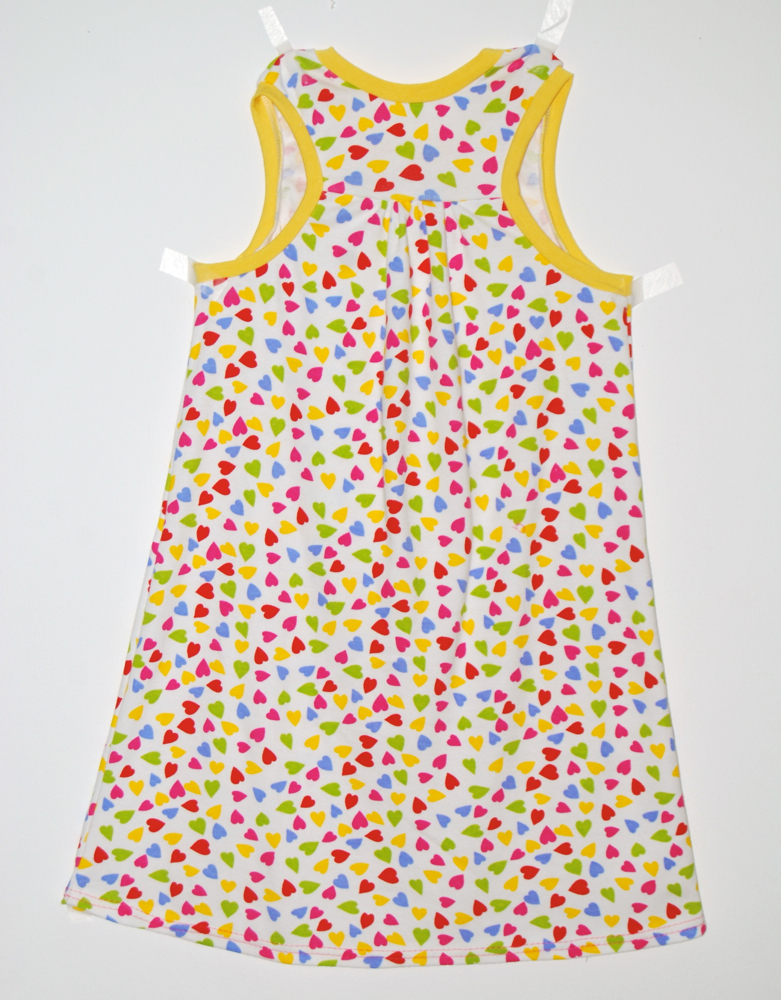
If you saw Susan’s posts on Friday, you know that we’re currently involved with a project to send simple dresses to little girls in Africa, dresses that are weather appropriate and don’t have buttons or zippers that can break. Well, it doesn’t get much simpler than this. If you have an hour and a yard of fabric to spare, you could whip up two of these racerback dresses and make a difference in the life of a little girl in need.
So let’s jump in.
First gather your materials. You’ll need:
– The Pattern! Get it here.
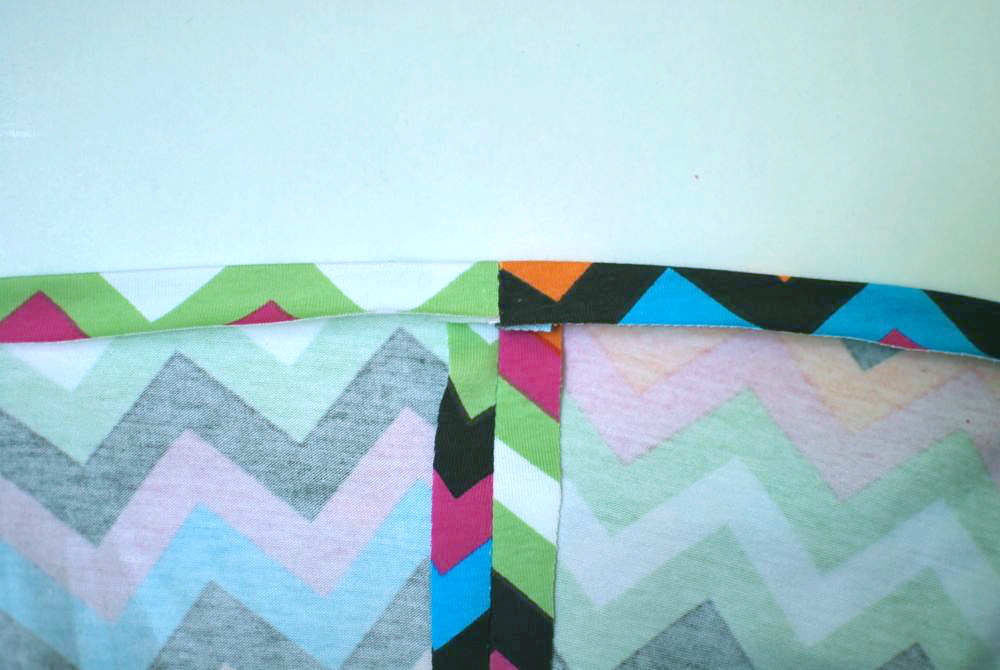
– 1 yard of knit fabric (You’ll have a ton left over but due to the direction of stretch, you’ll need to start with this much. You can fit a 12-18 month size on 3/4 yard.) Good knits for this project include jersey, stretch jersey, interlock, or anything with a little stretch. A baby rib (1×1) will work, but will be harder to keep from stretching as you sew. Steer clear if you’re a knit newbie.
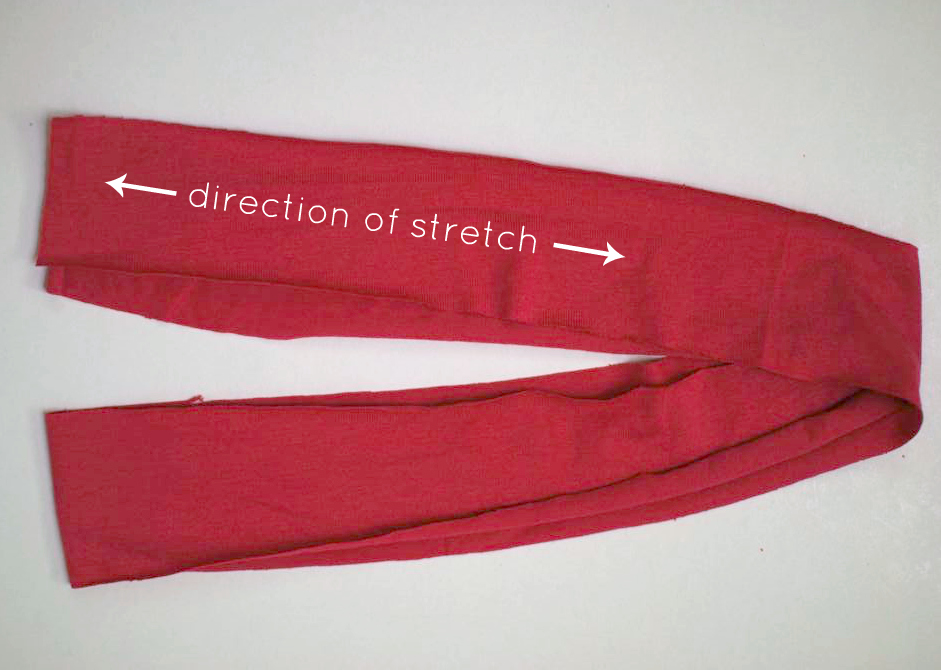
– Coordinating stretch fabric for the binding. Rib knit is a great option here, but a stretch jersey will work perfectly too. You will need three 20″ x 2″ lengths of this, with the direction of stretch going lengthwise. A good option is just to cut off a 2″ length from selvedge to selvedge on 60″ wide knit fabric, if you have it.
– Thread that matches your binding fabric.
– Computer, printer, tape, scissors
Please note:
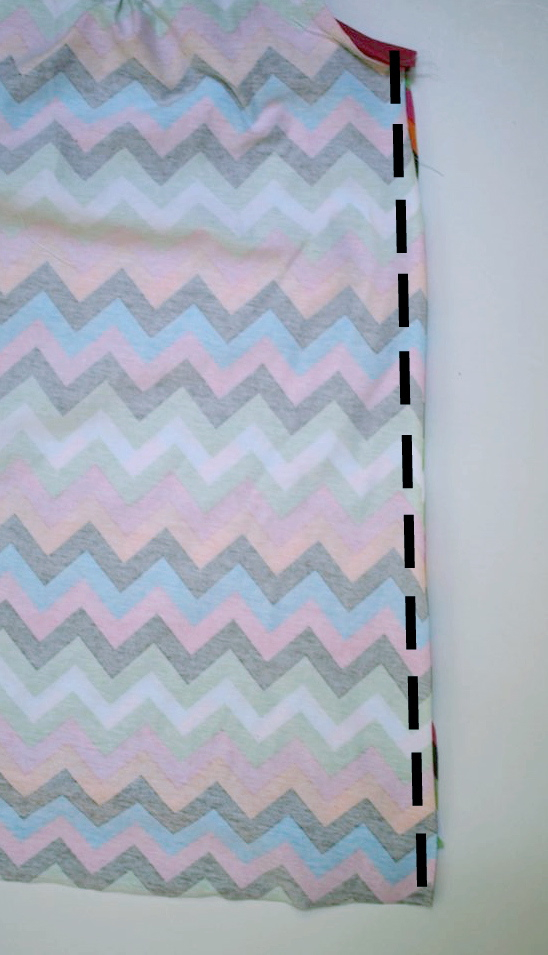
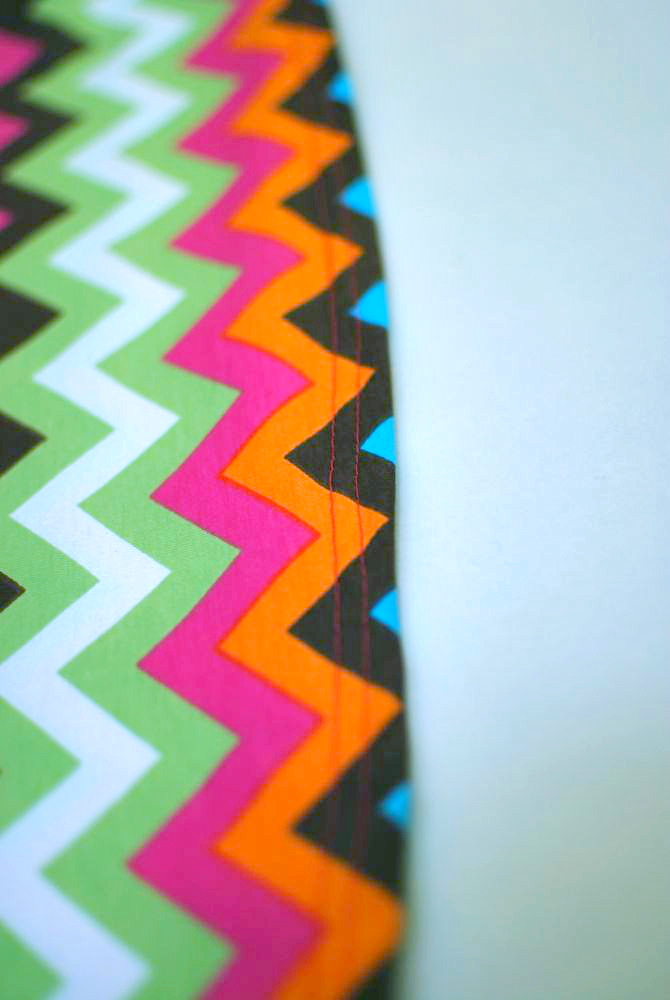
– All seam allowances are .5″ unless otherwise stated.
– I made this tutorial using only my sewing machine, but for those of you who have a serger, feel free to use that for everything except the gathering stitch and hem. For those of you who don’t have a serger, don’t feel like you’re missing out. I actually find that this dress comes together just as easily and more accurately using a sewing machine because I have a bit more control.
– Finished garment measurements:
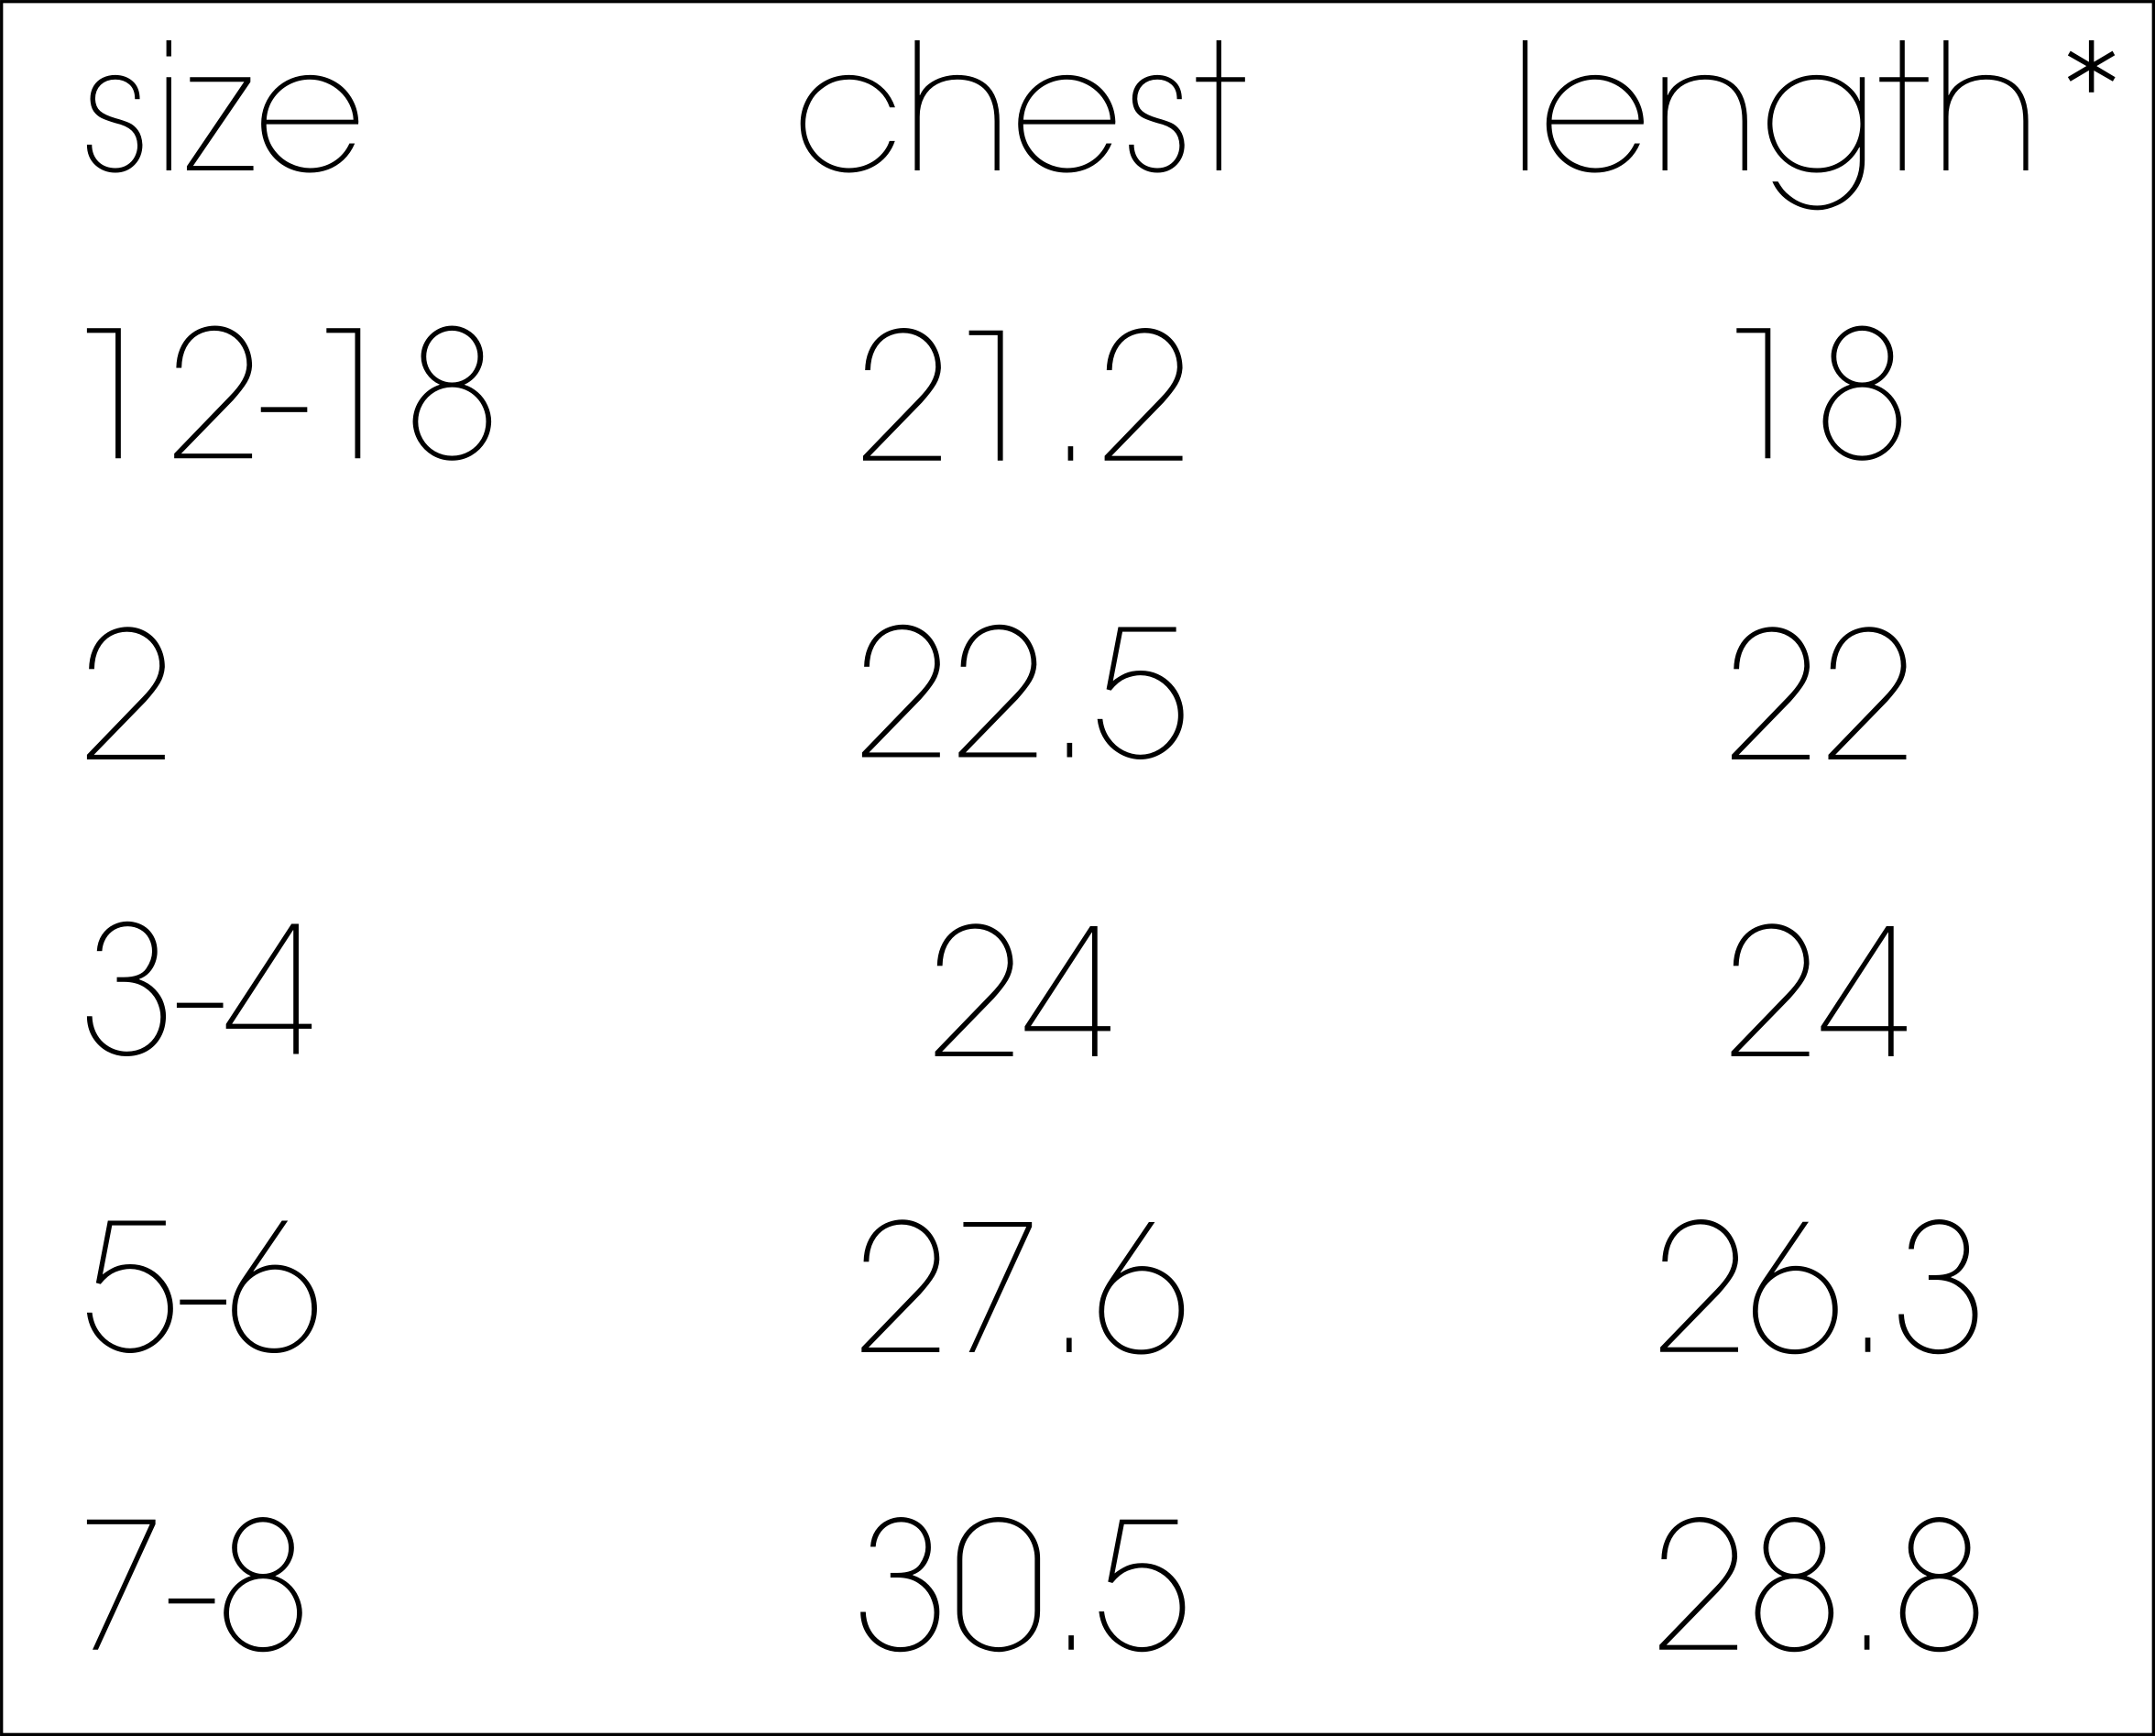 *this is the length for the larger size (the 8 in the size 7-8, for example). You will make a deeper hem for the smaller sizes so they will be an inch or an inch and a half shorter (and can be let out to fit for another year!)
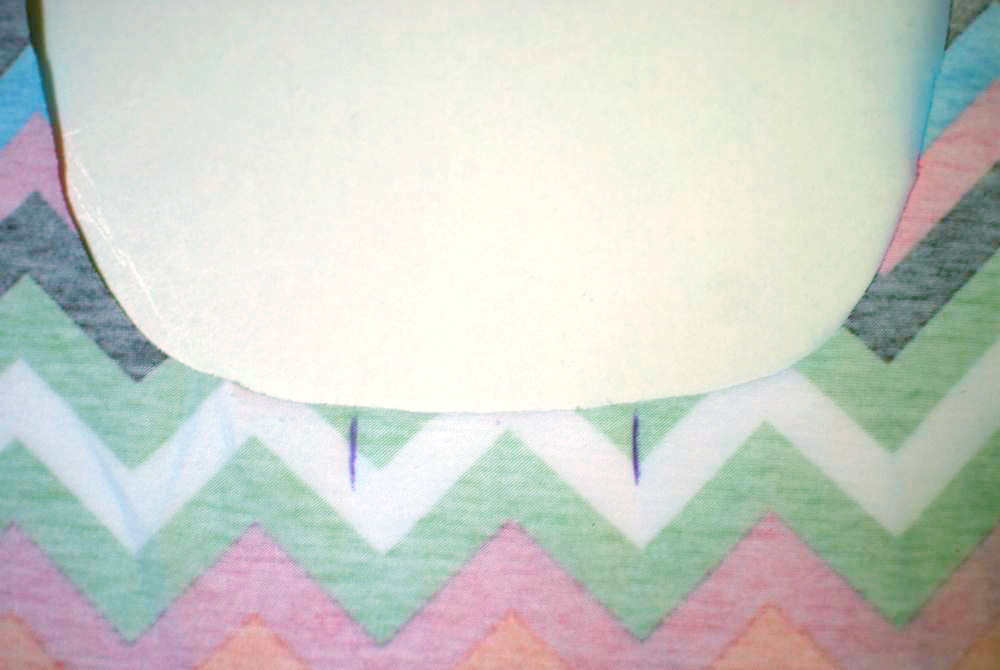
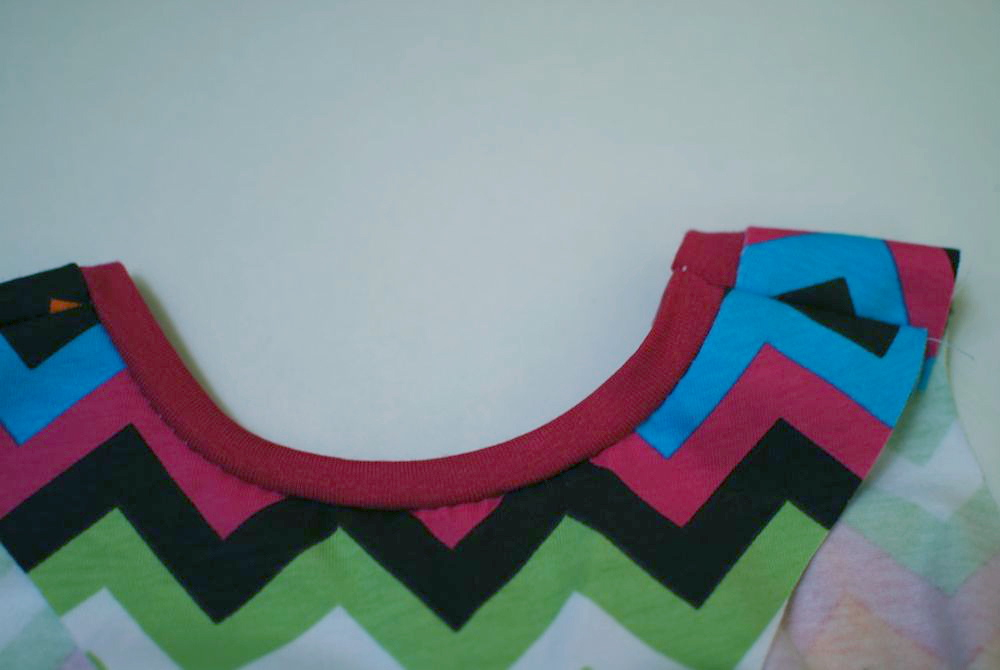
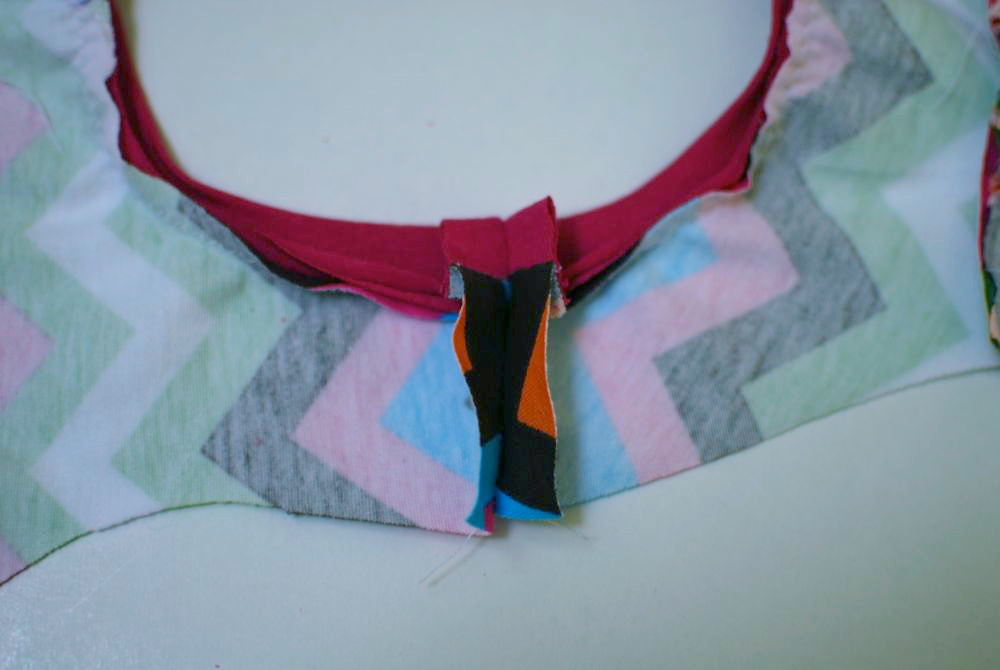
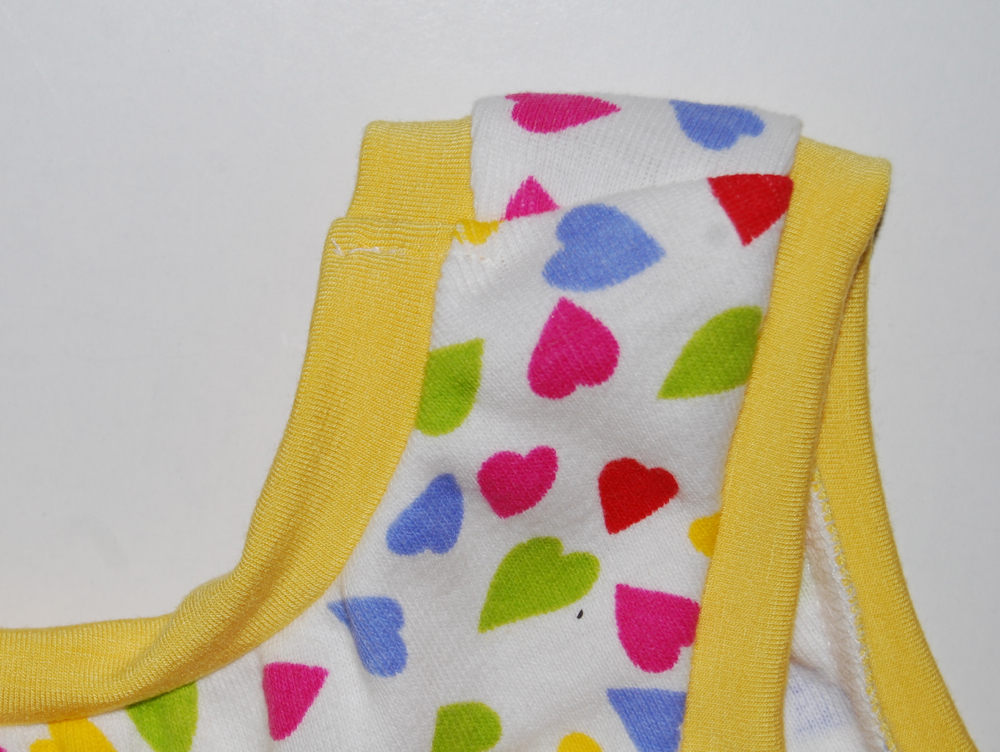
Step 1:
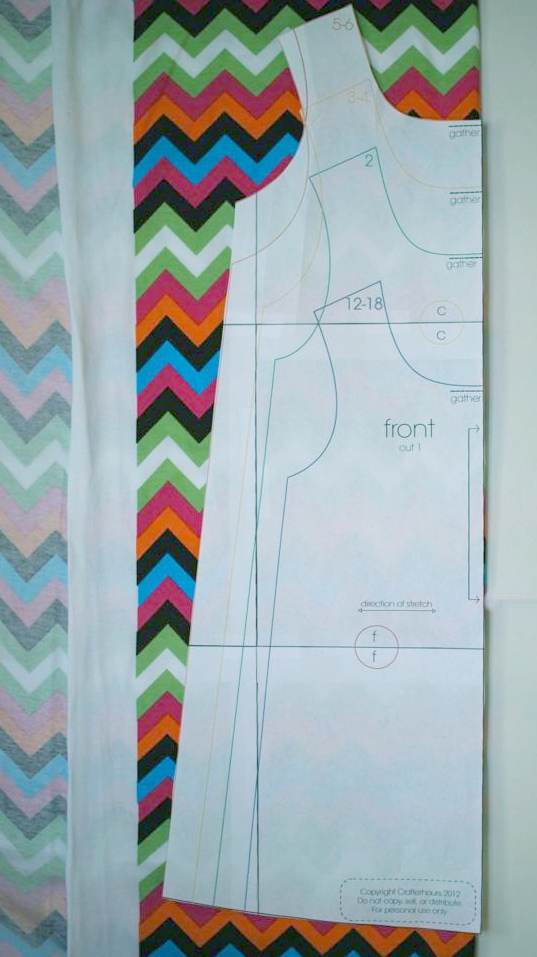
Read the printing directions on the second page of the pattern before printing. Tape each page together by matching up the letters encased in half-circles. Be sure you’re taping within the pattern, not in the empty white space. You will have a front piece, a lower back piece, and an upper back piece. Cut out the appropriate size.
Step 2:
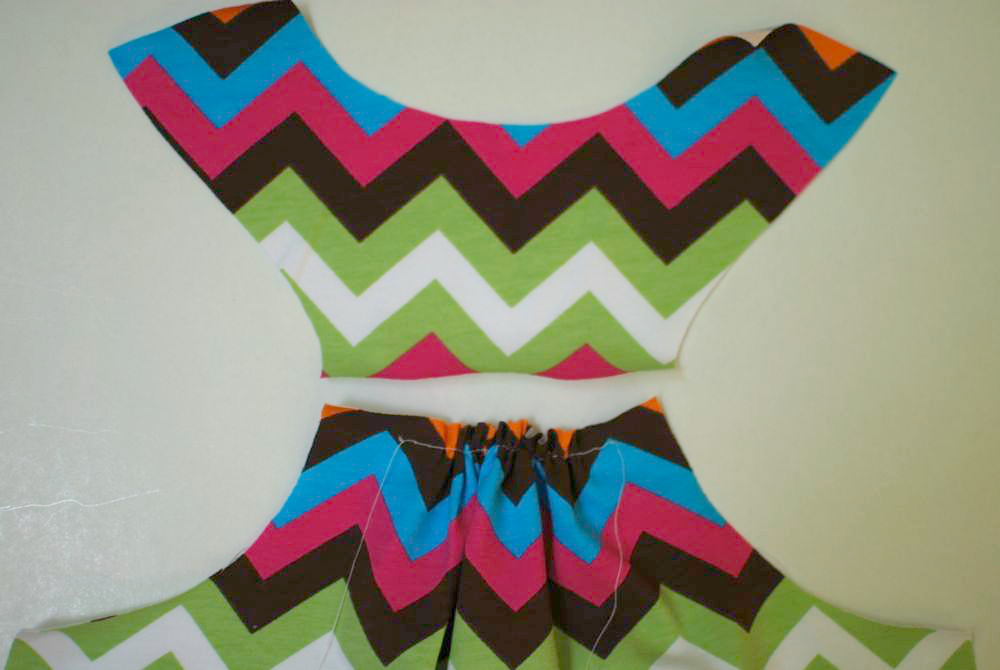
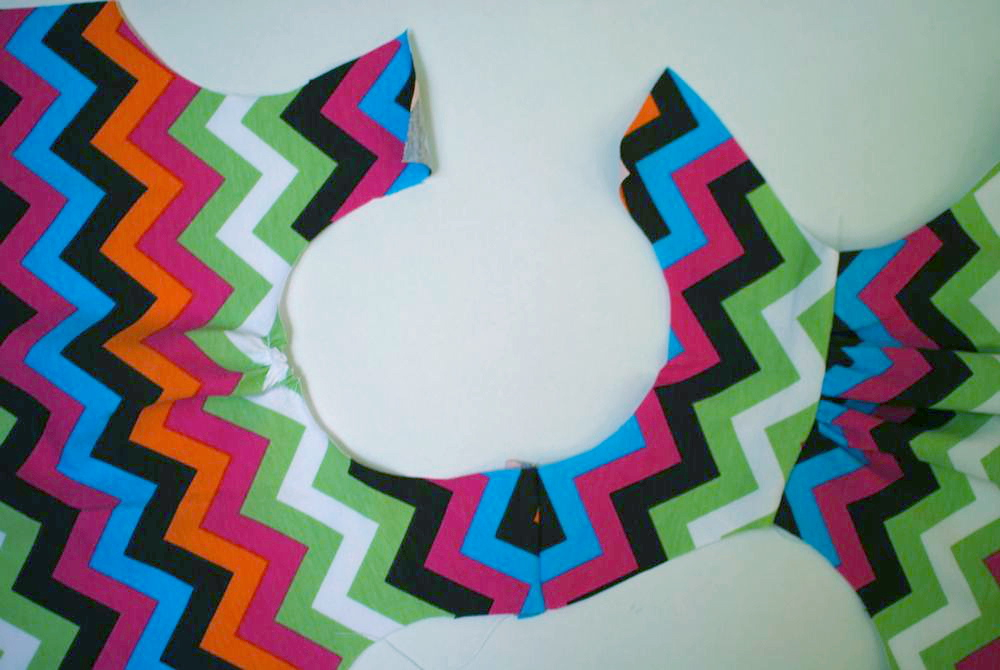
Lay each pattern piece along the fold of your fabric and cut around the edges to produce one symmetrical piece.


Thank you SO much for gifting us with your pattern and tutorial! What a great cause – there will be two very happy little girls who receive and wear your dresses:)
Wonderful!!
Adrianna, you are awesome! Thanks for sharing this tute with us, especially with enough time to send some off to share. :)
Adorable!! This might be just enough to make me face my fear of knits again! Thanks for sharing – and being so generous with a FREE pattern. You rock.
love it! thanks for sharing the pattern! I think this will be my today project!
I love it! Thank you so very much!
DArling dress….and where I lived in Africa—would be a prized possession!
I am getting the fabric stash out today to make some!
Oh, thanks! This is great. I don’t usually make matching outfits for me and the girls but I think I will with this one. :)
love love it and those knits are fabulous!
Really really adorable. I am totally going to try this for my two girls! THANKS!
Super cute!! Thanks so much for the free pattern.
Wow this dress is great! It’s all over Pinterest today so apparently everyone loves it too! Thanks so very much for the free pattern.
Thank you SO, SO much!! What a great tutorial. It’s exactly what I was looking for. Greetings from Spain.
what great dresses for summer……thanks so much….my grandaughters will appreciate them!
Couldnt get pattern to show up any ideas? I would really love to have it.
Hi there,
The link will open up a blank webpage, but somewhere on your computer it will also open up a small download dialogue box that will ask you if you want to view or save the file. You can choose from there and it will download it for you. If you minimize all your windows and still don’t see this little box, check your downloads folder and it may have been downloaded automatically. This is dependent on the type of computer/operating system you use and the settings you’ve chosen for downloads. Let me know if you still don’t find it and I’ll help you out!
This is really cool!!! Can I blow this up for my size! haha!
sorry but I couldnt get the pattern, the page didn´t had the litlle box you said and it is not in the downloads file, but when I try to find in the that file it show me a page if I want to dowload the program toopen it, do I have to do that, my mail rojasalvarado2003@yahoo.com
got it, my computer had a program name RUN, i COPY THE LINK AND PASTE IT THERE, 23 pages OMG, thank you for share all your magic, God bless your hands, rojasalvarado2003@yahoo.com
Thank you it worked for me to.
Just in time for me! I´ve been wanting to draft a racer t shirt for some time… thank you!!!
The hearts print is lovely.
María
Fantastic! love it. My girls all one want and I still want one for me – I’ll have to scale it up :)
Very cute and very nicely done pattern! Doing this with three wee ones…. holy cow. You’re amazing.
I’ve wanted to try sewing with knits…thanks for the inspiration! Is a straight stitch what a knit prefers?
Kimmie
mama to 8
One homemade and 7 adopted
Where did you get the knit? Kristi at akhales@juno.com
Awesome dress and tutorial. Stumbled it here:
http://www.stumbleupon.com/stumbler/bloomsandbugs
I can’t download and get the following error:Error (403)
It seems you don’t belong here! You should probably sign in. Check out our Help Center and forums for help, or head back to home.
I tried your suggestions you gave another person in comments but it still isn’t working :(
I’m getting the same thing. :(
Yep.. me too.
Should be fixed now!
Yep. Got it now. Thank you! I love, love, love this little dress! :)
Perfect! Thanks so much!
AHH! Thank you so much!
Thanks for tthe tutorial but I have the same error (It seems you don’t belong here!) I’ve already registered but the error persist. If you could send it to me I’d appreciate it. Grettings from México
I’m LOVING this dress! Thank you so much for pattern and tutorial! You are great and what a great cause!
This is awesome! We live in East Africa and I can’t tell you the litte girls I see everyday whose clothes are falling off because the zipper is broken. This is great for my 2 girls as well!
What a great cause and fantastic pattern! I love how great it will look with any kind of printed knit (I’m a print fanatic!) I think it would be really cute if made out of vintage sheets too! Thank you so much for sharing!
Bonnie
ridingthebonnieway.blogspot.com
Thank you so much for sharing the pattern! I love this style dress, and can’t wait to make some for all the little girls in my life! I love your blog and appreciate what you do soooooo much!
Great dress! I have a slight problem, I don’t know if it’s from the knit I used but I made the size 8 for my daughter who is a size 10/12 but I figured tight would be ok. It’s actually too big and the arm holes are too big that her tiny chest shows. So i have to take it in. It actually fits me nicely as a shirt and I’m a size 12. But this could be the stretch in the fabric. I’m new to seeing with knits and it only took me an hour from cutting to finish. I will definetly make a couple for a local charity. Thank you!!
Hi Anonymous!
hm, it should definitely not be that big, even with a different type of knit (unless yours is stretching like mad crazy, but I doubt it). Maybe check your scaling? It must be at 100% and printed on letter paper. I made the largest size and tried it on my 6 yr old daughter and it was slightly too big, but didn’t show her chest or anything crazy. Is your 1″ square showing up as 1″? The front arm curve from shoulder seam to side seam should be somewhere in the vicinity of 8.5″.
I’m glad the actual construction worked well for you! Thanks for helping out with a great cause!
Send me an email directly at crafterhours@live.com if you need more help!
Wow this is really nice, I’m going to make some to send with my friend who is going back to work in an orphanage in Haiti. I was wondering if you had thought about sizing it up for bigger girls? I find so many great tutorials and patterns, but only up to sz. 6 or so and there are lots of little girls who aren’t so little that would love to have one, including my own. I am no good at sizing up, but if you have a good recommendation or wouldn’t mind doing a bigger size it would be great! Thanks for the great pattern!
LOVE this. such a simple pretty design! Cant wait for mum to make a few of these!
Thank you! I already made two of these for my girls. What a lovely dress.
Hi, I absolutely love this dress, I am having trouble downloading the pattern, I click on the link and all I get is Google drive home page with no dialog box. I hope I’m not too late…
Hi Peta, nope, not too late. Try to refresh your browser and let us know whether it appears. If not, e-mail us at crafterhours @ live.com and we’ll e-mail it to you. Susan
Hi Susan, still no luck. I will email you. Thank you.
Great pattern! Just made one for my daughter and I’m gonna make a few more! Super quick, and so cute!
thank very much
i m french i not speack very good but i just said you extra your tuto i have make a tee shirt for my girl whit your tuto in my blog .very easy thank isabelle
Thank you for this free pattern – I made it today… great !
what a cute free pattern:) I´ve made it, and added a link, onto my sidebar:)
thank you so much for sharing, Ursula
Thank-you! Love it!! A simple dress on which to practice your “sewing with knits” skills. I will be sizing this one up and down. : )
Hi!
I love this dress!!!!
But I can`t get the download…????? Help! Is it possible, to send me an E-Mail? nicole.guibtz@gmx.de
Thanks a lot!!! Nicole
My E-Mail wasn`t correct….
nicole.gubitz@gmx.de
Thanks!!!
Hi…
what a nice dress… I would like to make it for my daughter, but I can’t get the download too… Would you also send me a email please? Let the patern travel around the world :) My email is: lisette.goossens@upcmail.nl
Thanks!
Thank you! I love it!
Sylvia
I have been looking at this dress for a month, finally made it to a fabric store, (40 min drive to the closest one) and now the pattern link only takes me to a google documents page. Help!! I really love this dress!
or you can email it to tonyanading@yahoo.com
Hi, thanks for this great pattern that I totally love ! I do love basic patterns with perfect details and that one does it exactly. I’m French and I have made one dress for my daughter for a “ikks inspiration” challenge between French sewing bloggers. I would be honored if you stopped by my bog to check it. Thank you again. http://lautreatelier.over-blog.com/article-inspiration-ikks-1-107573564.html
Thank you!
Blogged!
this is just what i was looking for for my little girly, thank you! x
where did you find that fabulous fabric? the chevron?
The dress is adorable but like everyone else, I can’t get the tutorial/pattern like others. I think because Google is doing a transition from google docs to google drive. Old links are lost. Not smart on Googles part. Is it possible to get the pattern emailed to me? crafting4many@gmail.com Thank you so much.
Lori
High-five!! Thank you so much for this tutorial! I will be sending this comfy dress in my Operation Christmas Child shoeboxes as well as making a couple for my girls!
I would LOVE this pattern to make my four granddaughters dresses for this summer. I am having problems w/ copying. Is there any way you could email it to me? cathy.leishman@gmail.com
Thank you,
Cathy
Where do you get your knit from? I can never seem to find cute patterns in knit. Love it!
Any chance you would be able to email the pattern? I get redirected to Google docs like the above people.
Thanks to monroevg9@yahoo.com
Thanks so much! I whipped up two dresses for my girls last night. It was my first time working with a knit and thanks to your tutorial and great pattern, they turned out wonderfully!
Thank you for the tutorial and the free pattern for this very nice dress :)
Hello! Cut out 2 of these for my daughters last night. Anyone have experience cutting knit on the bias to make the binding? I have a stripe I would like to use…
Hello. Thank you for this tutorial. I made 2 dresses for my girls!
Is a yard of fabric enough for size 8 dress? Thank you!
Thank you so much for sharing this!! It was EXACTLY what I was looking for.
I didn’t read all the comments, but are there measurements for each of the sizes somewhere?
Thank you! I made one for my four-year-old and it’s adorable! http://kaesey.wordpress.com/2014/04/11/little-foxes/
This is so so so pretty I love it.thank you for being so generous Can you please tell me how to get the pattern on a tablet as I don’t have a computer. Please.m
This is so cute, and my daughter is in desperate need of new summer clothing, but I can’t get the pattern to open. It keeps giving me an error message that it needs to reboot, then just goes in a reboot cycle. Help please!!!
I’d suggest trying opening it in a different program or from a different computer. That’s a new one to me!
Just cutting the fabric now. But a question. Do you have to add the seam allowance or is it already in the pattern?
Already in there!
Thanks, almost finished. Picture will follow.
Is the seam allowance included in the pattern or do you still have to draw that yourself?
Included!
Thank you very much!
I’m an avid sewer, can you tell me a little more about the project for Africa? I would love to send something and do we send a dress to you or do you have a direct address to send to in Africa? Such a lovely idea. I’m not much into the blog world I just see you on FB and love your posts! So if you wouldn’t mind sending any info to my email I’d appreciate it. Thank you kindly! Danielle
Hi Danielle, will e-mail you also, but here’s the active information we have – the site updates what they’re collecting and where to send it: http://www.littledressesforafrica.org/blog/make-a-donation/
:) Thank you for the great pattern!! Looking forward to making it up!!
love this pattern. has anyone made in cotton?
Thank you so much for this pattern. I have sewn a little with knits and I took on this project. To my surprise it came out great. No slip ups…whew! This project built up my confidence. Thank you again and love the racerback dress. I know I will be making plenty for my 2 girls since all they love are dresses!
I have just started making this dress for my grand-daughter and I have a question re Step 11. Is the shoulder seam a normal open seam with the fabric wrong sides facing?
Thank,
Pat
I cannot get the pattern pages to print. I thought it was because I recently started using Windows 10 but am able to print other pdf’s just fine. I can only print page 1 and anytime I try to print the current page (like page 10) it reverts back to page 1. If I try to print page 10-23 it just sends an error message “Sorry, did not print” I downloaded from Craftsy which is where the link takes you so maybe there is a problem with their file?
Has anyone made this with a straight cotton not a knit? I have a fabric a fave fabric that I would love to make this style of dress with
You’d have to make a number of adjustments to be able to get it over the kid’s head and body. A zipper on the side and an opening/button closure at the shoulder or back neck, at least. And then because knit patterns don’t include much ease, it still might not be comfortable to wear and/or could rip open at the seams. So… might be better off just looking for a pattern that’s made for wovens? You might be able to get away with making the front woven and the back knit or vice versa.
This tutorial looks great! But I can’t get it to print correctly. Only the racerback piece prints correctly and other than that I get a bunch of blank pages or just the sizes, but no outlines to cut. I changed my ink cartridge and it did not help. I’m not sure what would cause this, as I have printed many other patterns. Any suggestions?
Thanks!
Most often it’s an issue with printing the file while you’re still in the browser. If you download and open it in Adobe Reader it’ll usually fix the problem.
Plz tell what software you use to digitize your patters? Or how you grade them?
See more from Adrianna at heyjunehandmade.com :)