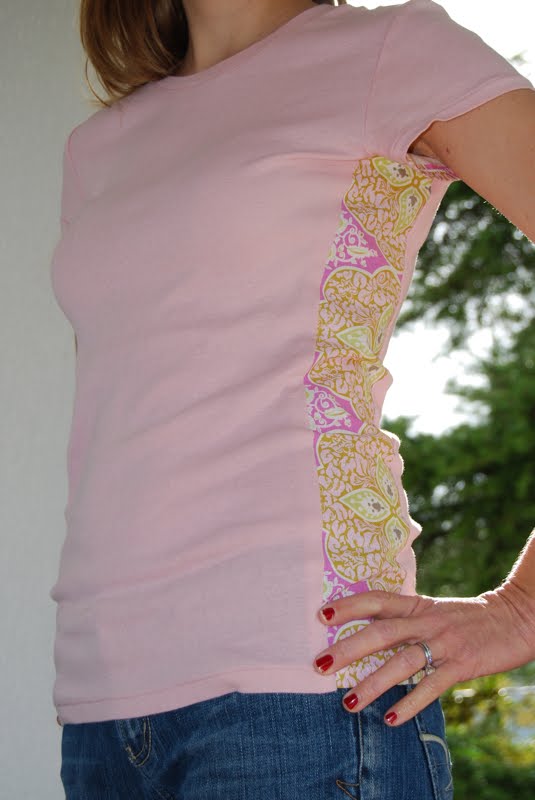
This one’s an oldie but a goodie. Refashion a knit shirt by inserting panels of fabric on the sides. The practical reasons behind doing this refashion could be:
1. make a small shirt bigger
2. make a big shirt smaller
3. get rid of unsightly evidence of perspiration
4. use tapered fabric inserts to make the bottom part of the shirt bigger to compensate for baby bump (either before or after baby)
but the number one reason in my book:
1. it’s way cute.
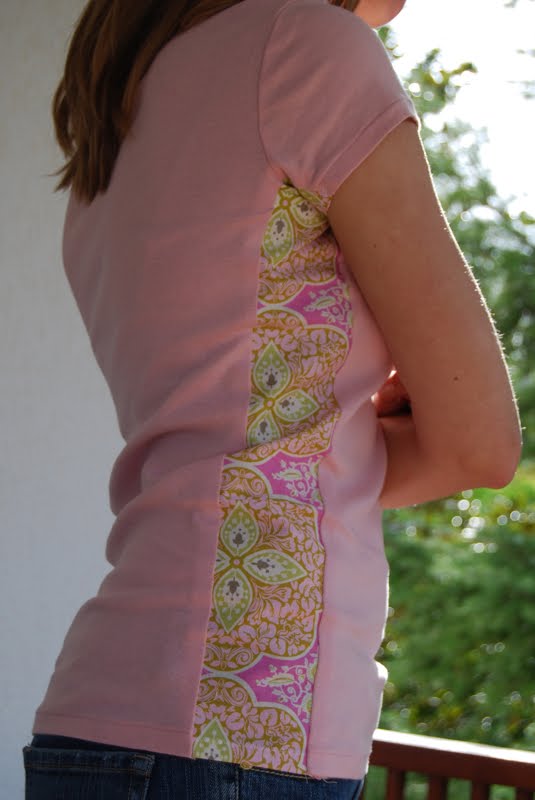
You will need a knit cotton shirt and some fabric to make the panels. I used woven, but you could also use another knit.

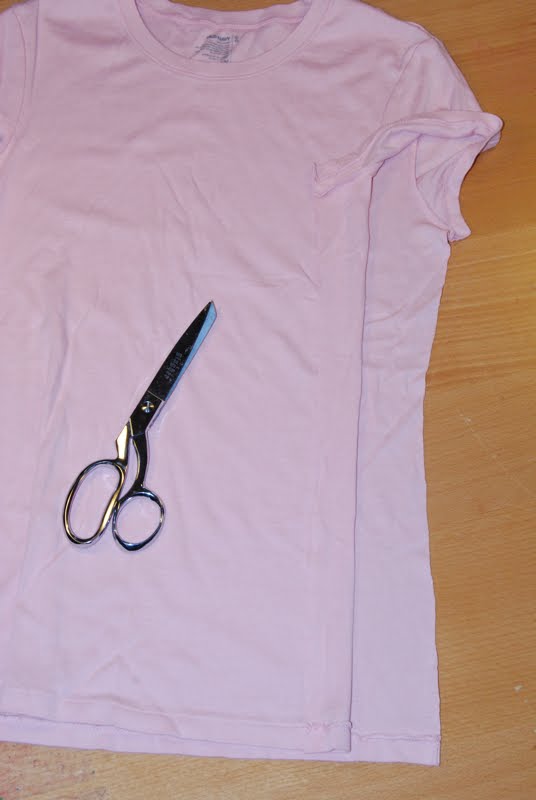
Cut up the side seam from the shirt hem to the sleeve hem – right through the underarm.
Cut two panels from your fabric. If you’re making the shirt bigger, just cut up the side seam and insert panels as wide as you need. If you’re making the shirt smaller, remove equal amounts of fabric from each side of the side seam and then make panels that are smaller than the amount you removed. Just remember that you’re replacing it with a non-stretch fabric, so that will help make the shirt smaller in itself.
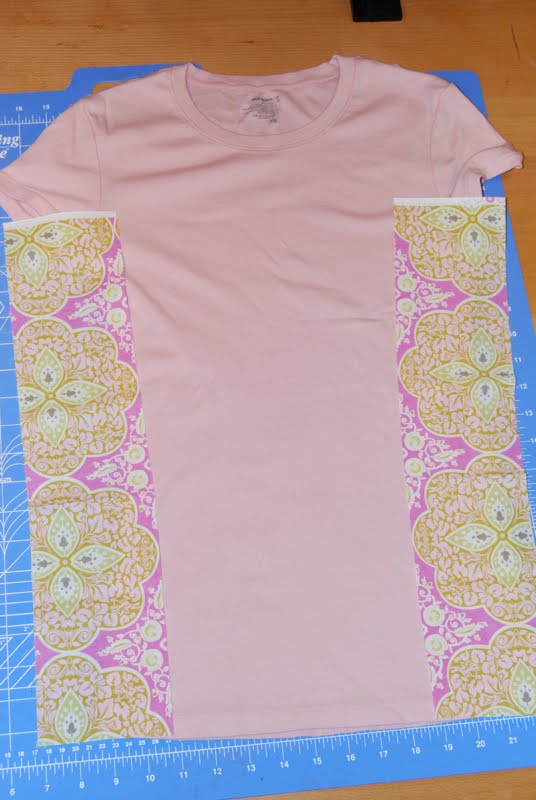
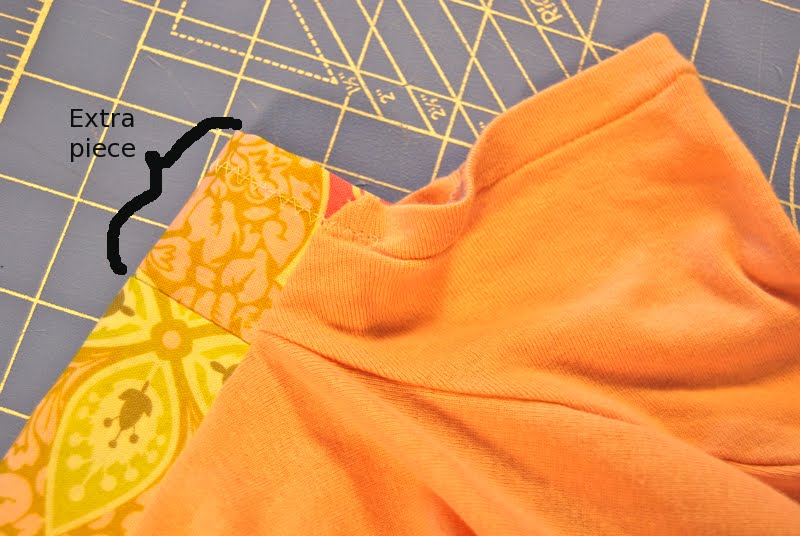
You can make the fabric insert run all the way between each hem, but I also cut out a smaller square piece and attached it to the longer piece. That way you have a seam in the panel right where you have the underarm seam in the knit shirt. I think it helps the woven to bend with your arm, but it isn’t necessary.
Now sew the panel to both sides of the shirt, right sides together, and hem the woven at each end. This is what the panel will look like inserted into your shirt. Now do that again for the other side.

Simple, cute, and most importantly: done in about 20 minutes! (or, 6 hours if you have toddlers)

hey der adrianna,
thanks a lot as you saved two of my tight yet oh-so-cute t-shirts. now i know just wat to do with them..n ur idea is just so cute and useful! keep up the good work! i’l watch dem all!
super cute! I’ve never seen that before… but I think i’ll use it! :D
Oh I love that!! That is an awesome idea for me, because I’m tall, so if I buy shirt that are long enough, they are always too wide!!
Thanks!
This is an AMAZING idea!! I am so featuring this TODAY!
very cute idea! i have a freaky long torso and shirts that are long enough are always to wide for me.
That’s so cute! It really made the plain T-shirt!
I’ve never seen this before – too cool!!
This is such a great idea! I’ve never seen it before! Glad you shared!
really love it thanks for sharing…glad i found your blog
Love this idea. I’ve got a few t-shirts lying around that were getting a little tight (not that I am admitting to gaining any weight here…)Thank you for sharing.
I love this idea! I’ll have to give it a shot. I’m sure those vertical lines are very slimming…and I can use all the slimming I can get!!
Ohhh the possibilities!
Ha! I LOVE what you say about the tshirt refashion taking six hours if you have a toddler. It so made me giggle! And I’m trying your Coke Brisket recipe in the sidebar tonight!
I love this! It is way cute! I love the colors you chose too! I’m going to have to try this!
great idea! too cute!
I love this! Especially as a baby bump idea. :)
merhabalar
çok güzel olmuş eline sağlık
bende geçen hafta eski olmayan kıyafetlerime bunu yapmayı düşünmüştüm görünce örnek oldu bana nasıl yapacağımla ilgili
iyi çalışmalar
sevgiler…
ingilizcem çok iyi olmadığı için Türkçe yazıyorum çevirirsen sevinirim by..
Still laughing about the “or in 6 hours if you have toddlers” comment. You must know my kids. heehee Super cute tut though … I have a snug shirt I was loath to part with. Thanks!! Can’t wait to fix it. :o)
Okay, I will be busy this weekend, I have about 3 shirts that need (ummm) a little adjustments (ha ha). Thanks for the tut.
Woah. I have a brand new really nice and soft shirt that fits me perfectly. But I managed to splash a little bleach on it close to the seam. How the heck does that happen anyways? So I’ve been hanging onto it for a tshirt refashion idea that doesn’t look too angsty teenager, so my adult shaped body can wear it. I think I found my answer! Thanks!
Oh, my. I have bags full of cashmere sweaters from the thrift shops that this would really work with. Thank you! I’ll try it tonight.
This is a godsend for my curvy 7 year old… thanks soooo much!
What a great idea! This will really spruce up old t-shirts. Thanks!
Love this idea! I’m going to try it when I get a chance.
Im trying to do this, and was wondering whether you pinned the fabric in place first or just went to sewing to the shirt right away? Im a relatively new sewer, self taught. Thanks, June
knowing me, I probably just went ahead and starting sewing. Pinning is almost NEVER a bad idea though (there are a very few circumstances when pinning would hinder you, but don’t worry about that for now). I would say, when it doubt, pin!
ps: love your name! it’s our third daughter’s nickname :)
6 hour timer starting…..now :)
that is a GREAT idea — I enjoy embroidering on T shirts — so I think it would be fun to incorporate some embroidery design to compliment the print fabric that is inserted — thanks for the inspirtation!
You could also use an old T-shirt, in a contrasting color and cut panels out of that then it would have the stretch like the T-shirt.
I love this idea. I am always seeing tee shirts at thrift shops that are cute, but too small. Now I can buy them and remake them to fit me. Thanks for the great, easy tutorial. Take care.
I love it! I am SO doing this to my t-shirts!
This is just what I was looking for. I bought a holiday t-shirt and it’s too small so this tutorial will save my new T-shirt, thank you! Also great idea about under arm seams. My T-shirt has long sleeves so I guess the same application would work. I’m a new sewer so this will be a fun experience for me (or not) And it will probably take me 6 hours without any toddlers about.
Blessings, JL
Thank you for this great idea. I have now done two of my old shirts, the second going a lot faster than the first. With a little more practise I will soon be ready to tackle those newer pretty shirts that seem to have shrunk over the winter. (I am in the Southern Hemisphere just in case you are wondering.) I found you on Pinterest, and every day that I look at that site I am astounded at how smart and innovative my fellow human beings are. Thank you for sharing.
Cathy
ACCIDENTALLY SHRANK MY FAVOURITE SHIRT RECENTLY – these are neat instructions to make it bigger!! (GOING TO USE WIDE LACE ) Thanks a Lot !!
11/2/14
Make my own pencil skirts for the office. Going to use this idea for some neutral colored tops I have using the skirt fabric to make matching ‘suits’. Thanks so much!
thank you for sharing your idea, that was very useful.
I love this idea! I have some shirts I bout that are to small. I like a certain print. Now it it easy to enlarge! Thank you.
I’ve done this with a few t-shirts which were too small, but I love your idea of the print fabric to contrast with the tshirt knit — very cute!
Fantastisk ide, thank you.
Got a few t-shirts that are in need of altering!! I was going to cut them up to use as crochet yarn, as it doesn’t fray. This way I don’t have to buy new t-shirts. Thanks
What kind of stitch did you use up the side? Straight? Serger? I’ve had this very same idea in my queue but wasn’t sure how I would keep the knit shirt from bunching or stretching when sewing. Any helps? Your side seams look perfect. Thanks!
I just used a straight stitch. I didn’t even own a serger back then :) Maybe a zig zag to maintain stretch? But taking out an inch or two of stretch on the sides doesn’t change the fit of the tee too much. I don’t remember doing anything special to keep the knit from bunching, and this was a very stretchy shirt. Just go slowly and use lots of pins!
Thanks for the tutorial! A friend gave me a “hand-me-over” cotton shirt that I love, but it didn’t quite fit. I am so glad that I was able to use your instructions and how the shirt is just right.
I made mine today using your idea. I LOVE IT. Used a stretch print, green , white , black on a black tee. I used a ball point needle for knits, but just straight stitch ..I did add that little piece at the top for the underarm.
Get I am going to try on my golf shirts, kind of busty maybe it will give me extra room.