crafterhours

sleeping babes. crafting moms.

  • Tutorials
  • Patterns
  • Shop
  • Contact
  • Follow

Kids’ Cutlery Tray: A Tutorial

May 18, 2010 By crafterhours 25 Comments

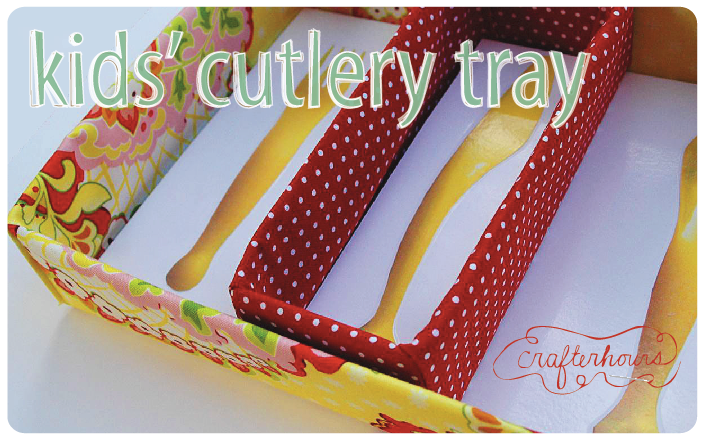
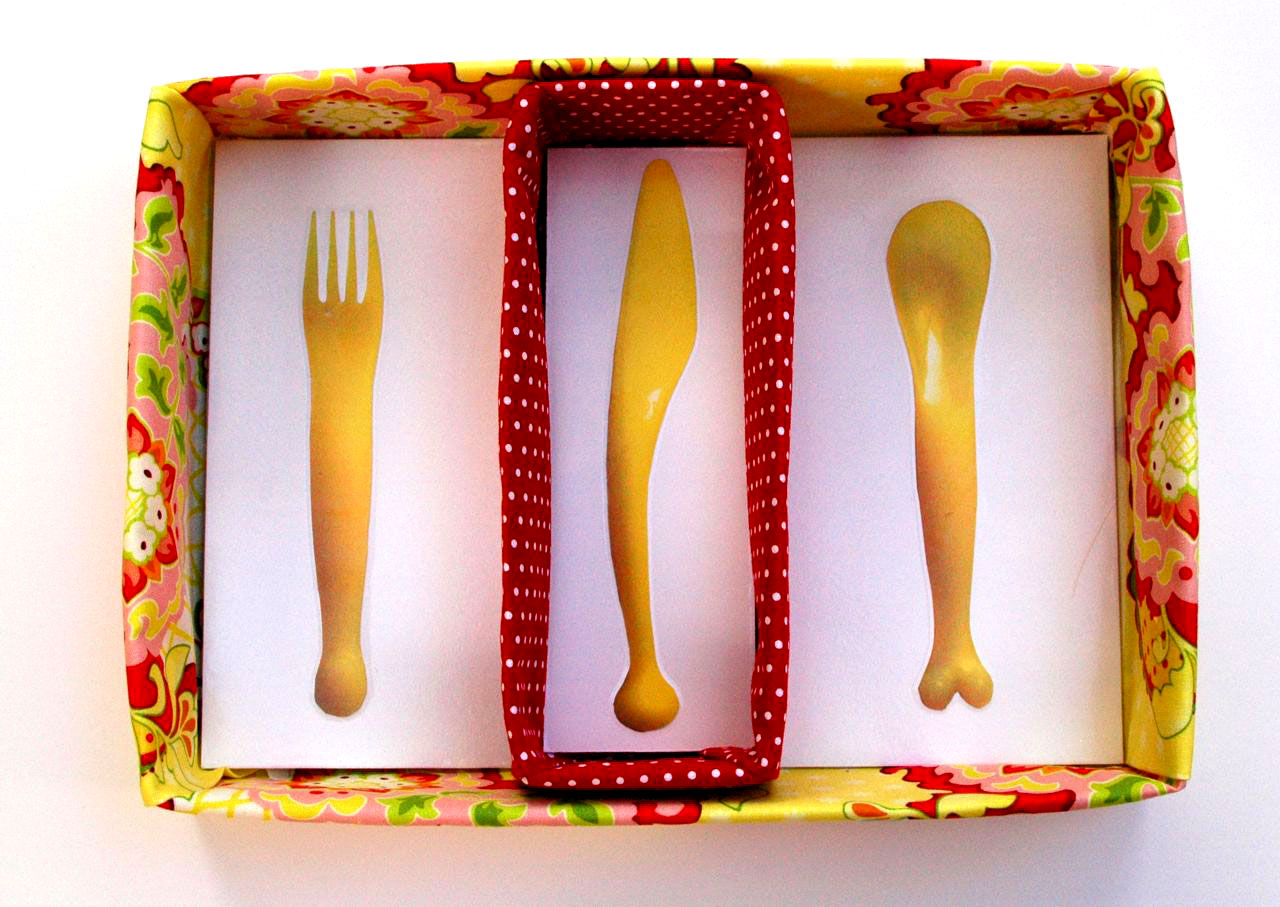
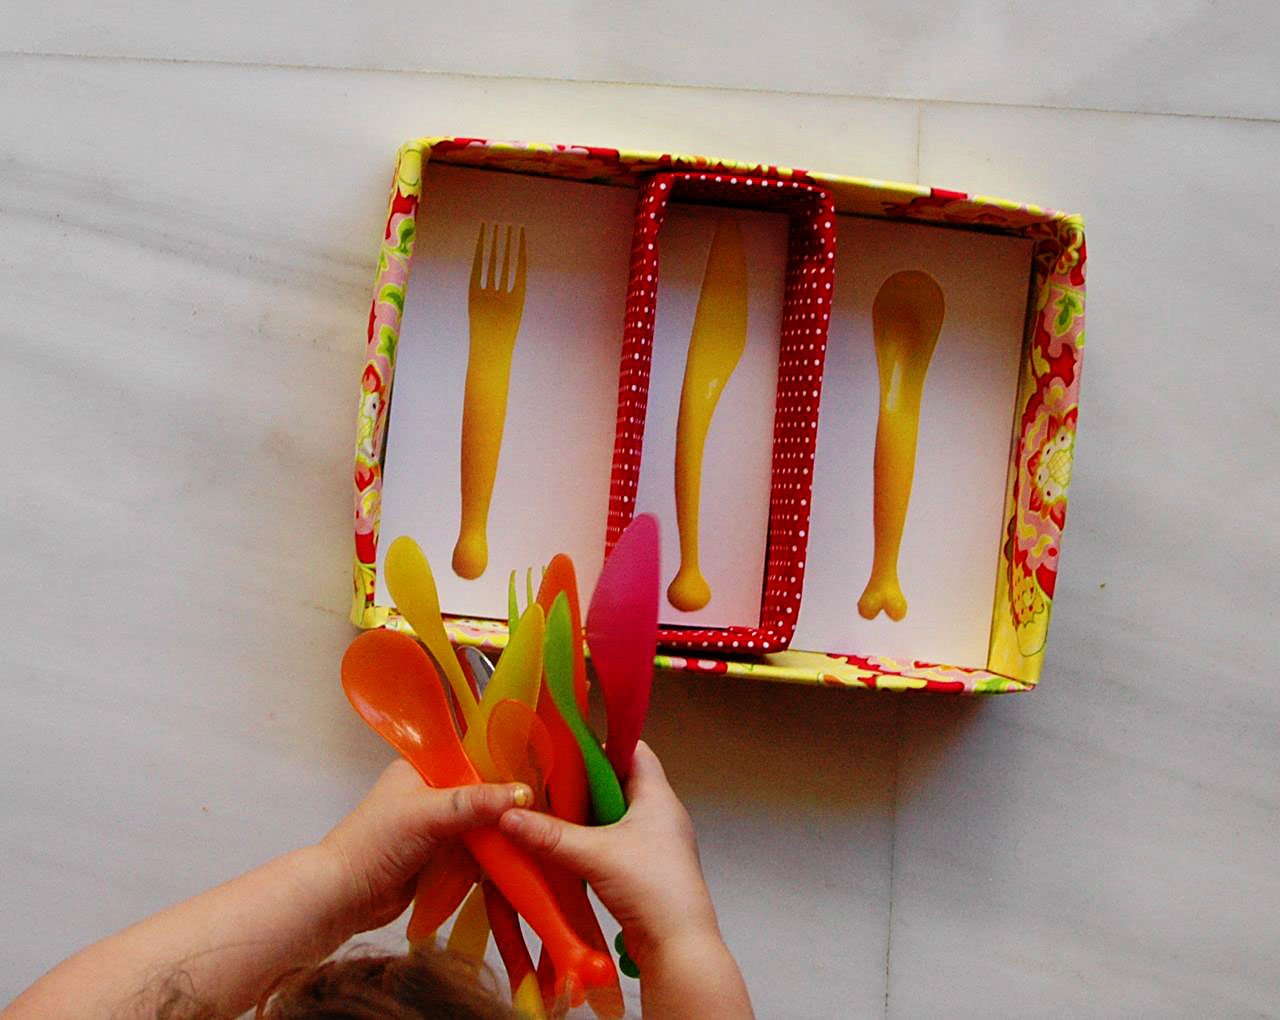
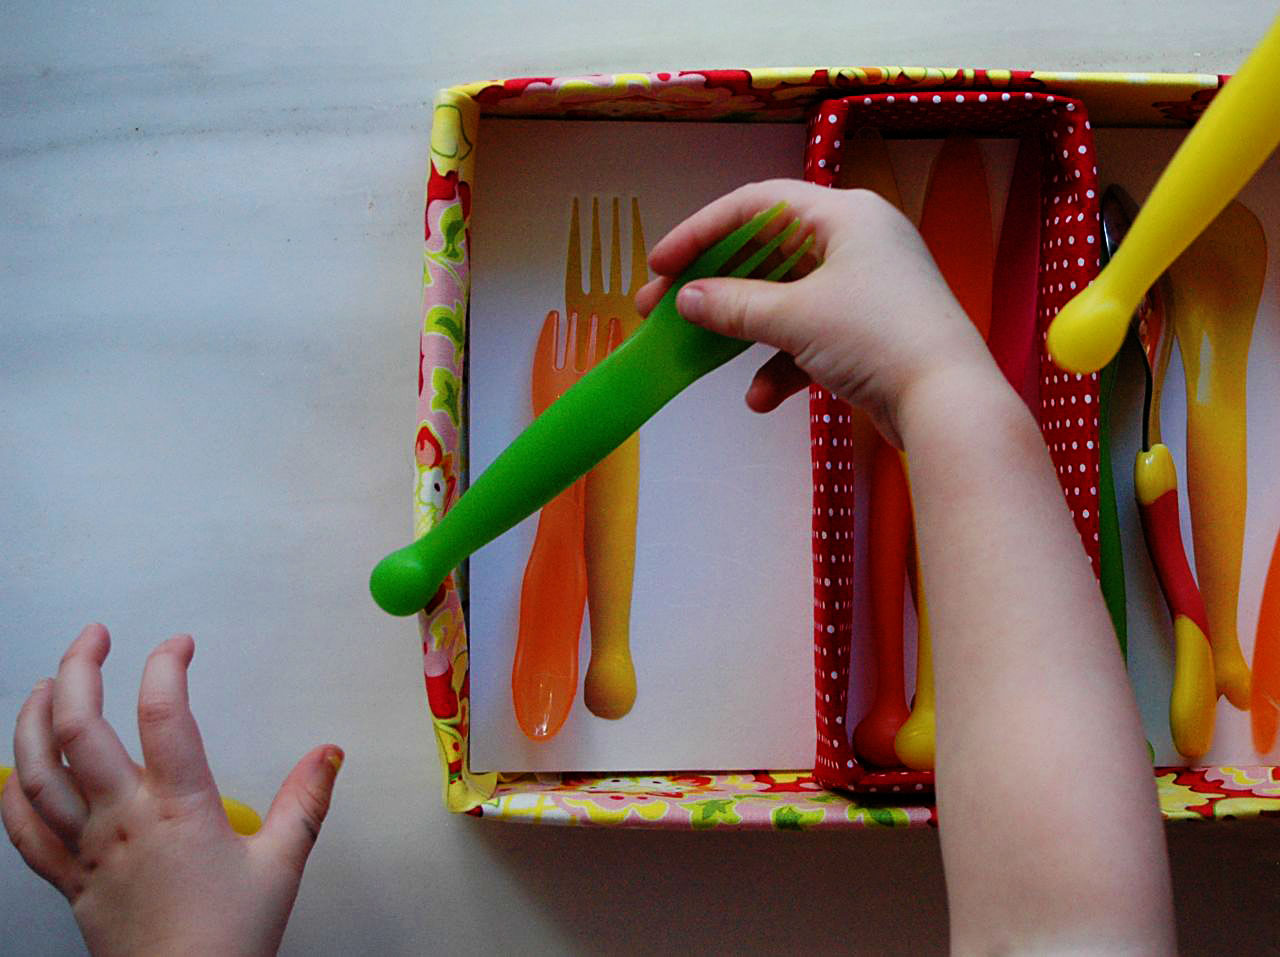
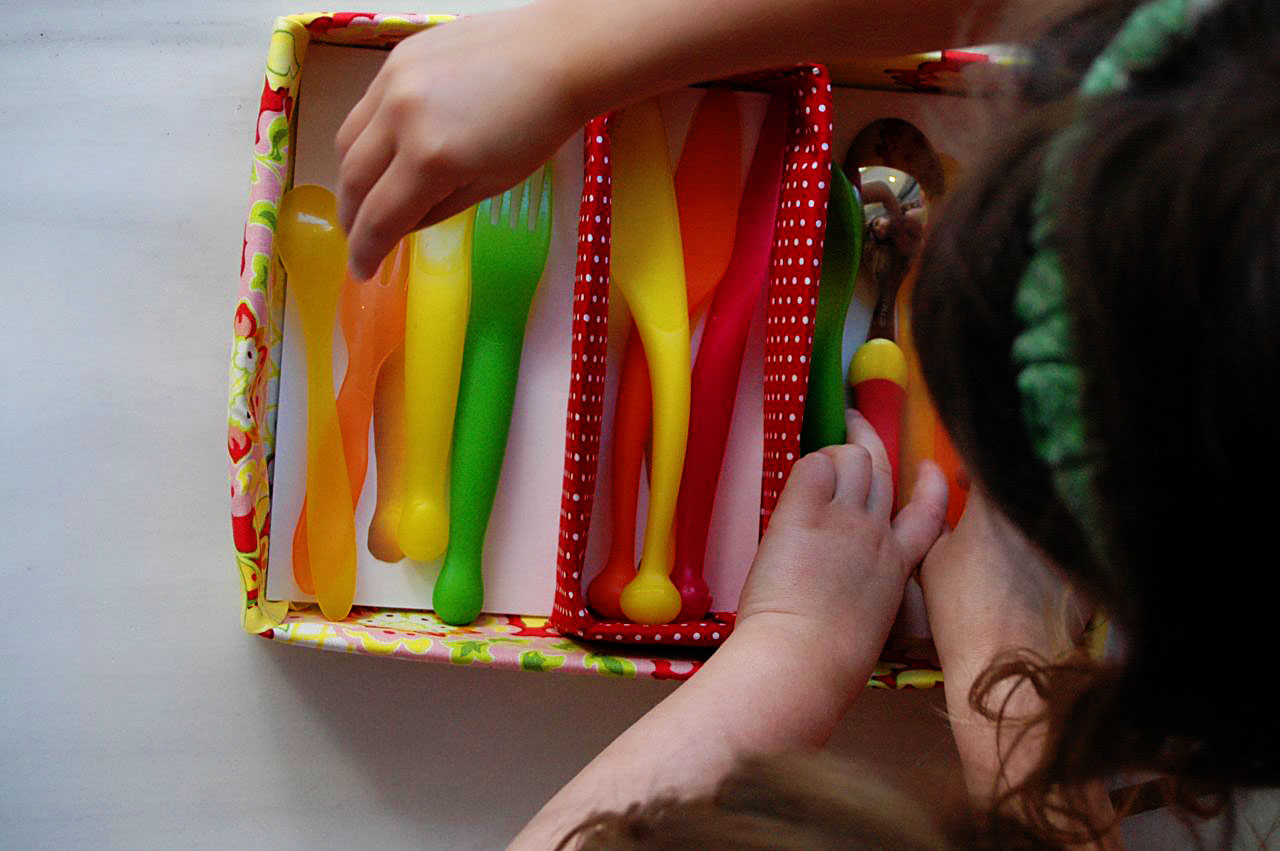
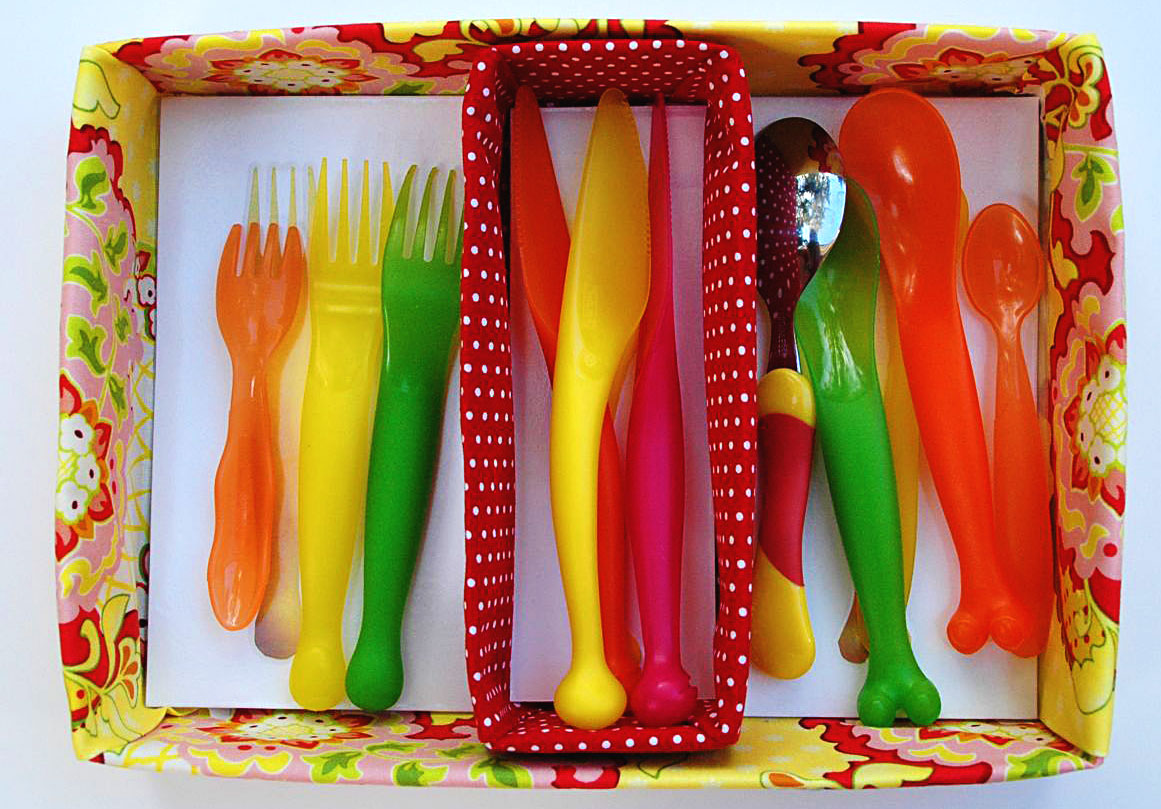
When Anna suggested spicing up our kitchens, this project immediately came to mind. Inspired by this, I had made one for myself a while back and hadn’t gotten around to blogging about it. After months of use, I can say it’s a hit at our house. The jumble of spoons, forks and knives gave me a headache every time I opened the drawer, and now K can help put her cutlery away and knows exactly where to go to find what she needs. Now that everything is organized, she seems to feel less compelled to dump everything out of the drawer once or twice a day– I’m appreciating that, too. Because then I have to decide exactly how dirty I think the kitchen floor is at that moment and whether I feel the need to wash alllll of it again. Or just throw it all back in the drawer and call it an exercise in immunity-building.

Other things to love about this:
– the fabrics can be as plain or as exciting as you like.
– you can pull the whole thing out when you have kids over and take it to the table
– it costs very little to make
– you can choose the size that best fits your drawer

If you’d like to make one, all you need are:
– two clean, uncrumpled cereal/snack boxes 
– two coordinating fabrics, roughly twice the width and length of your boxes
– scissors
– tape
– white poster board or card stock
– glue stick
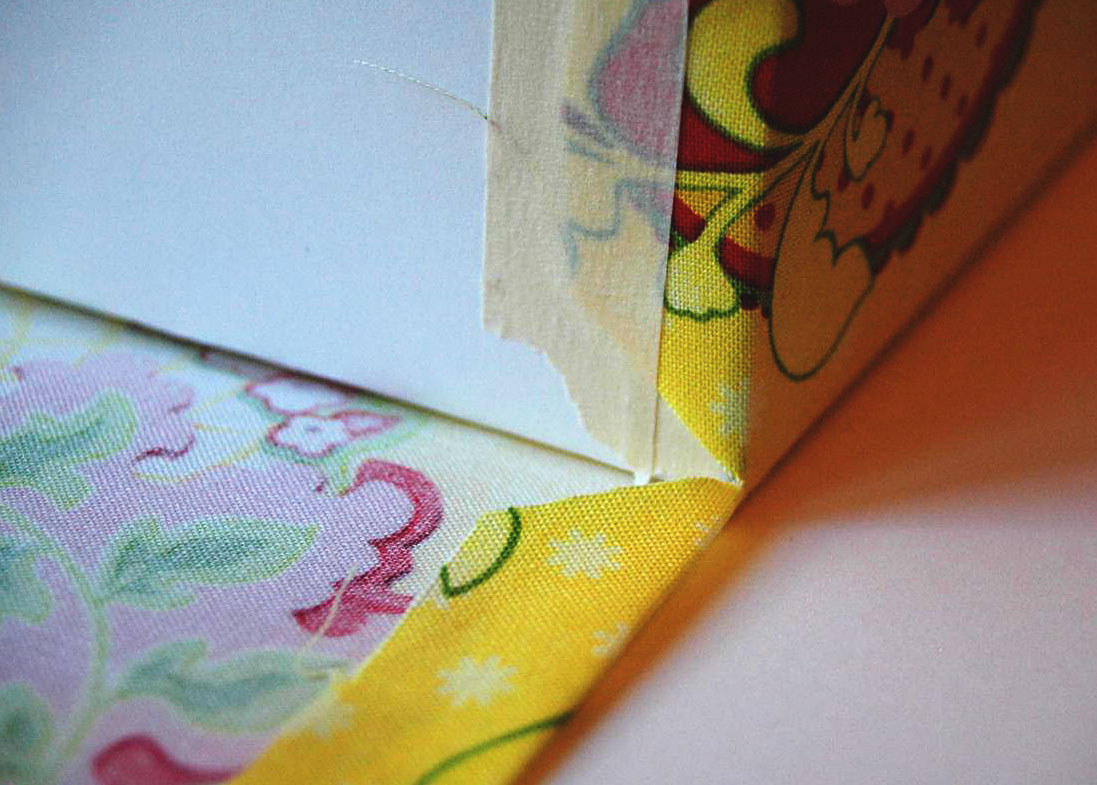
– clear contact paper

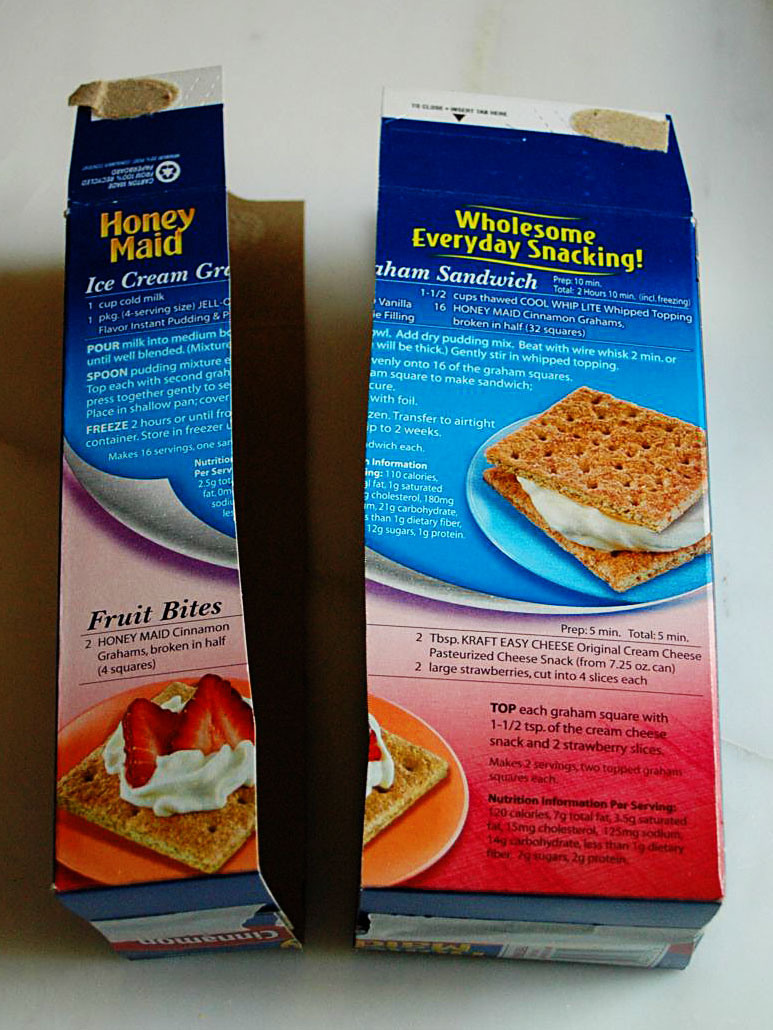
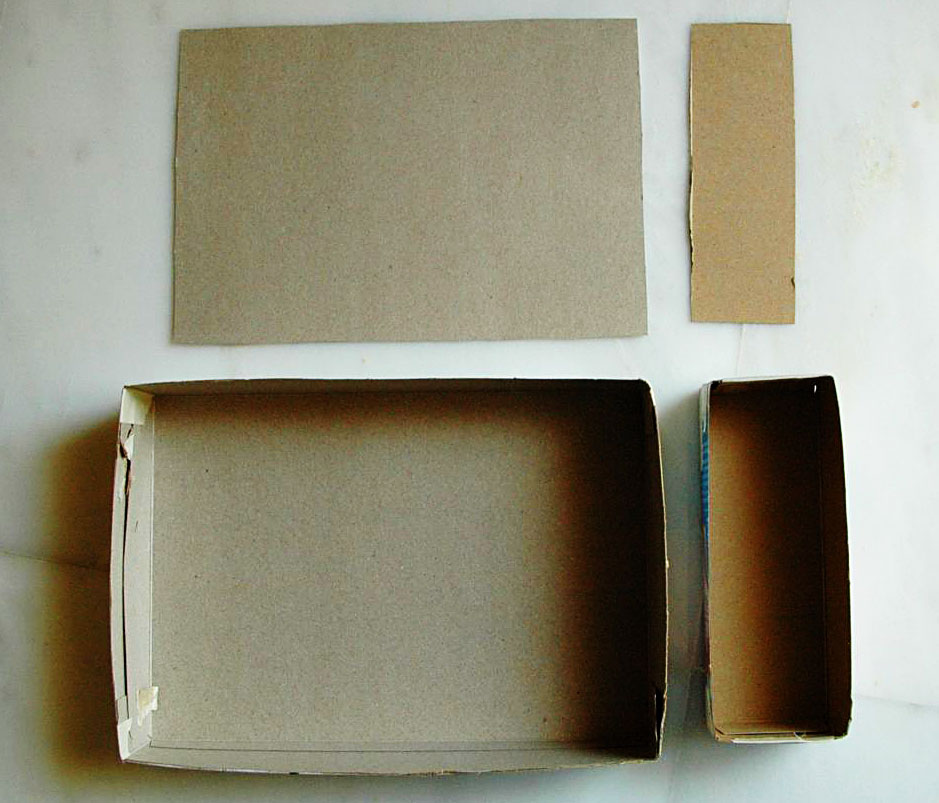
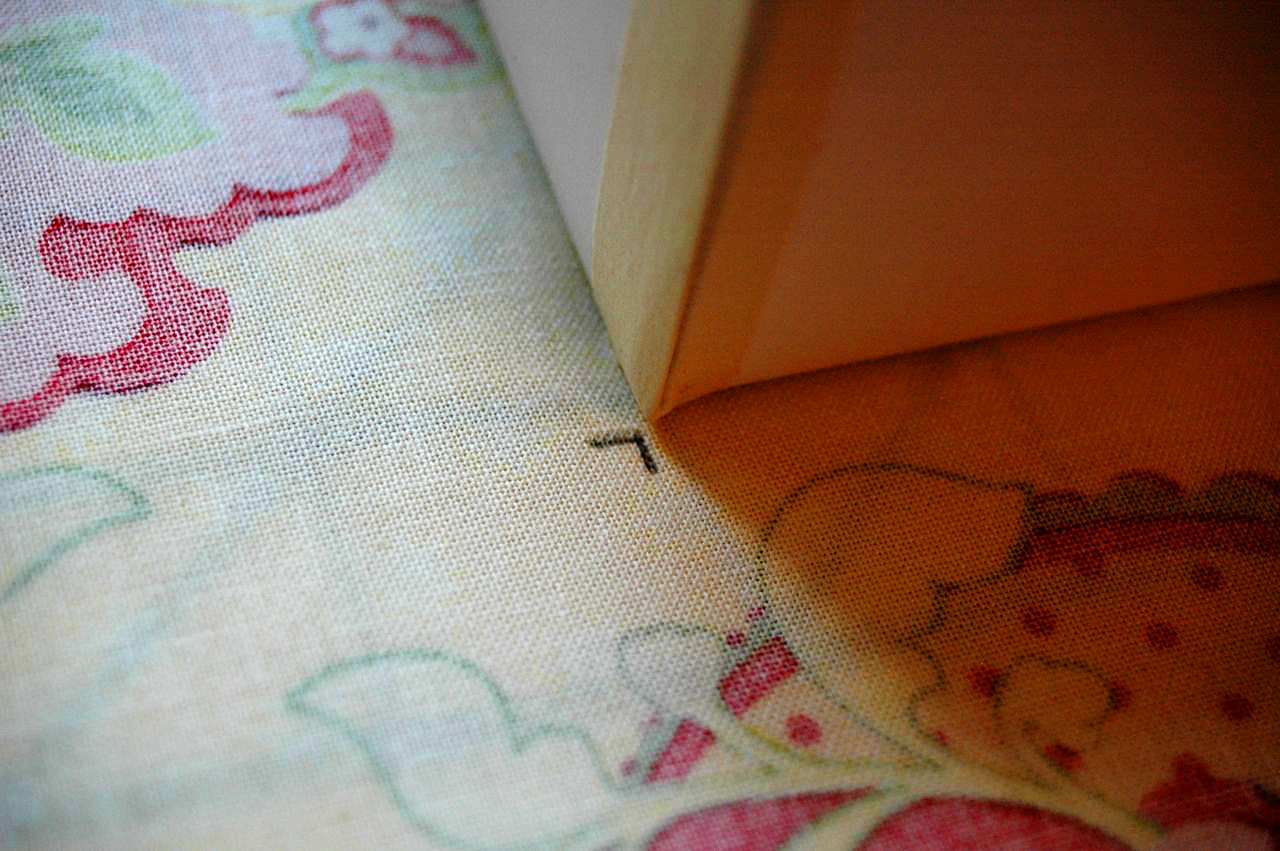
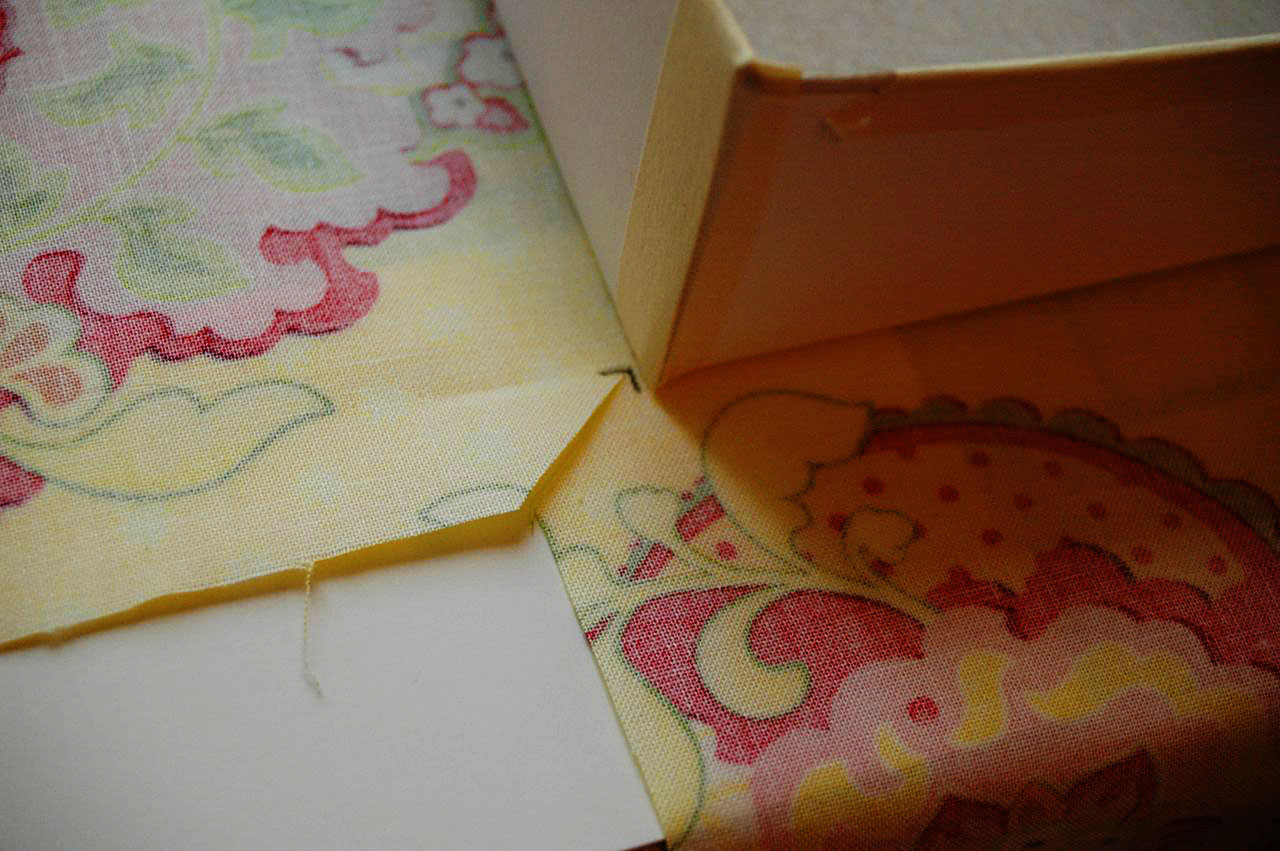
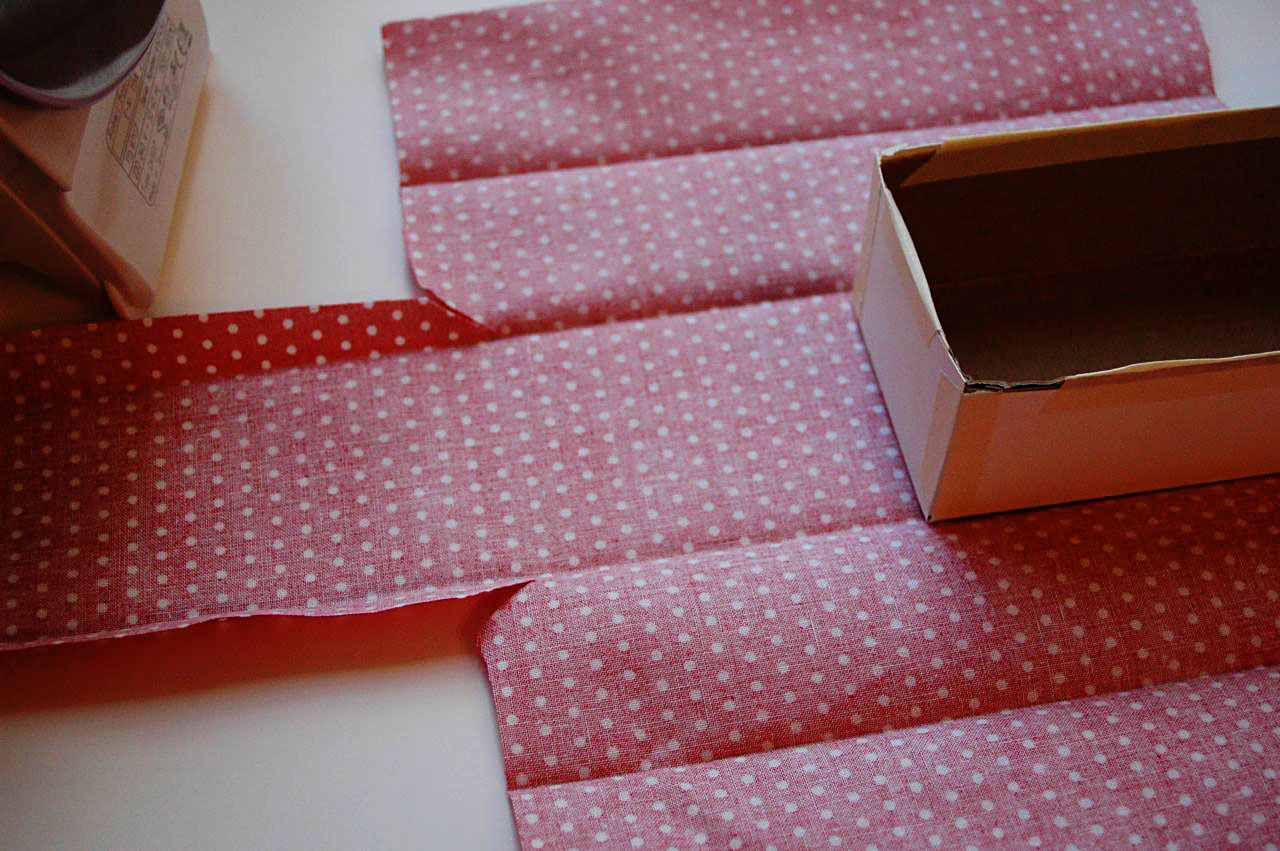
You’ll want to choose one cereal box that will be the main tray, and a smaller box that fits inside of it to section it.

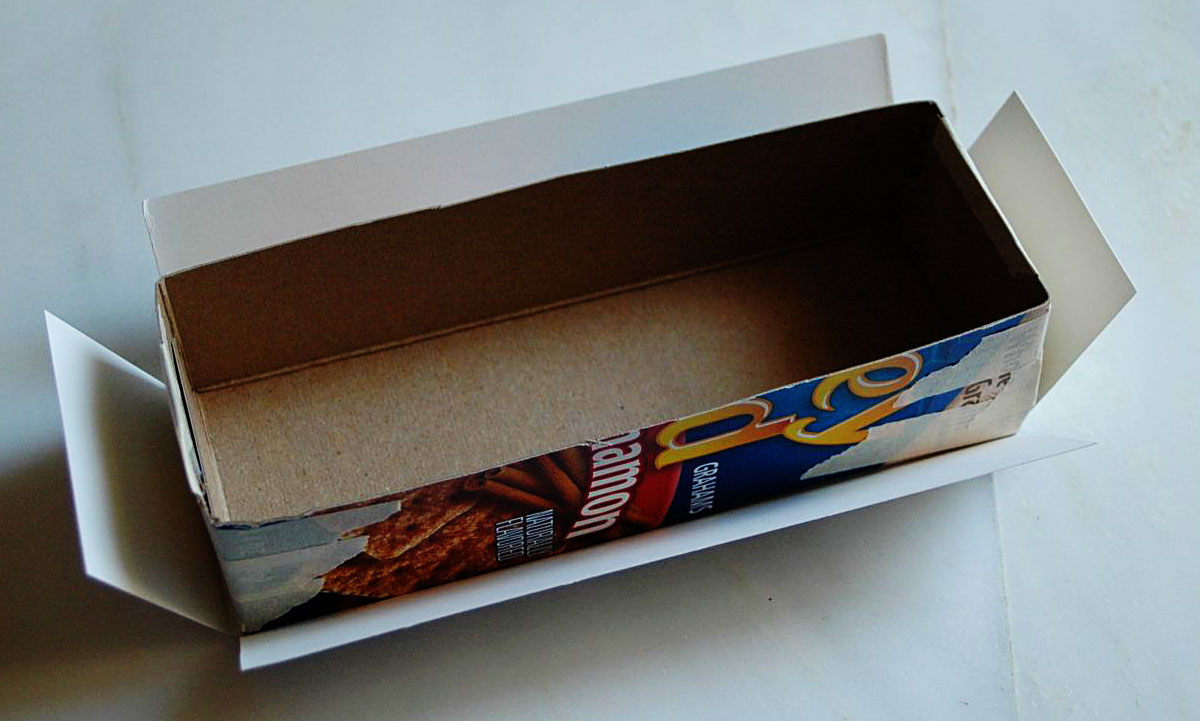
Make sure the larger box fits in the drawer you want to use and is also large enough for the cutlery to fit inside with some wiggle room. I cut my insert piece like so.

Cut away one face of the larger box and use tape to reinforce the edges. Trim the edges of the cut-away face so that you can use it to line the box later on. Cut a similar liner for the insert.
The next step is to cover the oustide of your trays and it serves two purposes. It provides a white background to go underneath your fabric so that you won’t see packaging through it, and it adds sturdiness to the trays. I used white bristol board; you can also use card stock or poster board. Tape around all of the edges. If you feel like your cardboard is already plenty sturdy, you could use a light coat of white spray paint. 
Lay your tray onto a piece of fabric and mark the corners.
Trim the excess fabric from the corners, leaving enough of an edge to tape and/or fold.
Press the edges to create creases in the fabric at the corners. Tape one side of the corner to the tray, the other will fold over…
Like so.  Trim and tape to the bottom of the box. Repeat all the way around.
And do the same thing for the smaller tray. By placing the tray on the fabric and ironing the lines to follow, it’s not hard to line it up nicely. Pinky swear.
At this point the boxes are wrapped in fabric, so we move to the liners. I took a photo of a set of K’s cutlery on a light background so that I could print them at about actual size. Alternately you could go low-tech and trace around a knife, fork and spoon on cute scrap paper. Or freehand it. Endless wild and crazy possibilities.
Trim bristol board to match the size of the liners.
Cut the printed cutlery out and apply with a dab of glue stick. Laminate with clear contact paper. I used the insert tray for knives, since we don’t have or use as many, and that leaves the fork and spoon areas flexible. We have more spoons than anything else.
Drop the liners in, and the insert tray in, too. Ta-da! Serious cuteness every time you open that drawer. A pop of color. (Get it? Pop Garden fabric?)
Then let your 3 3/4 year-old and a bestie try it out.
A fun sorting game.
Works just as will with two.
All done. Well, these are the pieces that were clean and coordinated. We must coordinate. At least for blogging.
Thanks, Anna, for helping me get this off my to-do list! And since I had one for myself, I happen to have a co-blogger who was not-so-subtly hinting that she needed one. May be appearing in a drawer near her soon…

Related

Filed Under: tutorial Tagged With: no-sew, organizing, tutorial

« Voile-ah!
The Guests Who (We Wish) Would Never Leave »

Comments

  1. Mary says

    May 18, 2010 at 6:16 am

    This is super cute! What a great idea!

    Reply
  2. Anna says

    May 18, 2010 at 8:35 am

    so so cute! I’m totally going to make one. Thanks again ladies.

    Reply
  3. Leslie says

    May 18, 2010 at 8:58 am

    hi i popped over here from Anna’s and i love this. this is so fun and such a great way to get your kids to help out. thanks for the tutorial

    Reply
  4. Bethany says

    May 18, 2010 at 9:35 am

    Where do you come up with these wonderful ideas?!!?

    Reply
  5. Anonymous says

    May 18, 2010 at 10:23 am

    Very cute, great idea!

    Reply
  6. Megan says

    May 18, 2010 at 10:35 am

    Love this! Im making one as soon as the kids go to beds tonite. What brand of cutlery is that? I am in dire need of durable kids cutlery and can never find any!

    Reply
  7. Vanessa says

    May 18, 2010 at 11:33 am

    SO cute! Great idea. May need to make my husband one ;)

    Reply
  8. jess says

    May 18, 2010 at 11:57 am

    love this! way cute and functional!

    Reply
  9. crafterhours says

    May 18, 2010 at 12:52 pm

    The cutlery is from Ikea. They’re pretty sturdy and super affordable. The pointy ends of the forks are not for chewing on. But other than that (do your kids do that?) I love them. Well, and the shape of the bottom of the spoon is a little odd… anthropomorphic. But I still love them. Susan

    Reply
  10. KJ says

    May 18, 2010 at 1:04 pm

    super idea. on my to do list. thanks for this post!

    Reply
  11. Megan says

    May 18, 2010 at 3:15 pm

    My kids chew on everything. Cups with any type of a plastic straw are no longer welcome in our house. I thought the same thing when I saw the spoon. “Ohhh what a cute set of cutlery, hmmm whats up with that spoon tho, oh well.”
    I knew you were going to say ikea, because everything amazing or fantastic or anything that I gotta have comes from ikea. One problem……No Ikea with in driving distance of where I live. Ugh. And you can’t order a lot off there website. Double Ugh.

    Reply
  12. Megan says

    May 18, 2010 at 3:23 pm

    W.o.w! 1.99 for an 18 piece set is freaking amazing, now I just have to find somewhere else. I have been paying $2 for just a fork and spoon that after 5 times in the dishwasher fall apart. Thanks for sharing, it has opened me up to affordable kids cutlery. Tear tear, sniff sniff.

    Reply
  13. Delia says

    May 18, 2010 at 3:25 pm

    Very very cool! I love that it fits IKEA kidware too.

    Reply
  14. Katie says

    May 18, 2010 at 3:41 pm

    I love it! It’s super cute and it looks really functional too. When I used to teach preschool we put silhouettes of everything all around the room so the kids would know where things went and could put things away more independently. So it’s not only cute, but it’s so age-appropriate too!

    Reply
  15. Courtney says

    May 18, 2010 at 5:29 pm

    Really cute, and I love how easy it looks to make! Mostly, I want to know what cutlery you got your munchkin that’s plastic but has knifes – I’ve been looking everywhere for toddler cutlery that has more than just a fork and a spoon!

    Reply
  16. Jessica says

    May 19, 2010 at 1:48 am

    So cute!! My 2 year old’s favorite thing to do is to help me unload the dishwasher and it’s amazing how good she is organizing the utensil drawer. She would LOVE this!!!

    Reply
  17. Kari says

    May 19, 2010 at 5:36 pm

    Cute AND organized. Two of my favorite things. You won my heart. :) Love the tutorial!

    Reply
  18. Liz @ LivingMySweetLife says

    May 19, 2010 at 9:31 pm

    This is adorable! I wish I had a freaking drawer to do this for! My tiny kitchen stinks! I love your blog!

    Reply
  19. ificould says

    May 20, 2010 at 2:41 am

    Megan,
    I have a set of plastic forks and spoons from the grocery store that we love… wish I could remember who made them. They are similar to other take-n-toss products and have animal shapes on the handles. We’ve had them for about 6 years and still goin’ strong! They came in a plastic cylinder by the paper plates. Good luck!

    Reply
  20. ificould says

    May 20, 2010 at 2:43 am

    Susan,
    Thanks for this great idea! Can’t wait to make it. I posted a link on my blog: http://ificould-ificould.blogspot.com/2010/05/kids-cutlery-tray.html

    Grab a featured button if you’d like: http://ificould-ificould.blogspot.com/p/featured-sites.html

    Thanks for the great ideas!!
    Missy

    Reply
  21. Pati @ A Crafty Escape says

    May 20, 2010 at 6:58 pm

    So cute! I love that everything matches… matchy-matchy is the only way to go.

    Reply
  22. celebi74 says

    June 1, 2010 at 10:31 am

    W.o.w!

    Reply
  23. GÖNÜL says

    June 2, 2010 at 7:44 am

    SÜPER BİR DÖNÜŞÜM ….

    Reply
  24. inday_adin says

    June 17, 2010 at 2:10 am

    Thanks for sharing! I am going to make one for my little guy. :) Love it!

    Reply
  25. EBeauty03 says

    September 14, 2010 at 8:52 am

    LOVE this idea!

    Reply

Leave a Reply Cancel reply

Search This Blog

Archives

Popular posts

  • Side Panel Shirt Refashion: A Tutorial
  • Racerback Dress: A Tutorial + PDF Pattern
  • FREE Pattern: Monkey Bar Skirt
  • T-Shirt to Tank: A Tutorial by Jen from Upcycled Education
  • Slipcover Your Dress Form: A Tutorial
Visit Susan Yates's profile on Pinterest.

Want our posts in your inbox?

Enter your email address to subscribe to crafterhours and receive notifications of new posts by email!

Our Privacy Policy

Copyright © 2021 ·Foodie Child Theme · Genesis Framework by StudioPress · WordPress · Log in


Creative Commons License
This work is licensed under a Creative Commons Attribution-NonCommercial-ShareAlike 3.0 United States License.
»
«