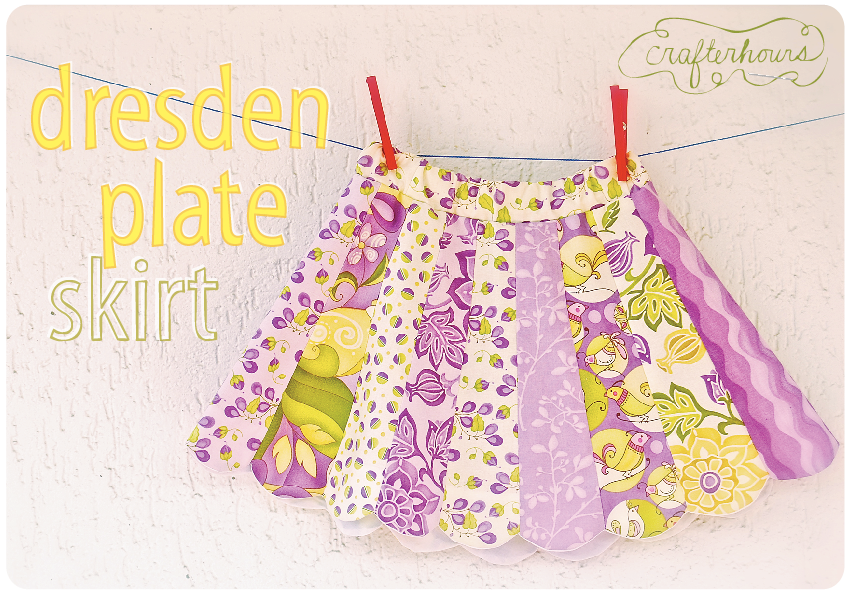
I’ve been thinking a lot about how to use quilting techniques in clothing lately. After making the little hexagons for this outfit, I was inspired to do more. So, now, from my crazy 3 a.m. big lightbulb idea, I’d like to introduce: the Dresden Plate Skirt! And tutorial! (really, really long tutorial.)
Are you guys ready for this? Because it’s a doozy. Not for the faint of heart. And I don’t recommend doing it in one sitting unless you are heavily armed with many rounds of caffeine and chocolate artillery.
Materials needed:
- Main fabric. I used 9 fat quarters and barely made a dent in them for a size 4-5 kid
- 1/2 yard lining fabric
- something round to form scallops
- 1 inch wide elastic, long enough to go around skirt-wearer’s waist
- all the other regular sewing accoutrements (that includes chocolate and caffeine, in case you were wondering)
Step 1:
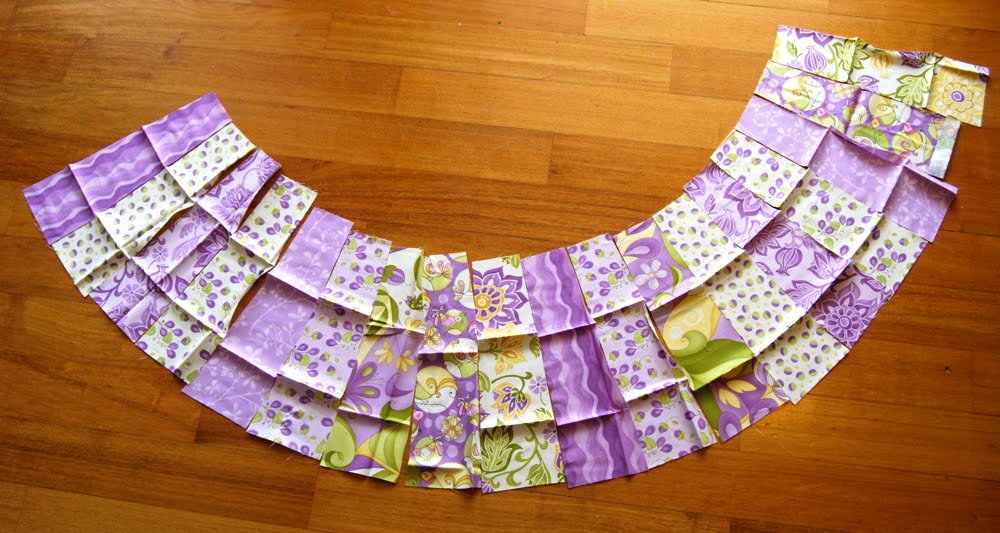
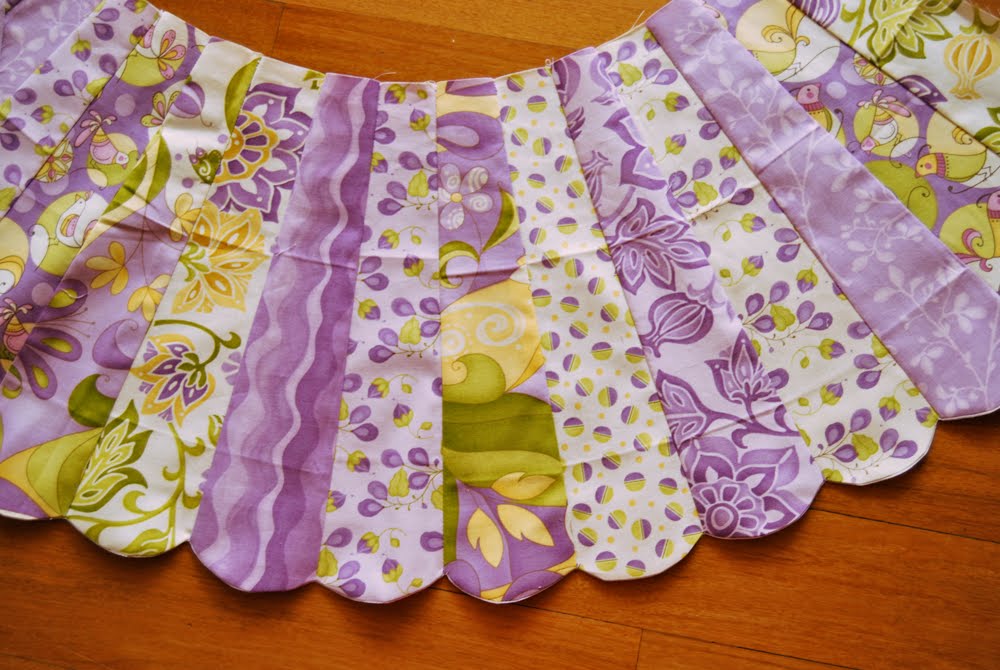
Cut out a whole bunch of trapezoid-y shapes. I cut 18 strips (2 of each print) that were 2.5 inches at the top and angled down to 4 inches at the bottom. If you’re certifiably crazy, you could cut enough of these to make a true Dresden Plate, ie: a full circle. Have at it. Tell me how that went. Your only guideline here is to use algebra to make sure the inner edge of your half circle (or full circle, you crazy people) will fit nicely around the hip circumference of your skirt-wearer, with a bit of ease. And in case you’re wondering, C=2?R. (thank you, internet)
Here are my strips, all lined up in a pleasing order. Ignore the severe lack of ironing.
Step 2:
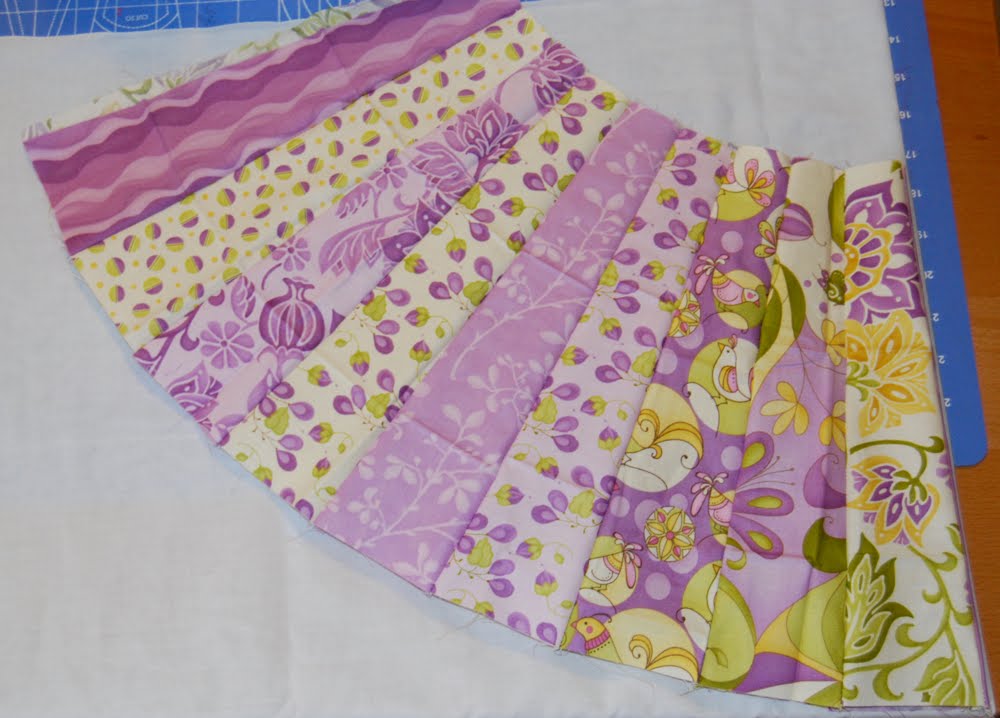
Sew ’em all together! As with any patchwork/strip sewing, I recommend having some eye-candy on in the background. Preferably something you’ve seen a million times so you don’t really have to pay attention.
Step 3:
Here comes another Adrianna method of sewing, where I forgo any type of math in favor of my super scientific method of “eyeballing it”. First, fold your lining fabric. Then, fold your skirt in half. Then place it down over your lining fabric. Make sure the skirt fold and the lining fabric fold are lined up:
Step 4:
Using a rotary cutter, follow the lower edge of the skirt from fold to raw edge, then cut up the raw edge about 3 inches. Move your skirt out of the way and cut a parallel line so you form a long curved strip, like so (fold is still in place, on the right side):

Step 5:
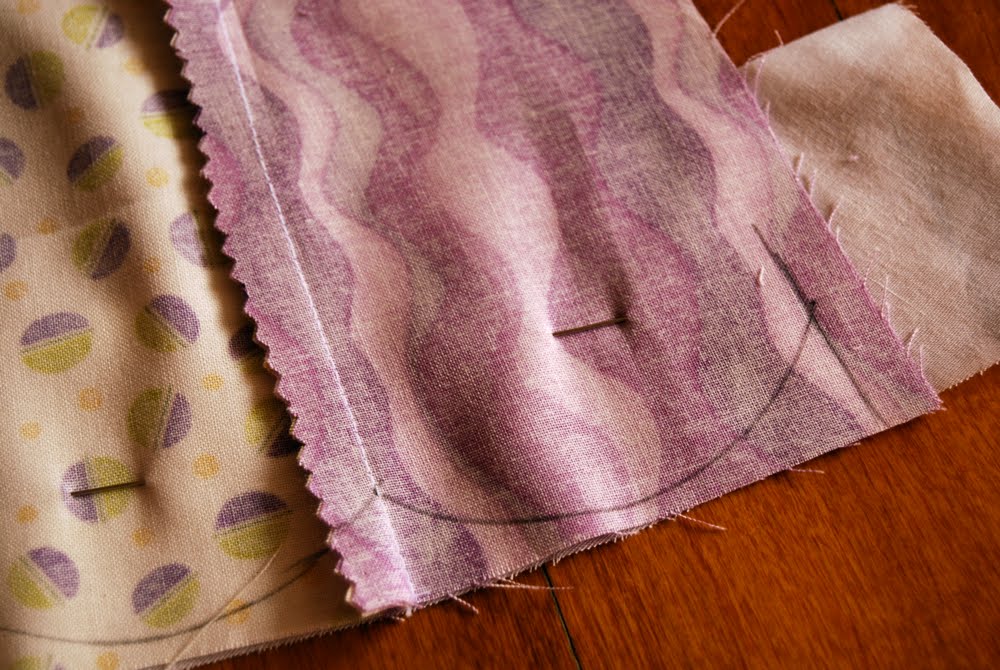
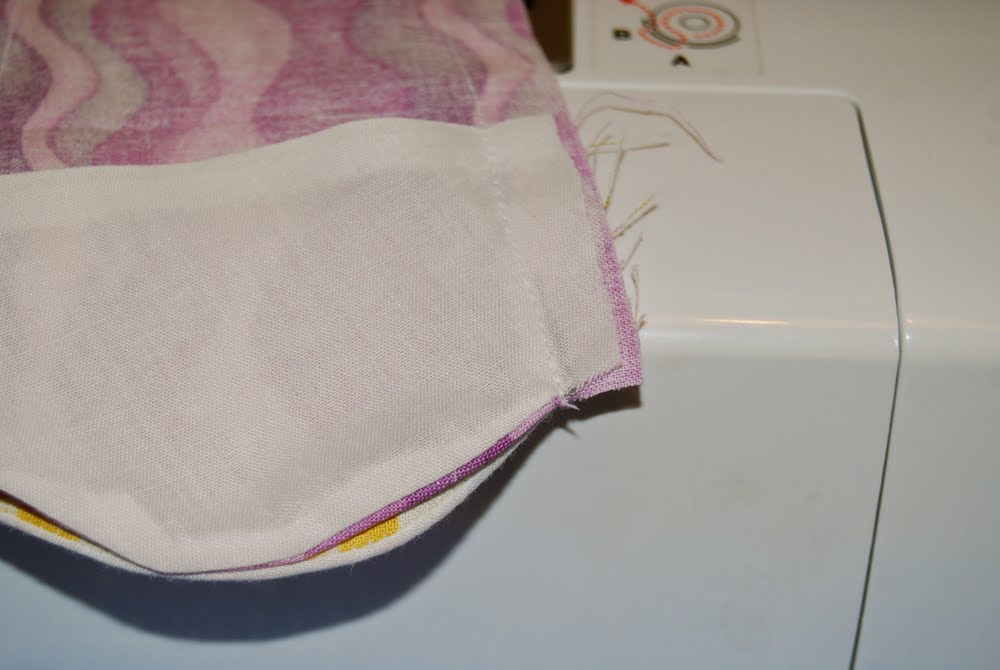
Finish the inner, or short end of that strip by serging or zig-zagging. Then iron the edge down just above your stitching. With that fold facing up, pin your strip of lining fabric to the right side of your skirt:

Step 6:
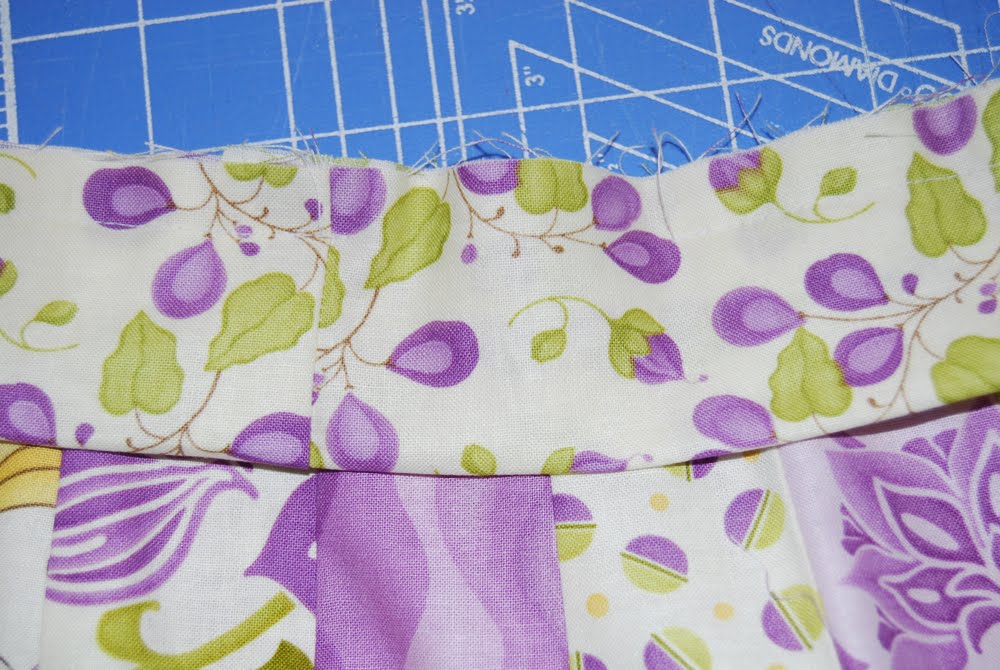
Use something round (coaster, glass, protractor….um yeah, I said protractor. My husband’s an engineer. We have those.) to draw curves on each of your fabric trapezoidy things. Start your first curve a 1/2 inch from the raw edge, and make sure each curve thereafter starts and ends right on the seam. When you get to the last strip, make sure that curve ends a 1/2 inch from the edge also. You want to keep the bottom edge of the curves a few millimeters away from the skirt hem. Keep the curve fairly shallow. The more curved your curve is, the more you will hate yourself in the next few steps, just fyi.
Step 7:
Sew directly on all your marked curves! See? I told you this would be fun! Or, you know, long and tedious! When you’re done sewing, clip the seam allowances all around, coming as close to the stitching as possible at the points.
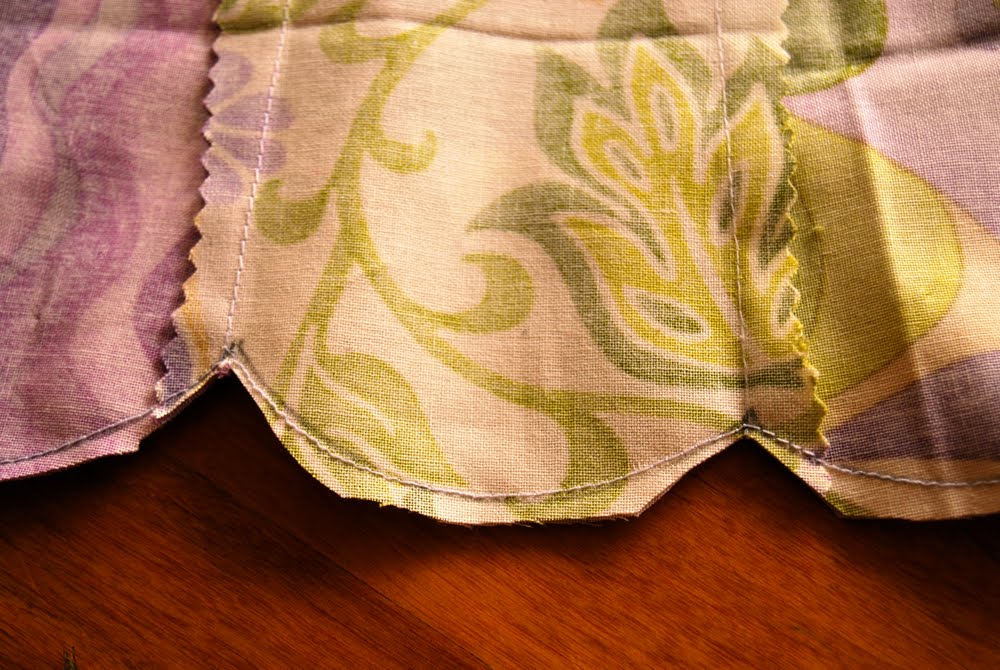
Step 8:
Flip your lining piece to the inside of the skirt, and using your fingers, push out each scallop and press. You’ll know you’re doing it right if you iron off all of your fingerprints on the non-iron-holding hand.
Step 9:
Sew your skirt together at the raw edge using a 1/2 inch seam allowance. At the hem, you should be joining two scallops together directly at their highest point.
Step 10:
Now for some more eyeballing where there should be math! Cut a strip of fabric to be your waistband/elastic casing. I made mine 6 inches wide and about 6 inches longer than the circumference of the top of my skirt. This extra bit is important if you want to avoid any math-doing.
Press the strip of fabric in half, length-wise, wrong sides together. Pin the raw edges of the strip around the top of your skirt, leaving the ends free, like so:

Step 11:
Bring the two loose ends together and mark where they meet. Sew them together at that point, trim the excess fabric, and press. Now your waistband strip should perfectly equal the top of your skirt circumference. Don’t sew it down yet though. Because…
Step 12:
…you need to insert the appropriate length of elastic into the casing first! (sorry, it’s been a long tutorial. I’m trying to amuse myself. At your expense, I imagine.) The elastic should be the waist measurement of your skirt-wearer minus an inch. After the elastic is in there, sew the elastic together at the ends, then finish sewing the waistband strip down to the skirt. Flip the waistband up.
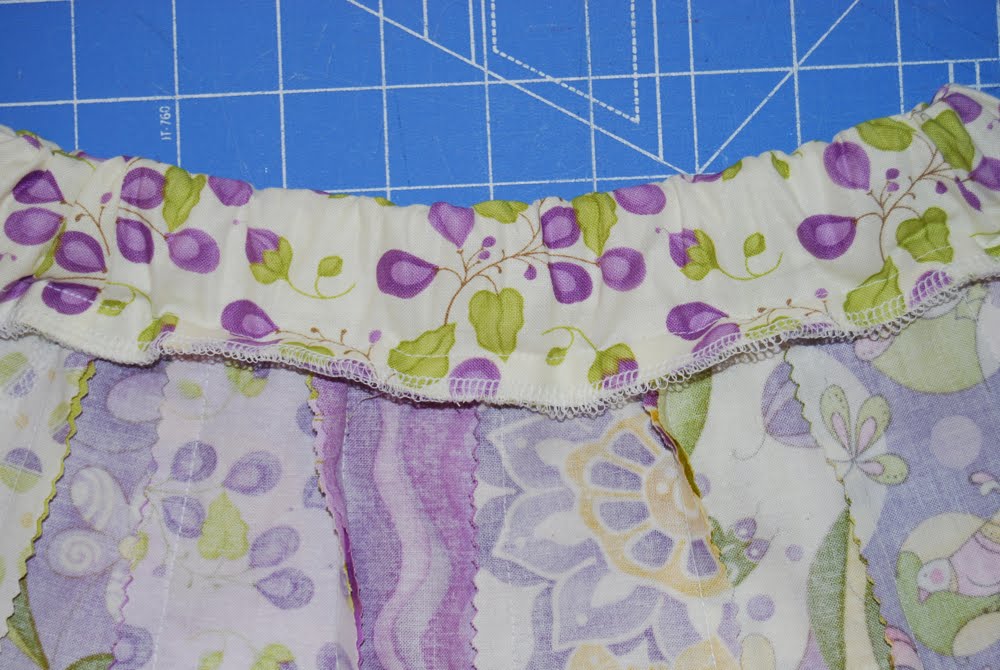
Step 13:
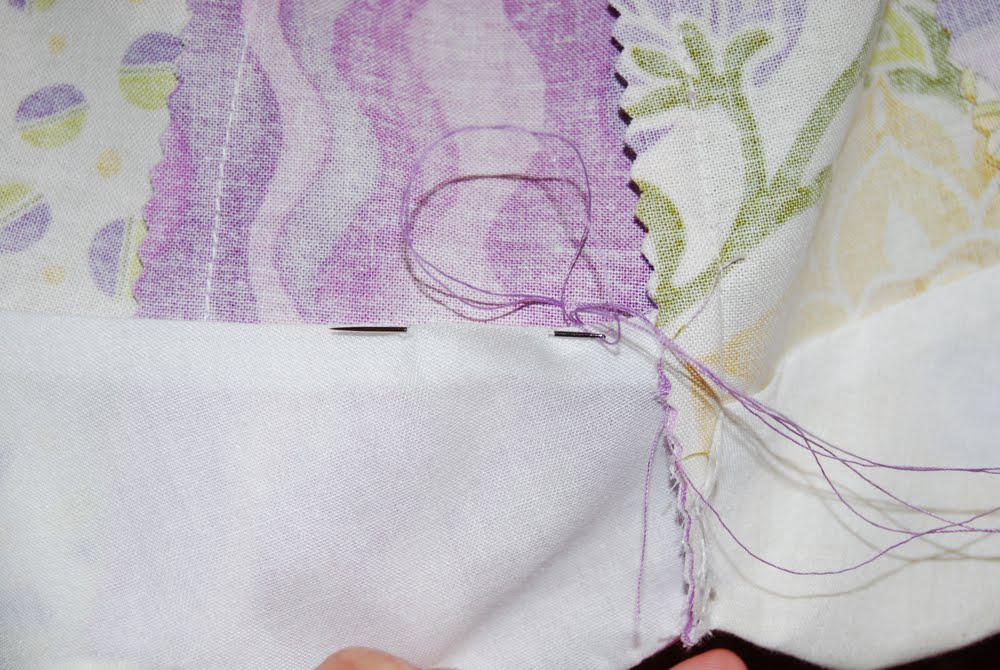
Now it’s time to hand-stitch the hem! Wait, I didn’t mention that part at the beginning? Oh, I’m so devious! I just wanted to make sure you’d reach this point of no return first. (insert evil laugh here). So, yeah, we’re going to do a blind hem stitch by hand. It’s much nicer, and it won’t take long. I promise! (unless you did indeed do a full circle skirt, in which case we all know you’re willing to hem it by hand, given your previously established crazy-ness.)
Insert your needle at the very tip of the lining fabric, and run it through the little tube created by the fold. Then pick up just one or two threads from the skirt front, and repeat. And repeat. And repeat.
Step 14:
Ok, this is not a step, this is just me showing you what your blind hem stitch should look like when you’re done. Oh, you can’t see it? That’s because it’s BLIND! What WHAT!! (ok, remember the caffeine and chocolate artillery I mentioned? Perhaps you can have too much.)

You’re done! Both with your skirt and my incessant, annoying commenting throughout this tutorial! Congratulations to you for making your way through both!
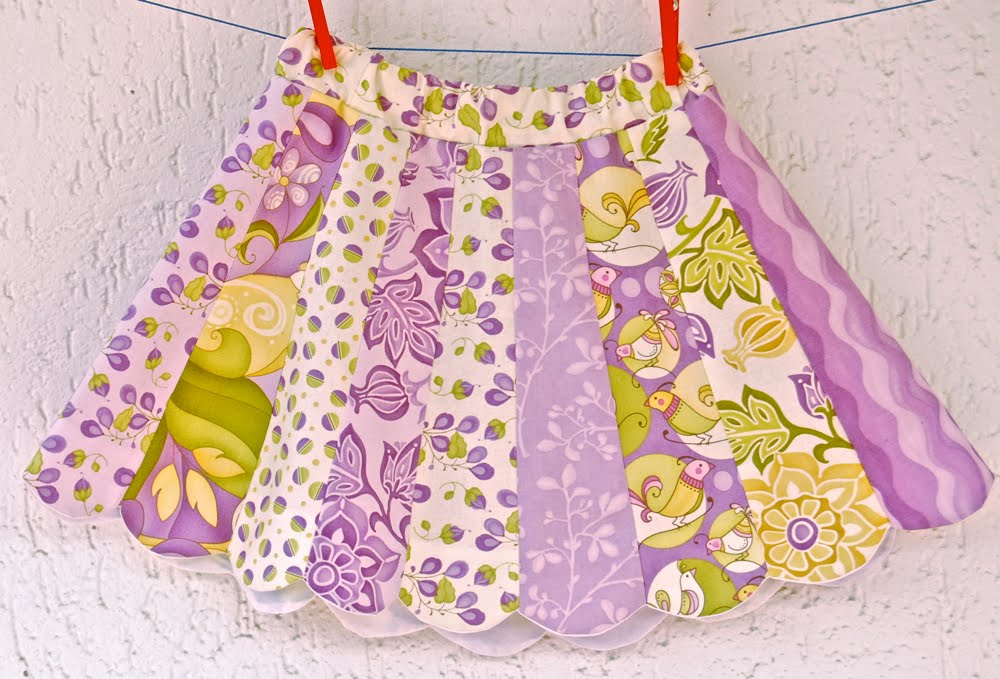
Note: Yes, you observant readers, I made this with purple fabric. No, my daughter will definitely not be wearing it. It’ll hang out here until I find an appropriate gift-ee or open an etsy shop.

update: If you don’t want to hand-sew the hem, check out Mandy’s alternate hemming technique over at Sugar Bee Craft Edition. Also, Jaya in the comments below left some nice instructions to fully line the skirt, eliminating the need to hem at all.
This is so cute! And we are on the same page. I have a scalloped bottom skirt all cut out and partially sewn that I have been tinkering with for the past month or so. It is not turning out as planned(I used recycled denim!) so I was actually thinking of going all quilting cotton. My strips are wider though. I will get back to it one of these days!
That’s so cute! I actually posted last week about a skirt I made for myself out of the same fabric! Too funny! I like what you did with the stripes!
http://allaboutmommies.blogspot.com/2010/04/patchwork-skirt-for-me.html
camille
This is way, way beyond my skill level but I’m in love with the scallops!
Thank you for this idea and tutorial!
I will make one for my daughter for sure!
That is GORGEOUS. I was wanting to make a skirt kind of like that and you just did all the dirty work for me =)
How many ‘crafterhours’ are there in a day? :0) You are one busy lady! Fab skirt! Love it!
Leisel
Brown Paper Packages
I LOVE this idea! I’ve been wanting to try out a dresden plate quilt, but not ready to jump into a big one. This would be perfect for getting my feet wet. Thanks!
Thanks for the kind comments! Leisel, you crack me up. I actually made this awhile ago and it’s been waiting “in the chute” since then. There are definitely not enough crafterhours in the day! :)
wow, super cute!
I saw the first picture, thought “Oh, this must be Susan’s since that’s purple” and then scrolled down to see if I was right. I was wrong.
This is so adorable!! Thanks for the tutorial!
This is exactly what I was looking for. Making one with cupcake fabric and alternating sprinkles for my daughters birthday. LOVE this. :)
so cute! amazing work!
thanks for the turorial… very cute :)
How cute is that?!?! I linked to your tutorial on Craft Gossip Sewing:
http://sewing.craftgossip.com/tutorial-dresden-plate-patchwork-skirt/2010/04/28/
(link will go live at 8:30 am CST).
–Anne
I love it… if it’s in a size 12 mo or 7/8, I’ll buy it from you? :)
So sweet. I’ve been playing around with scallops too lately, and I think I’ll have to try this next. Thanks!
What length are your strips? I sew for my niece who is 3 but she lives 3 hours away and I can’t measure her to get a good estimate of how long to make by trapezoids. Love the skirt. Will add this to my list of projects.
Lisa,
They’re about 12.5 inches long, including seam allowances. For my 3 yr old, I would make them more like 11, including seam allowances (for a finished trapezoid length of 10). That length would bring it right to the middle of her knee caps. And my 3 yr old is well above the 100th percentile for height, so you should be good with that length, or even take .5 – 1 inch off if your niece is shorter. Hope that helps! Sorry I couldn’t find a way to email you!
A
you need to open an etsy shop immediately. I can’t sew worth a lick and I have to have this skirt! Just beautiful!
This is so cute and the commentary, oh I laughed so hard; and I’m not even totally caffeinated! Thanks for sharing this sweet little skirt. I may have to make it a little larger–and more sedate–for myself.
Love it! Thanks for the tutorial!
Wow! How cute! You are all over the place today. (Leisel’s blog too!)
Wow, this is amazing! I just clicked over from Craft Gossip. I love this idea and your detailed tutorial. I’ll be linking.
This is great! I made a skirt a while back and added the scalloped edges but I had no idea how to make a nice looking hem on the bottom of them so they are all chunky and not pretty… I am so happy to have your brilliant scalloped hem idea for the next time I get the desire to make a skirt like that. Thanks so much!
What a gorgeous skirt. Definately will NOT be making it, but love it all the same :)
CLicked through from UCreate.
Thanks for the reply on the length. We are all tall in my family so I will go with your 11 in recommendation. Love the blog. Just found you today from craftgossip. I appreciate you taking the time to reply.
Would this be any easier if I made a template for each strip? Or am I making it harder?/
Penelope, (great name, btw, a particular favorite of mine!) I think a template would be a great idea. Or, just cut rectangles that are 4×12, then use a ruler & rotary cutter to taper them so the top is 2.5 inches. That is how I did it and it went really fast. Remember that those measurements are for a size 3-5 and are just an example!
Love the skirt…I would change one thing…I would line the whole skirt and then you would not have to do all that hand hemming…I do not enjoy hand stiching : )
very very lovely, I have 2 grand-daughters that I think I will make them one.
I love this skirt! I featured it on my blog: http://stellasola-boutique.blogspot.com/2010/05/tutorial-sunday.html
Here’s a button for your blog:
http://2.bp.blogspot.com/_a57TQuNxjFw/S9S_5KPvYPI/AAAAAAAAAC4/ggTUhBA9sGg/s320/web+badge.jpg
i agree with lining the whole skirt.. one, it will hide the lotsa-unfinished-seams on the back of the dresden plate, and two, if anyway you are eyeballing the lining, its easier to trace the whole skirt onto the muslin.
After hemming (sewing the scallops), you can sew the skirt side in a continuous seam, both the outer fabric and the lining.. turn right side out and voila! no exposed seams!
then baste the skirt and lining together at the top, then attach waistband.
lovely skirt, thank you for the tute.
Just wanted to let you know that I made the skirt with a full inner lining. It came out cute (but I do like yours better). The full lining was pretty easy to do and if done correctly could make this easily a reversible skirt. I used a light pink flannel.
Love the skirt and a great tute! I’ll be linking on Facebook. Thanks!
I can’t believe it but that makes perfectly good sense to me. I truly believe that your comments made me feel as if you were actually talking right to me!
love it, love it, love it. I see this in my 3 year old’s wardrode’s future. :)
Stunning! My next sew project for sure!!!
I finally finished it! It only took this long because I was putting off the hand stitching!!! ;) I linked ya up!
http://thecraftycopycat.blogspot.com/2010/09/dresden-is-in-germany-i-thought-it-was.html
fab, fab, fab. love the scallops. just finished an inverted pleat skirt for grdau and I am going to make your scallop skirt next!
So cute! I made a skirt with this tutorial…Thank you so much for it! Here is a link to my skirt (or my daughter’s rather..lol):
http://cajunhomeschool.blogspot.com/2010/11/hooty-hoot.html
very cute!
This is so cute! If this was made for an 18 month old would you still make the strips 2.5×4 or smaller? Would it even be worth making one so small? I love it though and thank you for the great tut!
Hi. I’m sorry to bother you with maths but if it’s not explained to me I’m useless. I want to make this for a 1 year old. I can work out the length of the pieces fine, I’ll just measure against my daughter. I’m just not sure if I should adjust the width of the pieces. Can’t wait to hear your reply. I’ll be making this for a 1st birthday pressie for next weekend :)
Hi Sherry, for width of the pieces, just follow step 1 and measure the circumference of her hips, then divide by how many pieces you want to use. The number it spits out will tell you how wide the strips should be at the top. Make sure you add a .5 inch seam allowance to each side. So, if your kid’s waist is 19, and you want to use 15 pieces, you’ll get 1.2666666, then add an inch to that for a total width of 2.2666666. You can leave off some of the sixes :) Then just taper down from there. You can eyeball this part, just make sure you use one as a template for the rest of them so they’re all the same. The wider you make it at the bottom, the wider your skirt will be (obviously!) so I would suggest not adding very much. Even tapering it out a half inch on each side will double your hip circumference, which will be plenty full for a baby’s skirt! Make sure you also add the half inch on either side of the bottom width for seam allowances too though.
Love this, not too long and it made me laugh, which is a good thing when working on something “serious” :) I’ll be making this for my granddaughter in the next few weeks. One question, why not line the skirt then there would be no need to hand-stitch. Instead of cutting the strip of fabric you sewed to the scallops, using the almost finished skirt as a pattern cut the lining fabric. Sew it to the scallops following your suggestions. Once the scallops, skirt and lining are ironed, you can cut off any extra at the waist if you cut it too long. Treat the lining and skirt as one fabric for adding the waistband. Would that work?
NOW I read the other comments and see someone else has suggested lining the skirt also. Guess great minds think alike. :)
Love it, just about wet my pants laughing at some of the comments. Will have to try it some time, but will read all the comments and check out the alternative lining technique you mentioned.
Also love the purple/green combo! :-)
you are hilarious! LOVE the tutorial! It’s exactly what I needed..although I am NOT doing that many scallops ;)
Found you on Pinterest! I loved reading through your post…hilarious. ;-)
I’d love to try this pattern. Maybe I’ll actually do it before my daughter is graduated from college!!
Love your pattern. I made it my way on the weekend, thank you.
If you want to see it:
http://nisabell-necessary.blogspot.com.au/2013/04/dresden-pleat-skirt.html
I love your skirt, and especially the colors. I used your technique for the bottom and the belt, and I intend to make one just like yours one day. You can see some pictures on my blog and I added a link to your tutorial and a picture too. See you !
http://sewingpot.blogspot.fr/2013/09/une-maxi-jupe-en-jean-recycle.html
Just made one yesterday (well almost done) and it was surprisingly easy and fast! It looks like I bought it at a kids boutique :) Thanks!!
I love it and think I will borrow your technique. I am planning to make a Dresden plate slip for under my wedding dress.