
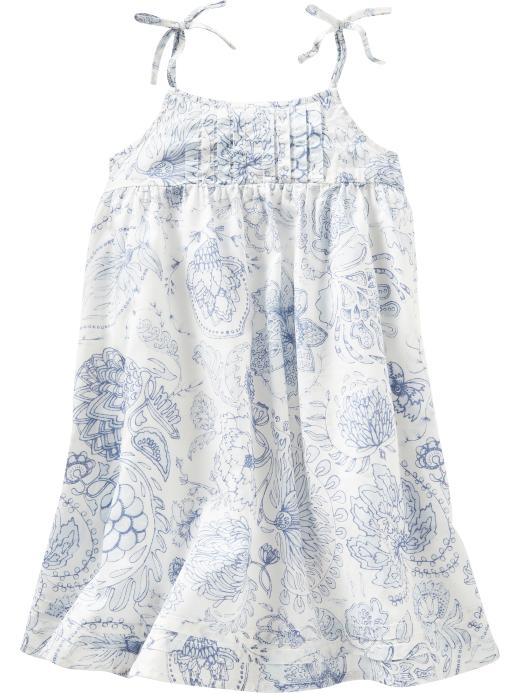
I saw a really cute, breezy sundress at the Gap, but at $30, it was way more than I’m willing to spend on a preschooler. I decided I had to give it a shot and since I used $2 fabric I got at a yardsale over 3 years ago, I was able to make my version for the low low price of FREE. (Ok, since I used about 1/3 of the fabric, maybe 60 cents. But FREE sounds better.)
And here’s a tutorial. I’ll assume you know the basics of construction and stick to the finer details. First, you’ll want to make yourself a little pattern for the bodice front & back. You can use the same pattern for both sides, but we’ll alter them a little when we cut them out.
Using your child’s chest measurement, construct a pattern for the front and back bodice pieces that looks like this, with the bold line indicating the fold:
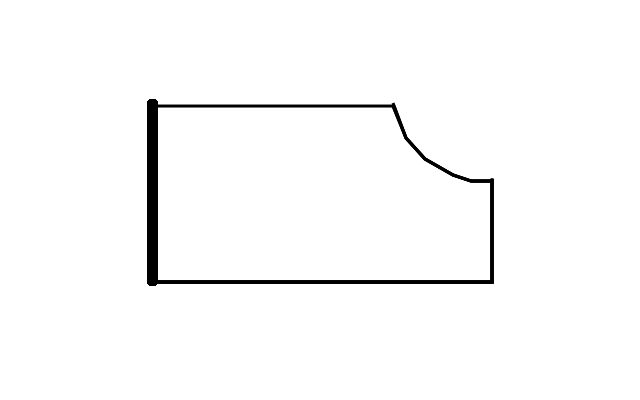
You will need to include a 1/2 inch seam allowance along the bottom edge and the side seam. The top edge and arm curve will be bound in bias tape, so no seam allowance is necessary.
It may help to use an existing garment to cut out the arm curve. The Gap dress has a fairly high empire waist, but I cut mine to be a little longer. You can cut to suit your liking. Also, note that the Gap version has a slightly angled neckline – it dips a little in the center. I made mine straight across, but wish I had remembered to do the dip. Again, your choice.
To cut out your front bodice piece, you need to first allow more room for the pleats we will add. So, fold your fabric, but instead of placing the edge of the pattern on the fold like usual, place it 4 inches away. Cut along the pattern, and continue cutting on the imaginary lines that would connect your pattern to the fold of the fabric. Make sense? This way, when you unfold your cut fabric, it will have 8 extra inches in width.
Now for the pleats. Mark the center of your bodice by pressing, then measure 1/2 an inch to the right. Make your first pleat by folding and pressing the fabric another 1/2 inch from that point. Once you sew the pleat, you will be removing 1 full inch from the width of the bodice, like so:

To make the second pleat, move 1/8 of an inch to the right of the folded edge of your first pleat and make another 1/2 inch pleat. Make four pleats on each side of the bodice, ironing them down so they face the side seams.
Now cut out the back bodice piece, again moving the pattern away from the fold of the fabric but only by 1 inch or so:

Shirr the back bodice piece with horizontal stitching all the way from the top to bottom edge, stopping at each side where the arm curve begins. I cannot overstate the importance of hitting your shirred stitches with a shot of steam from your iron. I also cannot overstate the importance of having every available person in the house watch this step, as it is so flippin’ cool. You’ll see.
Sew the front and back bodice pieces together at the side seams.
Now you will need to make enough 1/2 inch bias tape to cover the front and back top bodice edges, and enough 1/4 inch bias tape to bind the arm curves and form the ties above the shoulders. My dress is approximately a 4T and I included 10 inches of tape beyond the top of the bodice for ties, just to give you an idea.
Sew the 1/2 inch bias tape to the top edges first, then sew the 1/4 inch tape around the armholes and up the straps.
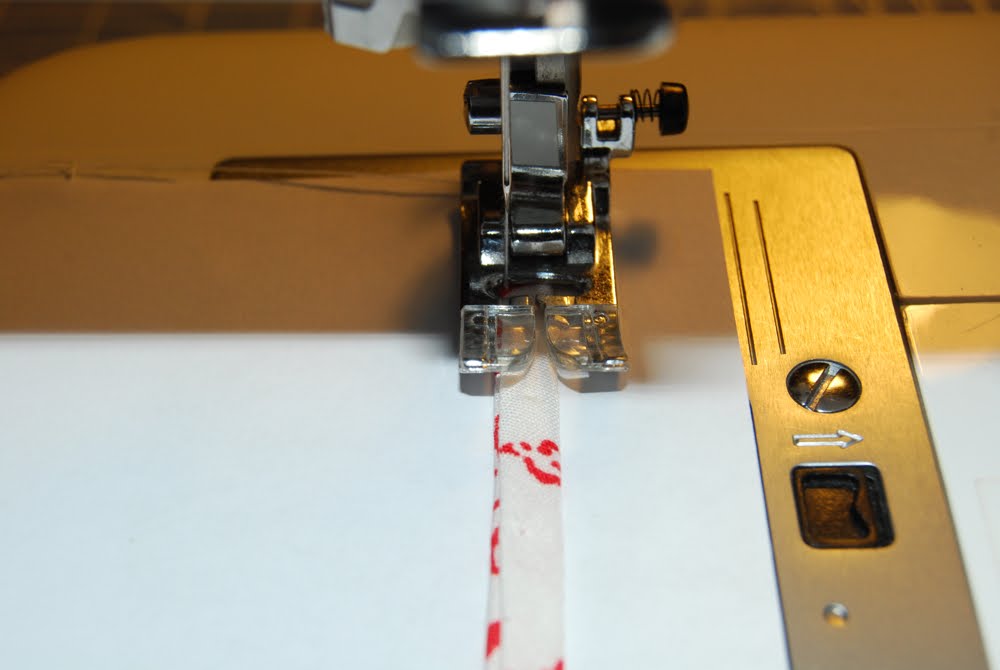
To sew the super thin bias tape for the straps, first pin everything in place around the arm curves, then start stitching at the under arm, and keep going beyond the bodice and up the tape. Then return to the underarm and sew again in the opposite direction.
Or, if you want to start at the tip of the strap and do one long seam, lay it down on paper or tear-away stabilizer. This will keep your sewing machine from viciously eating your tape, and when you’re done sewing, you can simply tear the paper in half along the seam and remove it.
Congrats, your bodice is done! Now for the easy part.
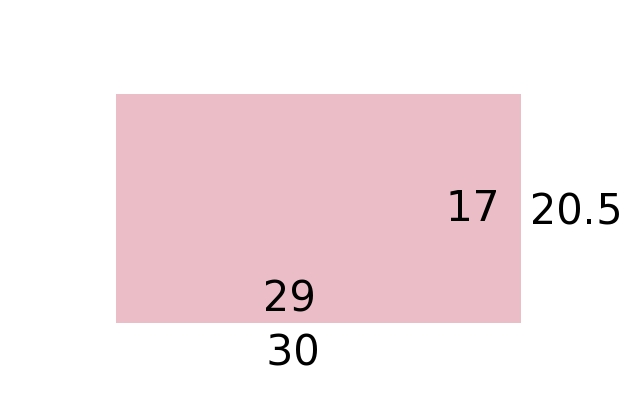
For the skirt, first measure how long and how wide you want it to be. Use an existing garment to check for fullness. I made mine slightly fuller than the original. I find it easier for my super visual mind if I draw a little diagram. The numbers inside the rectangle indicate my desired finished measurements, the numbers outside indicate how big I need to cut the fabric for seam allowances & hem. We are adding an extra inch in addition to the hem measurement so we can make a growth pleat.
From here on out, it’s business as usual. Sew the rectangle into a tube, gather the top edge until it is the same circumference as the bottom of the bodice, pin right sides together and sew.
To form the growth pleat and hem, first measure 4 inches up from the raw hem and make another 1/2 inch pleat all the way around. Then hem as usual, first pressing under 1/2 inch, then 1.5 inches. When you sew the hem, make sure the pleat is out of your way. Then when you press the pleat back down, it should cover up your hem stitch. Nice & neat!
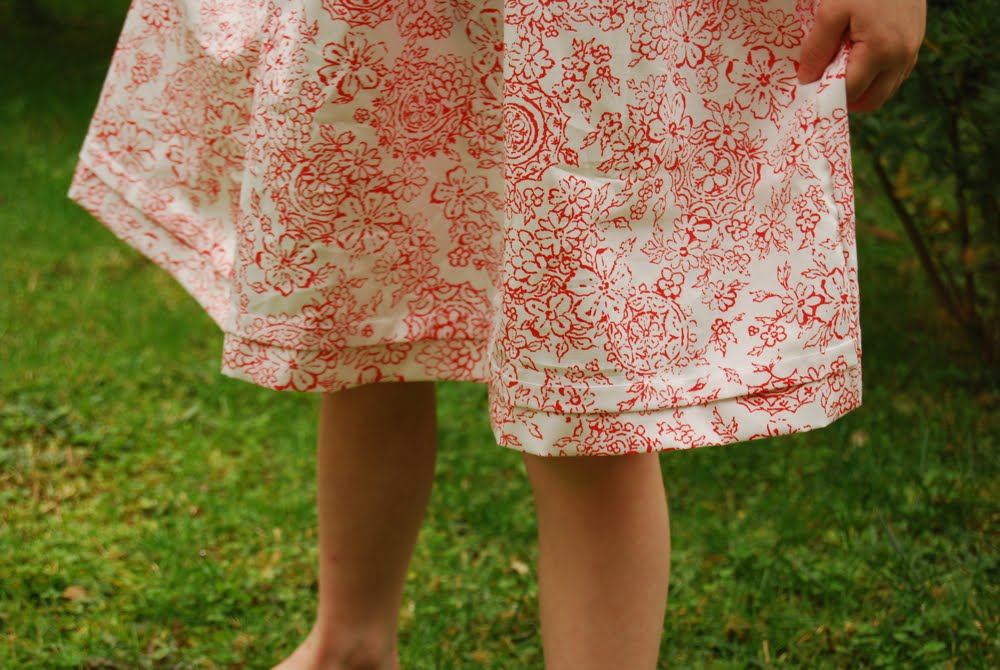
Growth pleat around the hem
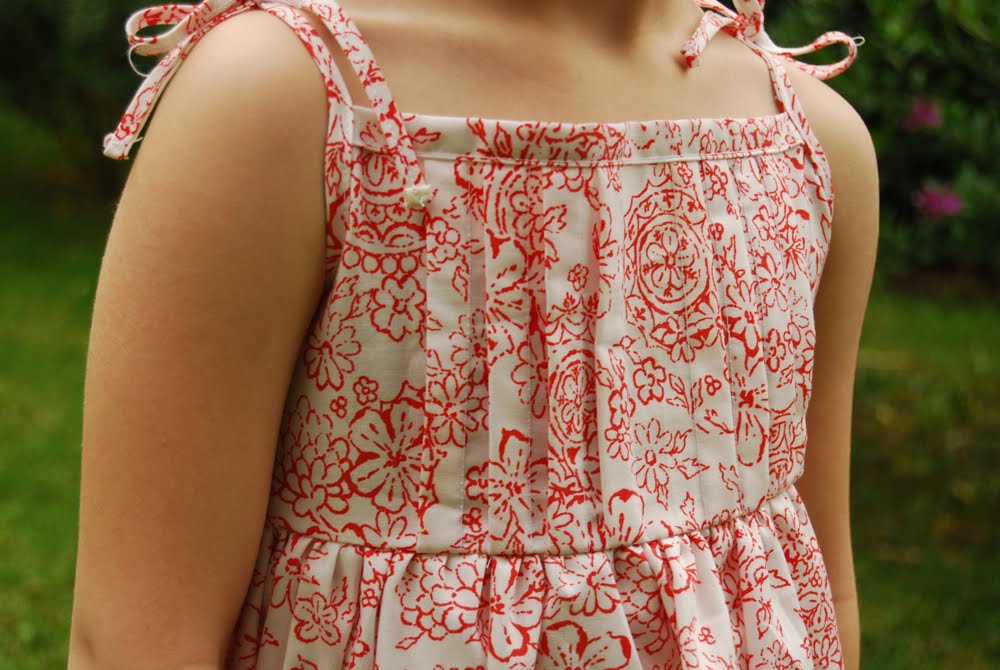
Pleated bodice

Shirred back bodice
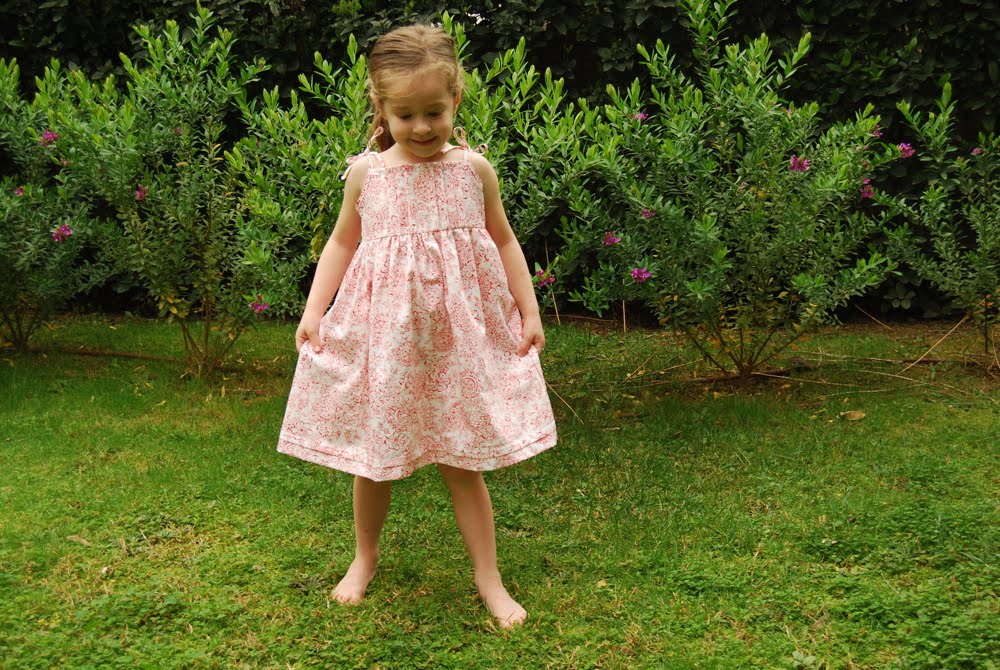
Happy kid, happy wallet!
Please note, these tutorials take a bit of time to construct, but what makes it all worth it is seeing you use them! Please post any pictures of things you’ve made based on Crafterhours tutorials to our flickr group. Also know that by posting your work there, you’re giving us permission to include you in a post featuring your finished projects!

This is sooo darling. And if it’s already in your stash, it’s free. ;)
I need to try shirring something. I’m irrationally afraid of it. Maybe this will get me going. Thanks for the great tutorial!
How adorable! Thank you for the tutorial!
So cute!
Lovin’ this! I will feature this at somedaycrafts.blogspot.com tomorrow!!! This is such a popular style!
Well done! Very pretty!
Really nice. I love it!. You make things seem sooooo easy. Thank you for the tutorial!
Oh Adrianna, you little lovely, this is fantastic. Will definitely be making one of these. Thank you!
That’s super cute! I need to go find a little girl to foist one of these on….
I bought a similar dress at the Gap for my daughter to wear to my sister’s wedding. My kids absolutely love the dress, but it’s getting too small now. Thanks for the tutorial – I will definitely try it out!
It’s a lovely dress. And the fabric you used is beautiful!
This is beautiful! That fabric is so cute too. Definitely well worth $2.00. I hope I am able to replicate this for my girls :)I have been wanting to make something with pleats. I especially love the pleats at the hem line :)
Very cute & that fabric was a steal!!
I love it! Still winter here in Australia so it gives me a head start on Summer. Thanks for sharing this.
That is such a beautiful dress!! I linked to your tutorial over at Craft Gossip Sewing:
http://sewing.craftgossip.com/tutorial-pretty-summer-sundress-with-pleated-bodice/2010/07/26/
–Anne
Very cute! Saw this on craftgossip. Do you use elastic thread for the shirring? I may try this pattern out on my 4 year old. Thanks.
Yes, I used elastic thread. There are tons of tutorials on shirring out there, but this is a particularly good one:
http://flossieteacakes.blogspot.com/2010/06/shirring-tutorial.html
As soon as I saw this yesterday I started making one for my two year old. I love it!!! I posted it on my blog at:
http://ashleyscrafts.blogspot.com/2010/07/polka-dot-pleated-sundress.html
Thanks for the awesome tutorial!
Great instructions. I’m always happy to make something for the great price of *free*! Thanks for the inspiration.
http://www.sewingdork.blogpost.com
I stalk your blog on a regular basis, but I have never left a comment :) I love this cute dress. I think I have to make matching ones for my three daughters. Thanks for the tutorial!!
love this tute! thanks for the inspiration.
I am so busy making dresses for my GDs at the moment. This one is on the list, thank you for the tutorial. I love the growth pleat and the shirring back.
Just a beginner and so just wondering if you had a place in mind that had the pattern for the bodice. I am horrible at trying to guess sizes. Love the dress and can’t wait to make one.
Stephanie,
The best way is to actually use a tape measure to measure your child’s chest measurement. Divide that measurement in half, then add .5 of an inch, and you’ll have the bodice length (remember that the center line of the bodice is going to be placed on the fold of fabric, so it will double. For the height, decide how high you want the neckline to be and where you want the empire seam to sit. Take that measurement and add .5 inch. Now cut a curve into the corner of your rectangle for the arm curve, and you’re set. It’s a pretty straightforward pattern, and you can always use scrap fabric to cut one up and hold it up to your child to see how it’ll fit. The best way to start pattern drafting when you’re a beginner is to just jump in a do it! That way you’ll learn from your mistakes and see where adjustments need to be made. This is a great pattern to start out with – good luck!
Hello!!
I just found your wonderful blog!
I love all the dresses you made for your little girls..
I sew for my little girl too and I’ve got pattern books but it always gives me a better drive to sew when I read tutorials like yours online. I hope I will find time to try out your tutorials soon, especially this one and the scalloped skirt (Dresden).
BRAVO! Cute-as-can-be little girl’s sundress! LOVE this red print on white background– less than $1.00 worth of fabric! Your pleated front bodice highlights the gathered skirt and makes a UNIQUE look! Plus the shirring for the back bodice looks fab. I like your use of the same fabric for neckline trim as well as underarm trim with ties on each shoulder. Looks like lots of Mom’s “love” sewn into this sundress! Sarah in Minneapolis