Here’s a tutorial for a technique that I use a ton. It’s not particularly hard, just hard to explain, and I haven’t found any good, clear instructions for it on the internet.
It’s called an all-in-one facing, and you can use it for sleeveless dresses, shirts, vests, basically anything that doesn’t have sleeves and needs to have a finished seam around the neck and arm holes. Also, it’ll make anything sleeveless reversible, if that’s your goal.
The best part about it: No hand sewing! After following a particularly obnoxious commercial pattern that required me to hand stitch around a sleeveless arm hole, I thought this tutorial was due.
This is our final goal. See how the front of this garment has perfect side and shoulder seams with no top stitching?

Well, the inside looks exactly the same. So nice and neat, and again, reversible! (er, not this dress. but it could be, you know?)

Let’s get started, shall we? For the purposes of keeping this tutorial to a mere 2,352 pictures instead of twice that many, I’m going to skip any discussion of closure. Not the emotional kind. The zipper/button/velcro kind. But you can adapt this technique to whatever your pattern or imagination calls for.
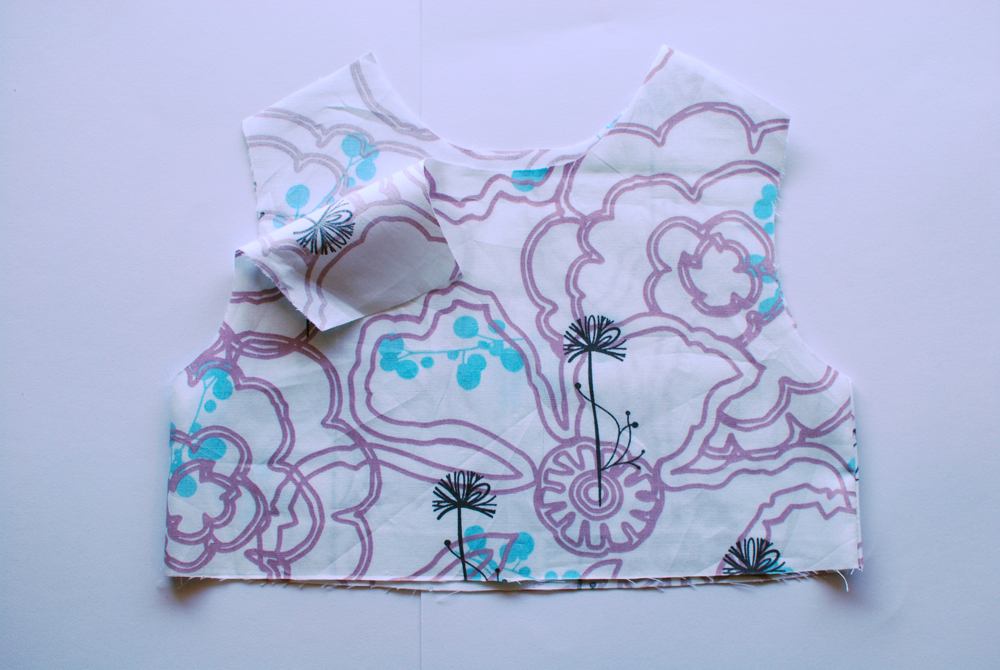
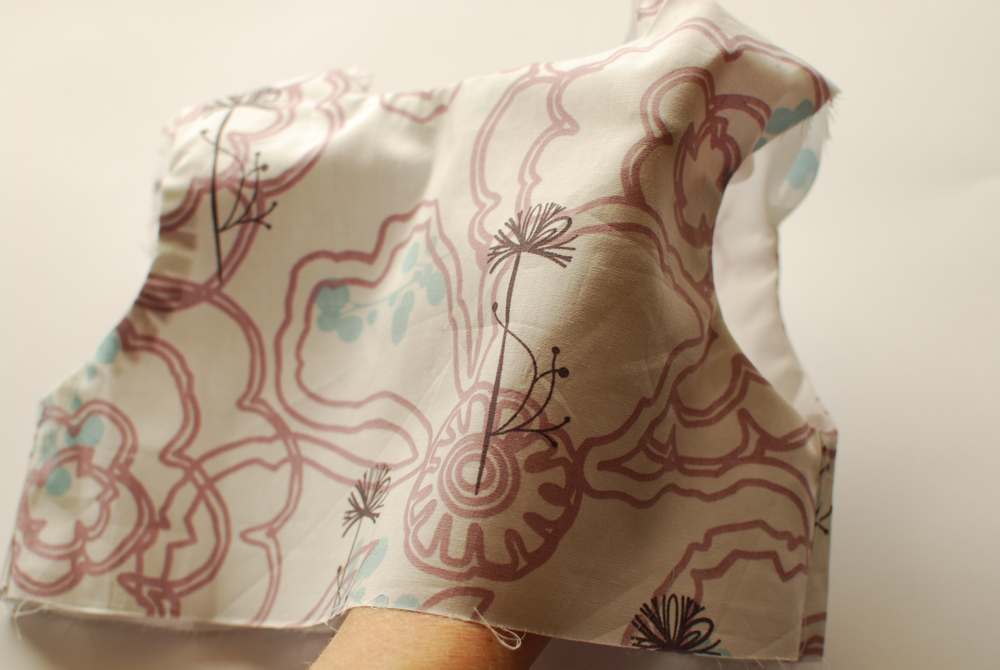
Let’s assume you’ve cut out a bodice front and back:

You’ll also need a lining or facing front and back:

(this picture shows a lining, which is what you’d use if you want to make something reversible. Otherwise you can just use a facing, which would just cover the area around the neck and arm holes, leaving the majority of the bodice unlined)
Step 1:
Sew your bodice front to your bodice back right sides together at the side seams:
Step 2:
Sew your lining front to your lining back right sides together at the side seams
Step 3:
Turn your bodice right side out. Keep your lining inside out. Slip your lining down over your bodice, lining up all neck and arm curves. Your bodice and lining fabrics should be right sides together.

Step 4:
Now pin your bodice to your lining. Place a pin about 2 inches down from the shoulder seam on each side of each strap (you’ll use 8 pins here)
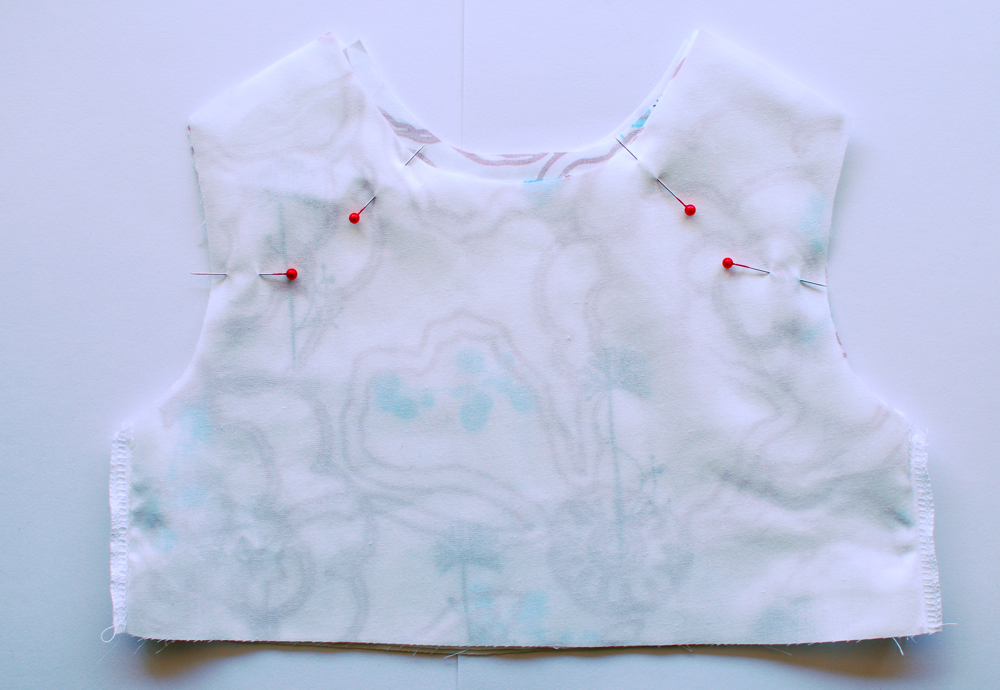
Step 5:
Put another pin at each of the side seams to hold everything together.

Step 5:
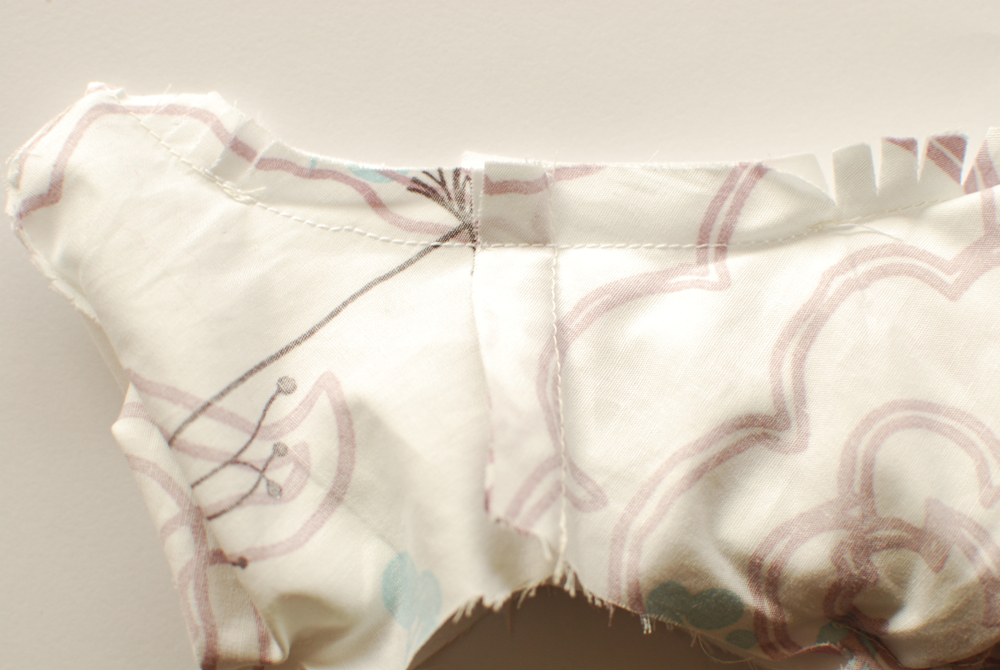
Sew the bodice to the lining, stopping when you get to each of the pins near the shoulder seams. You’ll be sewing 4 different areas here – the front and back neckline and each underarm area. Depending on what kind of closure you’re using, your back bodice may be in two pieces. That’s ok, it doesn’t change the process.
Clip the seam allowances close to the stitching line.

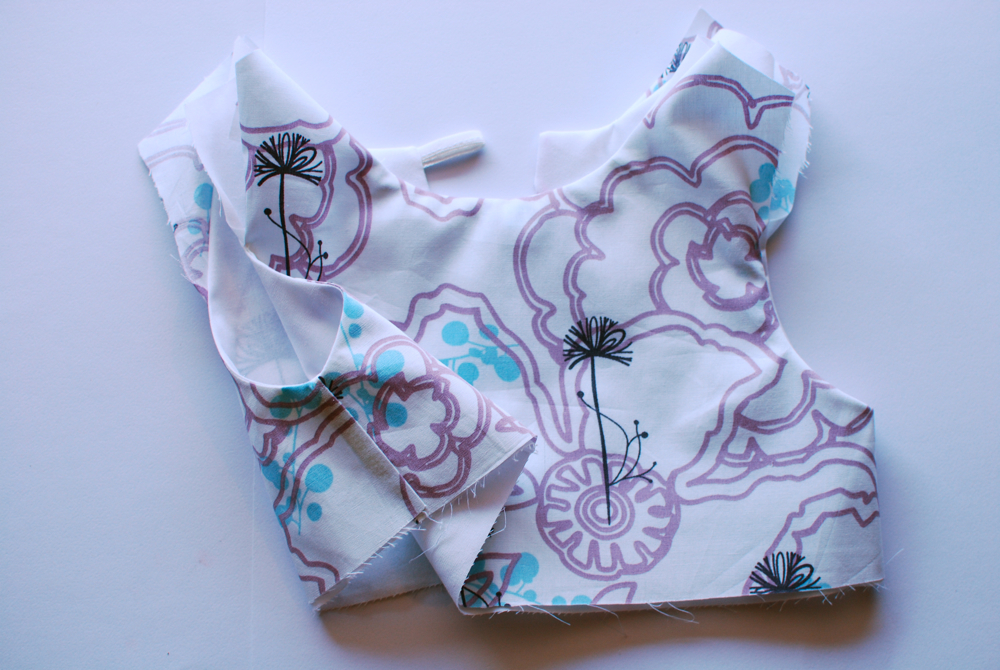
Step 6:
Turn the whole thing right side out through the bottom opening and press. Now everything is sewn nicely together except the shoulder seams.
Step 7:
Turn your bodice inside out so the two bodice shoulder straps are right sides together.
Step 8:
Pin the shoulder straps right sides together, moving the lining straps out of the way.
Step 9:
Sew the straps together.

Step 10:
Twist the lining straps so they are also right sides together and pin. This may take a little coercion, but it’ll work (this is where you’ll be glad you left a good 2 inches free).
Step 11:
Sew the lining straps together.

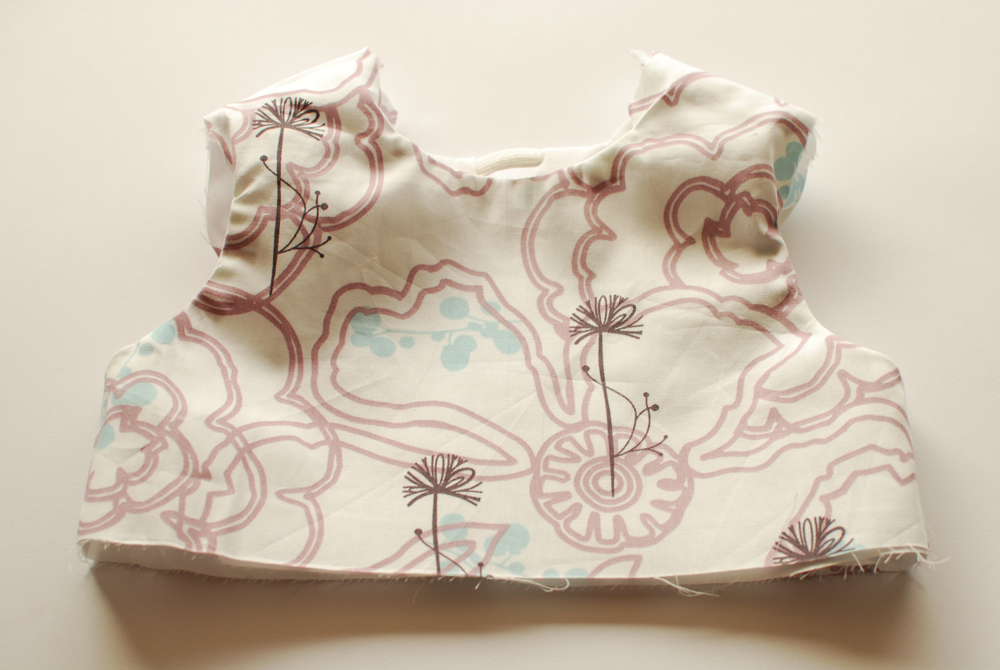
Turn the whole thing right side out. See how both shoulder seams are now finished without exposed seam allowances on the outside:

This is the part where some patterns I’ve seen will tell you to hand stitch the shoulder seam closed on one or both sides. But that can be avoided! Moving on….
Step 12:
If you’re making a reversible top, at this point you need to sew the bottom edge closed. But you’ll need to leave a hole to turn right side out at the end, and yes, you’ll have to hand-sew that opening shut. (Or you could top stitch around the bottom edge and close your opening in the process.) But if this is a bodice for a dress, you can leave the bottom edge open and continue with these instructions.
Turn the whole thing right side out.
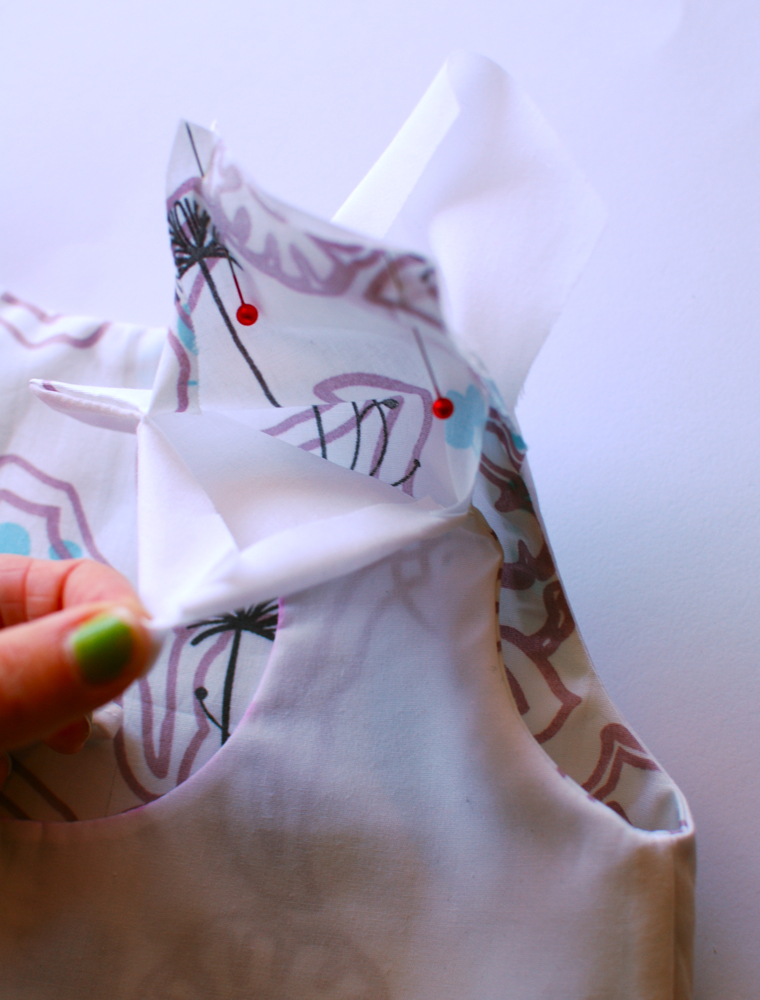
Step 13:
This is the part that is difficult to show in pictures and may seem strange, but stay with me. Separate the bodice and lining.

Step 14:
Reach your hand up between the two toward the shoulder.

(If you’ve sewn the bottom shut for a reversible top and have only left a small opening for turning, it’ll be harder to do this step, but just keep working at it. You’ll have to pull the whole shoulder strap through your opening.)
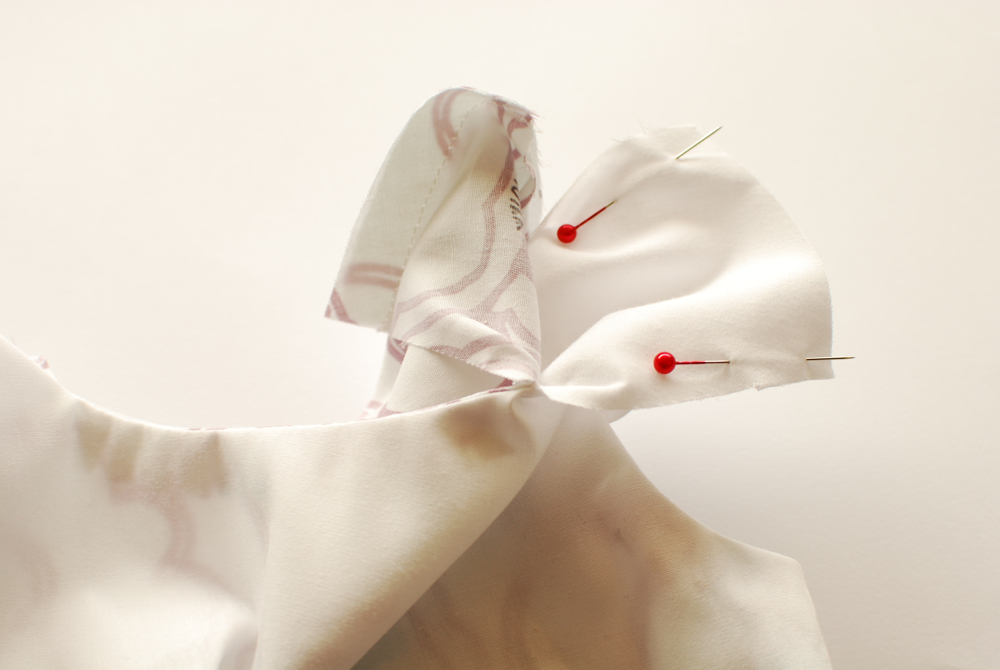
Step 16:
Keep pulling until you see your two unfinished seams on either side of the shoulder strap and your shoulder seam is laying flat.


Step 18:
And now sew between the pins, smoothly connecting the two stitch lines. Make sure to back stitch at the beginning and end.

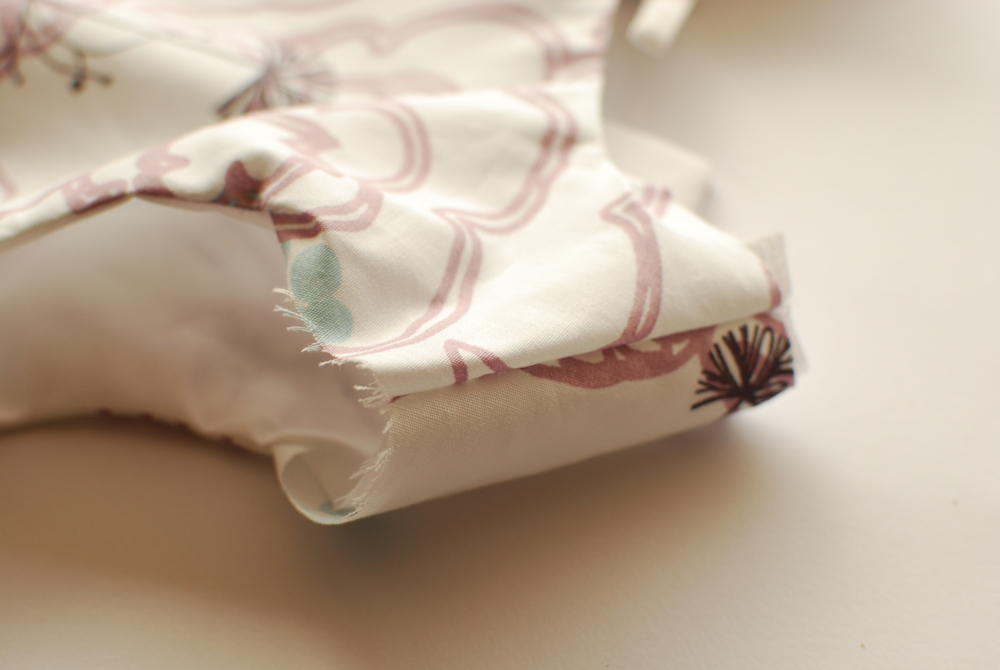
Step 20:
And sew a connecting line on that side too. This side will be harder because you’ll have a lot of fabric bunched up within the strap that you’ll need to keep out of the way of your needle. Just go slowly and stop occasionally with the needle down to shift the fabric and squish it out of the way as necessary.

It’ll kinda look like a stuffed dog bone at this point.
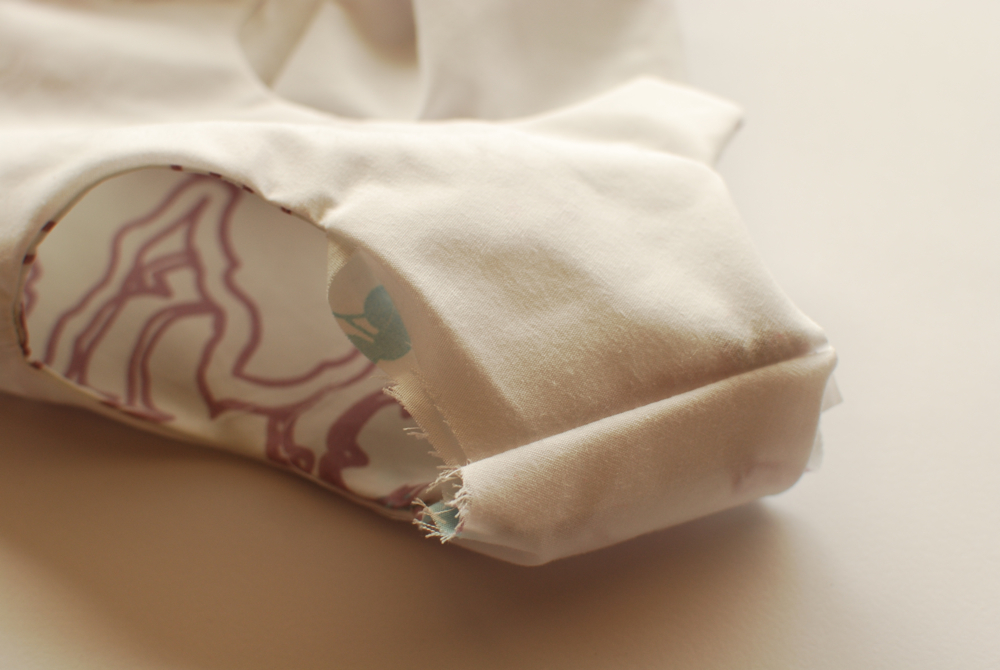
Step 21:
Now just pull the shoulder strap back through and right side out. Press the whole thing well, repeat the steps to finish the other shoulder strap, and you’re done! If necessary, close the hole at the bottom edge like I mentioned.

Or if you’re making a dress, you can now attach the skirt to the bodice.

And that’s all I’ve got on all-in-one facings! Have fun with it, this technique will really make your garments look clean and professional.


Okay, that’s totally awesome! I’m NOT a pattern reader (I’m a visual learner) and have played with techniques but never came up with something that seemed to work this well. This is perfect. Totally going in the bookmarks! :)
Nicely done! I really appreciate energetic people like you who take the time to do things like this! I could have someone over and show them, but to take the time to photograph every step and blog about it is very cool.
Thank you! There is a dress pattern I absolutely love but after FOUR attempts still can’t get the shoulder seams to look good. This will be such a huge help.
Thank you! This tutorial is going to help me out so much with a top that I’m planning on sewing. Isn’t it cool when a solution falls into your lap just when you need one?
Rachel
It’s so interesting to see this because I do it a completely different way! I’ll need to try yours next time :)
That is really cool. Some of these advanced sewing techniques blow my mind. How do people think this stuff up?
Also, this is amazingly timely. I am working on a baptismal gown and I would like to use this method to make the slip bodice. It has a back opening, but I think this will still work.
Love the dress! Thanks for sharing this! I’ve been wanting to make a dress for my little girl and this technique is perfect. :)
Adrianna, I have been sewing for over 40 years, and this is by far the most useful lining method I have ever seen. Guess I missed it somewhere along the line years ago. But, THANK YOU for posting this! I have 2 little granddaughters who will be wearing lots of this technique!
Great tutorial! I love the design on the back of the dress.
Duh, thats so obvious, why did no-one think of this before? I’ve only attempted one bodice like this and after googling lots of tutorial I made an ‘ok’ job of it but this will be much better!
Fantastic tute!! Thanks so much. Can someone tell me how to bookmark so I can refer back to it please??
Brilliant! Bookmarking for later use… (Monique… each browser is different, but in Safari, go to the top of the screen where it says “Bookmark” and click “add bookmark.”)
Thanks A! :)
This is a wonderful tutorial. So clear and I personally love a hundred pictures because I’m a visual kinda gal. I will be putting this to good use for the boy’s Easter vests. You know, the ones I was supposed to make last year. I hope that 2 yards of Searsucker is going to cover the now 3 vests needed.
Sweet! I’m totally linking to this post when I get to this technique with my lessons. Thank you!
Thank you for sharing your method for lining a bodice! This always gives me fits.
I linked to your tutorial on Craft Gossip Sewing (to go live Sunday morning):
http://sewing.craftgossip.com/tutorial-two-ways-to-line-a-bodice/2011/03/06/
–Anne
Mystery solved! I just could not visualize this process to save my life, your pictures really helped. Thank you!
-Ginny
A while back I made 2 dresses for my girls and had to do this very stage but the instructions were so hard to follow on the pattern that i stuffed it up about 4 times before we figured it out. This tutorial would have been so handy. Thanks for sharing!!!!!
Oh and I mentioned this on my blog too!!!
eatcraftsow.blogspot.com
Thank you so much for posting this! I just finished my first fully-lined dress and I was so annoyed that it required me to hand stitch the arm holes – now I know there is a better way!
It is easier for me to sew the shoulder seams at the top together on both the front and the lining.Press Then pin your armholes together. Pin the front to the lining and then sew together like you did. Do not sew the side seams. press that and then under the armhold, match your lining up with the lining and the front with the front and starting at the bottom, sew up and around. Press that seam flat, and there your bodice is complete without any handstitching. Not sure how clear I am…
Nevermind..LOL! I forgot the neck seam too but you have already included a tutorial on your blog on how I do it. I went to your latest posting..You have a very nice blog.
Thanks Elaine! yes, I agree, that other way is much easier. The only thing is you can’t use it for a dress like the finished one I showed above, because the back bodice isn’t in 2 pieces. But for all other bodices, it’s definitely preferable to do it the other way!
Could you please tell me if this dress is a published pattern? I want to do a cutout back like that, but don’t want to draw my own!
Hi Melissapens,
No, sorry, it’s just my own pattern. But if you can make the dress pattern, the cut-out is the easiest bit! Just make a straight line 1.5 inches down from the neck and at the end of the line, draw your circle. I traced around a small bowl. I’ve also made these openings with a tear drop shape, and a really large circle. You could do a heart or square or whatever you want!
Thank you soooo much! I have felt like I’ve been going mad and ending up with a dress turned in on itself again and again before I found this. I’m not a big fan of top stitching but thought it was the only way to go – just tried it out and your instructions are perfect.
Thanks again!
Thanks! I finnally understood this technique, I’m so glad!
Fantastic tutorial of a very sticky situation! Do you ever under stitch after sewing the bodice together and before doing the straps? Really makes a big difference! Thanks for sharing~~bookmarked :-)
Awesome tutorial! I don’t have a serger so I normally try to do all French Seams because I haven’t had much luck with zig-zagging. I was wondering if there was a way to fully line a bodice like you have done above, but for one with sleeves?? The armscycle is always my downfall. I never know how to finish the edge so it looks nice and doesn’t fray. I’ve tried bias tape, zig zagging, and turnning a hem, but if I could just line it somehow(without having to hand-sew ick!), that would be awesome! Any tips or tricks?
This saved my rear on a bridesmaid’s dress I am sewing! I had already sewn and serged the side seams on my acetate taffeta, so you know I wasn’t pulling those seams out! I used your method and the straps turned uot perfectly! Thanks a ton! I also didn’t find this method difficult at all- barely even fiddly :)
Wow, I like teh looks of this. Maybe on my next sleeveless dress…
What fabric are you using for the lining in this? What fabric do you prefer using? I’m new to sewing and I am making a shirt from a pattern. Since I’m practicing and the fabric has no pattern, I am going to use the extra for facing. I haven’t been able to find good information on good facings and interfacings to use though for in the future.
Thanks so much!
That’s exactly what I was looking for.
Thank you, Thank you, THANK YOU!!!!
I’ve been starching my head about how this is done since i started sewing!!!!
I cant thank you enough! now i can replicate my favorite dress!
-Lauren
With so many positive comments, I have to be a major moron, but I cannot figure out how to turn the bodice right side out with all of the seams but the sides of the shoulders sewn together. What am I missing? I keep turning and tunrning and can’t get it right. Is there a trick to this part? Thanks!
Hi Amanda! I’m sorry you’re having trouble with it. For this kind of thing I really wish I could pop into your sewing area and just help you out. I’d bring wine! Unfortunately I can’t figure out how to help you from here. It should be really easy to turn it back right-side-out, so if you’re having problems, maybe you sewed the lining to the main bodice piece? Make sure the lining is sewn to lining and the front bodice is sewn to the back bodice. There’s no special trick to this part, so I would check to make sure the previous steps are correct. I’m sorry I can’t be of more help, I hope you figure it out and don’t hate me too much in the process!
Hi! In your pictures here you’ve used full bodice pieces back and front, but if I were to to a keyhole back or just wanted to do a split for a button closure, at which point would I do that? (sorry, I dont know if my question is clear!)
Eleena
I got stuck in the same place you did Amanda. Found this Youtube video with a slightly different way of doing it that worked better for me. Maybe it will help you too. I’m keeping this pinned just in case a video does get posted of it. I’m so visual, it’s the only way I can figure things out sometimes.
https://www.youtube.com/watch?v=WcVZEkqxD9Y
Wow, amazing. I was working on reversible dresses for my daughters and this totally saved me! Thanks for the tutorial and pics!!!
Thank you so much for a GREAT tutorial!! I have been racking my brain how to face a blouse I drafted myself and I knew there was a way I could do it – your tutorial got it clear in my mind. Many, many thanks!! Kate
Holy crap you’re amazing!!! Thank you! This was JUST what I needed!!!!
thanks so much for htis great tutorial!
first answer to my google… thank you , thank you….I couldn’t wrap my head around what I knew I could do somehow until I saw this…I’ve done many for garments with some sort of separation in the front or back but couldn’t figure this out. you are the best!
THANK YOU.
Great tutorial. Thank you. I’m with kslaughter on the understitching though. It makes for a much tidier finish.
Thank you, thank you, THANK YOU! Finally I can understand how to do this. I’ve been trying for years to make reversible tunic dresses (great for travelling). Your illustrations and explanations were so clear. I’m doing a happy dance!
Totally confused – sorry! I want to sew a facing onto a bodice which has 1″ wide straps at the shoulders but cannot decide if this will work or not or even if I can do it some other way.
Thank you for the very clear tutorial!
Thanks so much for this great tutorial! I was struggeling with the pattern I was making but this explained it very well!
I just would like to tell you how clear your tutorial is. I’ve been using this method for a long time . And I teach it to my students.
the way you write and explain it is really really really brilliant!
congratulations
Thank you so much! I started sewing a dress about a year ago, and just came back to it today. In that year, I had lost the directions. Thank you for your wonderful tutorial!
I’ve been surfing the net trying to figure this out for weeks. THANK YOU THANK YOU THANK YOU!!! Such a PERFECT tutorial! It worked!!!
Please tell me more about sewing the bottom closed (like for a reversible top). I am trying to sew a one-shoulder lined top.
I would quite like to find out about that too! At this point, I’m making reversible tunic dresses with a slight gather string at the bottom so I’m just overlocking the edge and leaving a bit of an ‘raw finished’ look! It would be great to know how to finish is completely though – if it’s possible? – Dee.
Thank you soooooooo much , just answered my question xxx
Thank you very much for the good explanation.
Omg it’s like my prayer being answered! lol I’ve been working on a dress and the instructions for this typical dress calls for almost the same technique and the only part that got me frustrated was the shoulder part when u have to pull the shoulder part down to to the bottom of the bodice and your instructions were so much easier to follow! Haha I think u did a good thing writing this post as it may have saved and helped a lot of ppl. I usually don’t have time to comment on posts but for u I just had to! :) that’s how much I want to thank u for this now I know who to turn to when I’m stuck cuz like u said this was not any easy thing to search for and find a good tut for. Oh I wanted to mention that the dress I’m working on is the siccor dress (something like that lol) the funny thing is that I’ve made the dress once before! Lol
Awesome! I am not a sewer but my daughter wanted a 70s costume for an event! I made her a psychedelic sleeveless dress using your tutorial! It turned out really well, for a newbie! Thanks so much!
Thank you soooo much! This was the first search result I opened and boy am I glad I did. Just perfect!
I’m sure this is a great tutorial but I got lost at step 15. Guess I’ll never finish.
Thank you so much for this. It’s exactly what I was looking for. I’ve only read through it one time and will need to study it some more before I can attempt it. Hope it works! This tutorial was really well done but I probably need to see it in person!
Sadly, I get completely lost at step 15. I have sewn everything up to this point, but when I go to pull down the straps, I end up with the lining and the strap part side by side, and not looking anything like pictures 16 and 17. It looks like others have had great success with this method, but, I seem to be out of my depth. Can anyone take pity on a dad trying to learn to sew his daughter some better dresses and explain what is going on here?
I did this! Thank you so much for this tut. It was a little confusing at first but I got it and my dress looks great so far.
WOW, I have been sewing for 50! years and not seen such a GREAT! tutorial . Thank you so much!
Thank you! I haven’t sewn for years and decided to make a bias, self lined tank top. I racked my brain for the how to memories. You saved me so much torture.
Your tutorial was the best I’ve seen – thank you!! I looked at a few of the listings and they didn’t make sense. I’m not a confident sewer by any means and your pictures and descriptions were great and helpful! Thank you again!
I left a comment, but don’t see it so I’m leaving another one. Thank you soooo much! Your pics and descriptions were great and helpful! It really helped to make things clear for me! Patterns are not easy to read and may be why people have issues… Anyway, thank you – appreciate it!
This tutorial is the best! Thank you so much!!
Thank you so much for this tutorial. I found it very clear and helpful and will now put it in practise! Always wondered how this was done!
This is the best tutorial. I know have a very professionally finished sleeveless dress/jumper. Thank you. It is well written and easy to follow.
Very complicated method. There are easier ones out there. Look at the sewing books or online.
Very clear understandable turtorial. Very easy to follow.
Thank you, I turn to is tutorial every time I sew a dress. I prefer a side zip and so this method is perfect. The instructions are excellent and I like it ether than the rolling one in the video!!