crafterhours

sleeping babes. crafting moms.

  • Tutorials
  • Patterns
  • Shop
  • Contact
  • Follow

The Milkmaid Skirt: A Tutorial

November 8, 2009 By crafterhours 45 Comments

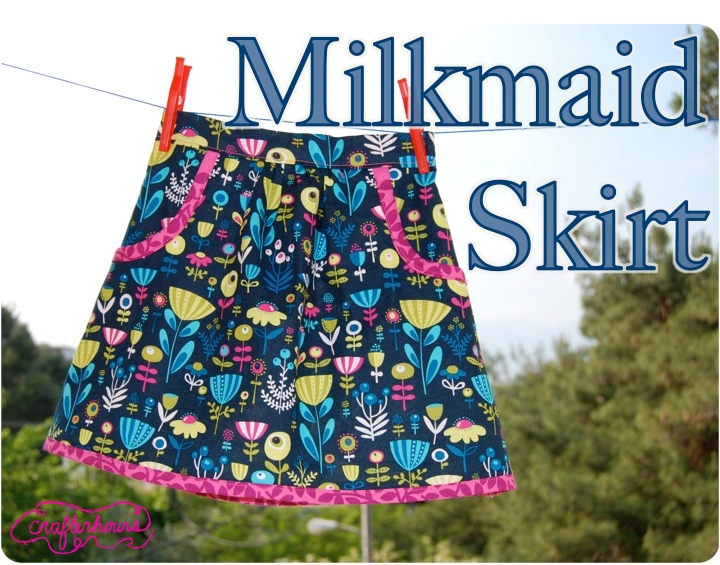
On a recent trip to London, I bought myself a cute skirt labeled “milkmaid skirt”.  Not really sure why, as this would be close to the most impractical thing to wear while milking a lactating animal, but cute nonetheless.  I decided I had to copy it in little girl sizes.  The following is a tutorial to help you copy it too. Caution: this tute is extremely image-heavy.  I’m not good at describing things, so I took a ton of pics.  Please leave a comment if there is any confusion.

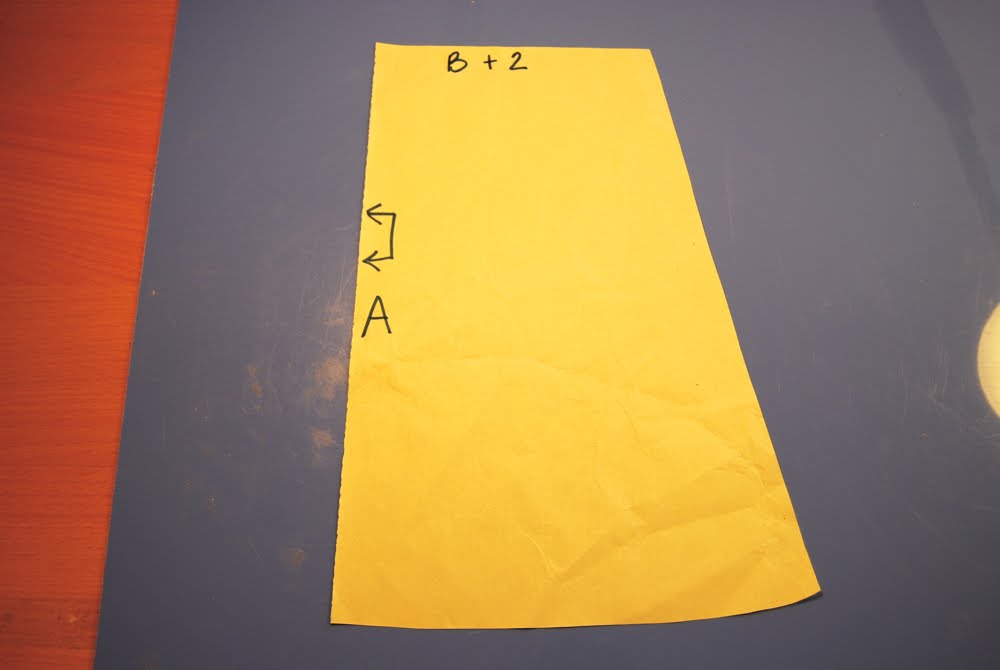
Step 1:  You will need to draft yourself a pattern.  First, we’ll make the skirt front.  Your “A” measurement will be the desired length.  You do not need to allow for seam allowances because we will be using bias tape to hem and adding a waist band.  If you wish to make a traditional hem, add 1.5 inches.  Please note that if you are making this skirt for a toddler, the waistband will probably hit under their tummy bump.  If you measure the length from their belly button, your skirt will end up way too long.  Keep this in mind when measuring for the waist as well.

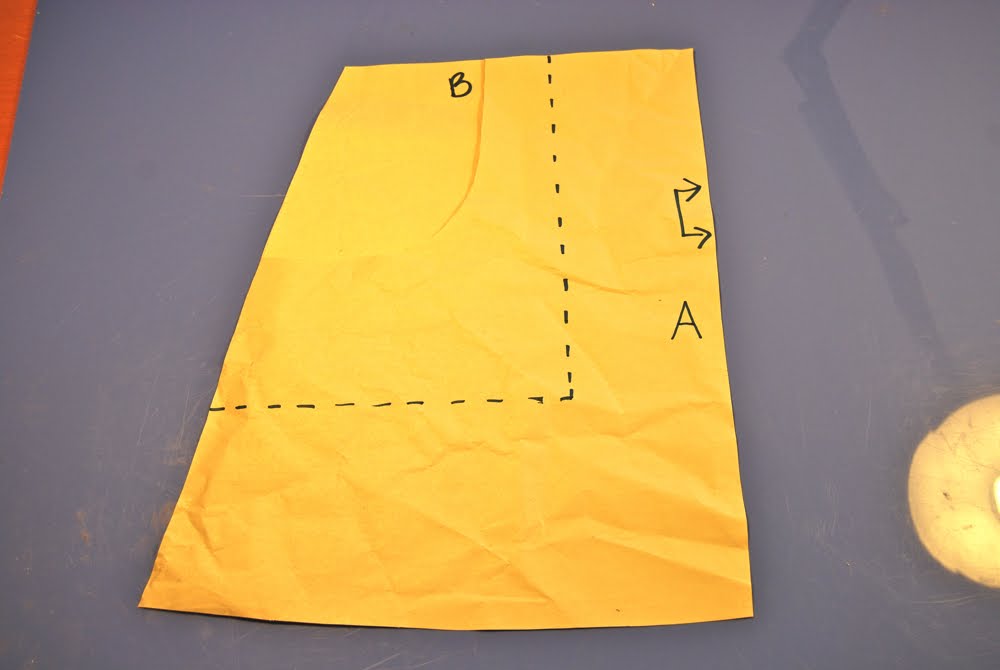
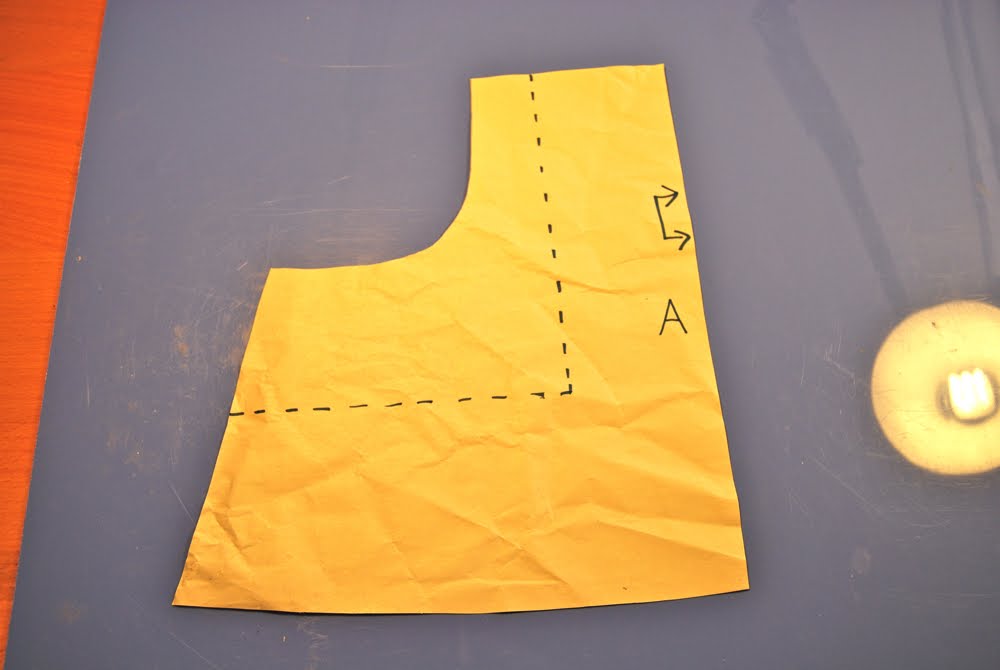
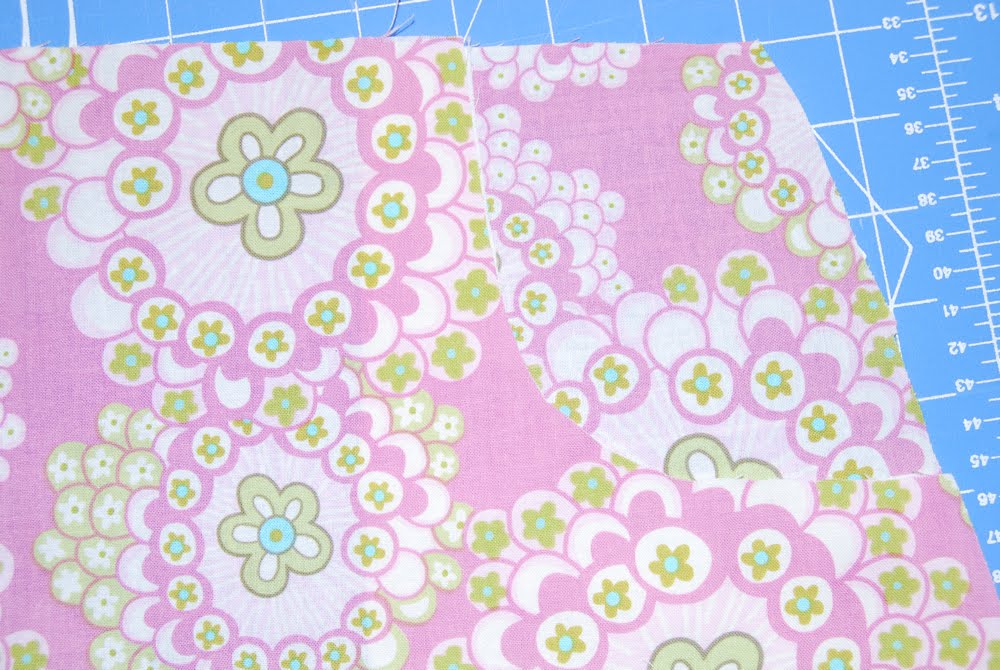
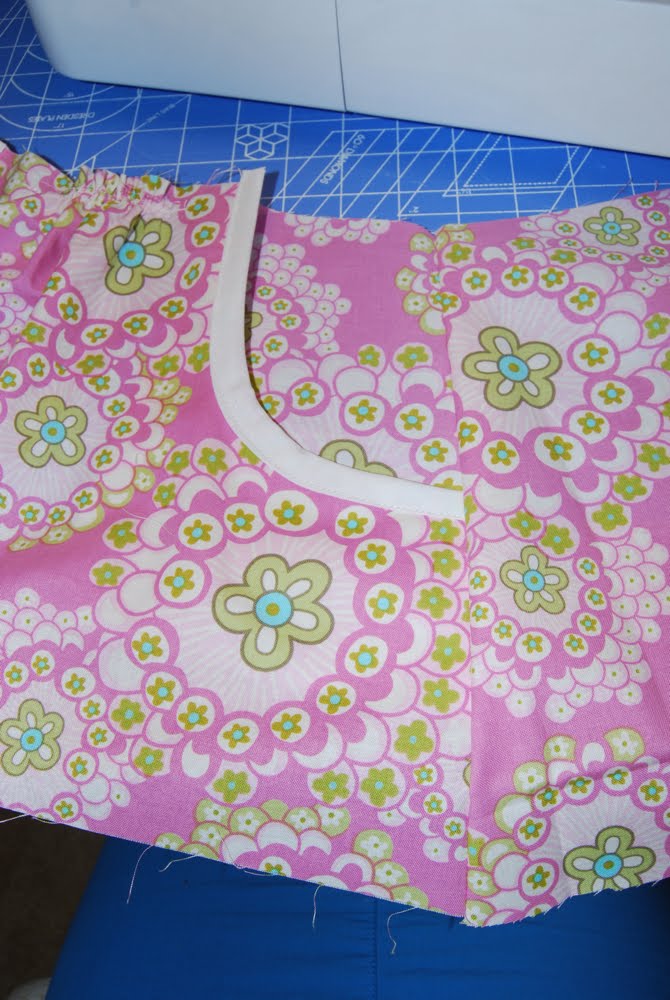
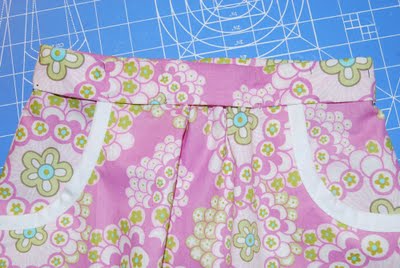
Your “B” measurement is around the waist, divided by 4, plus 1.5 inches.  Using those two measurements, construct a pattern piece similar to the picture below.  For the outer edge of the skirt, draw a slight a-line shape, but remember that it doesn’t need to be very pronounced or the skirt will be very wide.  The skirt I made using the pattern below ended up a bit too wide, if that gives you any indication.  For the next few pics, please ignore that little piece cut out of the top.  I got ahead of myself, as usual, when taking pictures for this tute.


Don’t cut your fabric yet, as we have a few steps to do before that.  You will need to draft a pattern for the back of the skirt that is identical to the front, but with 2 inches added to the “B” measurement, like so:

 The arrows on both the front and back indicate where you should put the pattern on the fold of the fabric.  
Our next pattern piece will be the pockets.  I did this in a rather unscientific manner (as I do most things), but it worked.  If you can think of a better way, please do (and share!)  First, take your skirt front only and draw a dotted line to indicate the depth of the pocket:
At this point, you will want to take another piece of paper and trace that little rectangular-ish piece you just made (outlined by the dotted line).  You’ll see why in a second.
Then, I cut a curved area out within that dotted line to be the pocket opening, using the scientific method of “eyeballing it”:
Ok, now it gets tricky because I forgot to take pictures and had to recreate this part, but I accidentally did it for the opposite side of the skirt.  Use your imagination.  You will need to cut out two pocket pattern pieces.  One will be the part you traced earlier from the pocket rectangle.  This is the pocket outside.  The second pocket pattern is the inside and will be the same as the pocket outside, but with the pocket opening curve removed.  Use the piece you cut out from the skirt front to trace because these curves need to be identical.  Let’s take a moment and thank God for pictures, because that was possibly the poorest explanation ever:
Step 2:  Let’s take a break from all that pattern drafting to do something even more tedious – making bias tape!  If you want, you can buy some pre-made, but if you live 4000 miles from the nearest Joann’s or want tape that will coordinate/contrast perfectly with your skirt fabric, I suggest making it yourself.  I won’t insult you by describing how to do this, but if you need a refresher, you can do a google search and find hundreds of tutorials.  I made mine so the finished width was 1/2 inch, which meant starting with a 2 inch wide length of fabric.  You will need two pieces that are slightly longer than the curve of your pocket opening, and one long piece that is about 5 inches longer than your skirt hem circumference:
Step 4:  Cut out your pattern pieces.  The skirt back will be fully intact, but the skirt front should have those little curves cut out of the outer top corners.  The rectangular pocket piece should be the same fabric as your skirt, but the inner pocket piece can be anything you want.  It is essentially just a lining, but you could use cute contrasting fabric for a little happy pocket surprise only you know about :)
Step 5:  Let’s sew!  Finally, right?  First, attach the pocket inside to the pocket outside by sewing right sides together along the edges that were indicated by the dotted line.  You can click on this picture to make it bigger.  I used a zig-zag stitch on top of my straight stitch to reinforce the pockets, as my 3 yr old enjoys collecting rocks.  If you have a serger you won’t have to do this (and I am jealous of you).
Next, lay your skirt front on top of the pocket so the curves line up:
Now you will use one of the shorter lengths of bias tape to attach the curve of the skirt front and the curve of the inner pocket.  Use lots of pins to force that bias tape to bend to your will.
 
Now let’s take a moment to familiarize ourselves with the stitch that will make sewing easier, neater, and more professional in appearance.  See that little symbol next to the “2” button?  That is my best friend.  That little guy takes the needle and does a little side step so that the needle will come down at the very edge of the presser foot.  He allows you to accurately sew as close to the edge as possible.  I thought I was just a terrible sewer who could not sew a straight line to save my life until I met this little hero.  You should always use him to do seams, edges, and attach bias tape.  If your machine is even slightly fancy, it will also have a “reverse” or “mirror” button that will make the needle switch over to the far right side, so you don’t even have to turn your fabric around.  Awesome.
Ok, let’s get back to sewing, shall we?  Use that handy little stitch to attach the bias tape to the curve, and voila, you have a pocket!  Now do all that again for the other side.
Next, sew two gathering stitches along the top of the skirt front, between the pockets:
Pull the threads until the skirt front has a slight gather in the center.  No science here, but we did allow for 2 inches of gathering in the waist measurement, so keep that in mind.  Sew a stitch across the gathers to hold them in place.
 
Now, right sides together, sew the skirt front to the skirt back at the side seams.  As you can see, you will be sewing the skirt back to the side of the pocket near the top.
Now you will need to make a waistband.  First, measure around the circumference of the waist of your newly constructed skirt.  You will need to be as exact as possible.  Then add an inch to that measurement.  That will be the length of the strip you will cut.  The width of your waistband can vary, but you don’t want it to be too wide or it will decrease the opening to your pocket.  But it needs to be about half an inch wider than the elastic you plan to use.  I made my waistband 1.5 inches wide, which meant cutting my fabric 6 inches wide.  Use the same procedure as making bias tape to press your waistband, like so:
 
Now fold your waistband lengthwise, right sides together, so the ends match up.  Take no note of the different fabric used in the pictures below, and please don’t assume that this was necessary because I did this part wrong in the making of my own tutorial, which I had also already made once before.   Thanks.

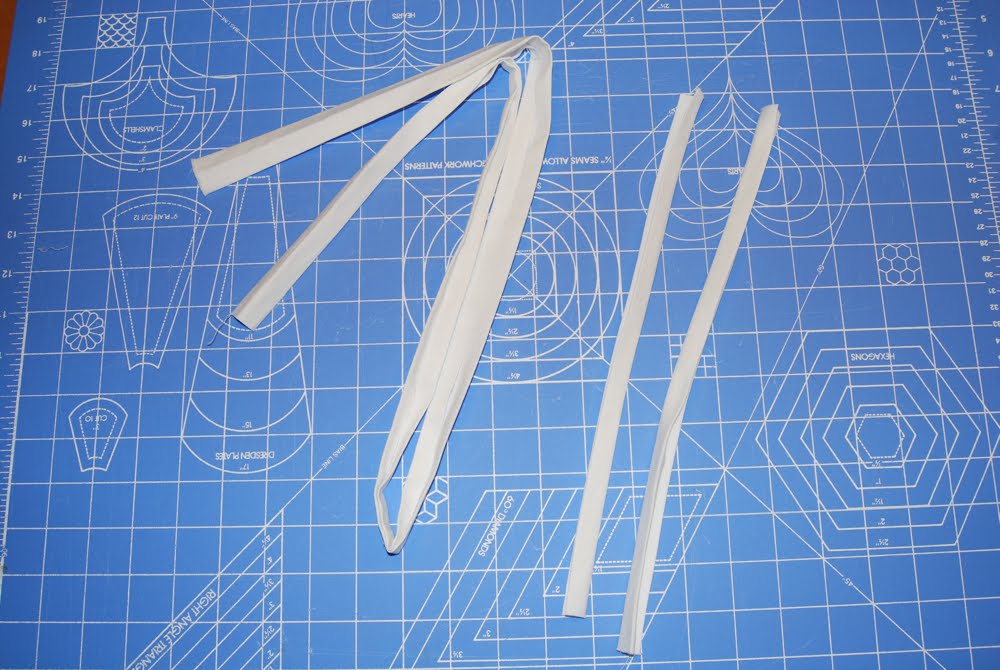
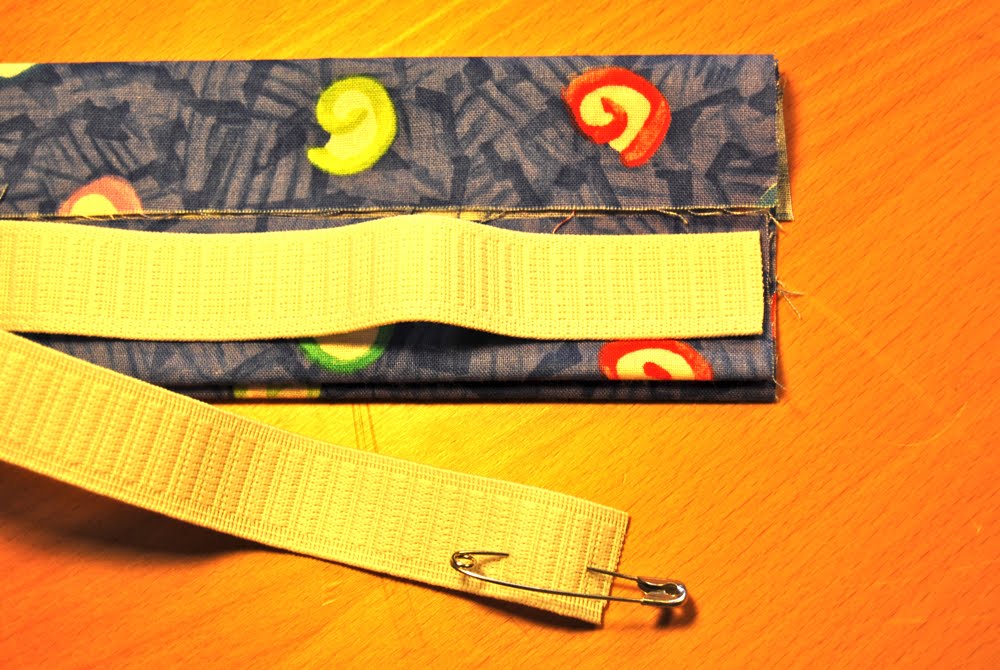
Now comes the part where you will need to wrestle your screaming toddler to the ground to obtain their back waist measurement.  Because your toddler will be flailing and most likely hop around and catch you under the jaw with their thick skull (don’t you hate that?!), it is not necessary that this measurement is scientifically exact, but you should try to get as close as possible.  You’re just measuring from one side to the other, ie: half their waist measurement.  You could just use half their waist measurement, but I find that their little frog bellies make it so the back waist is actually less than half.  Cut your elastic to this measurement minus 1 inch.

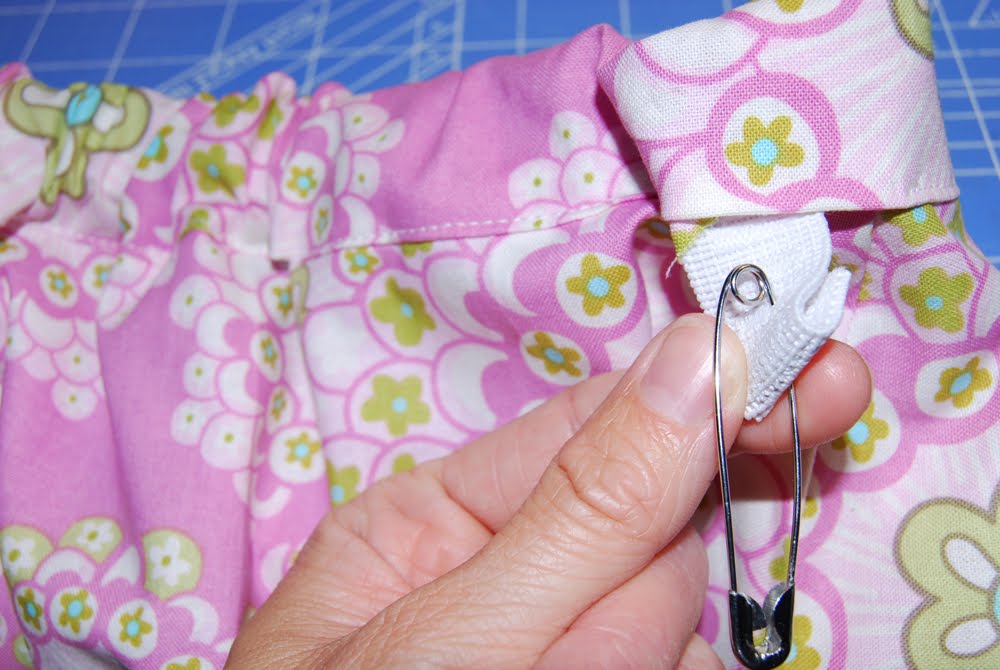
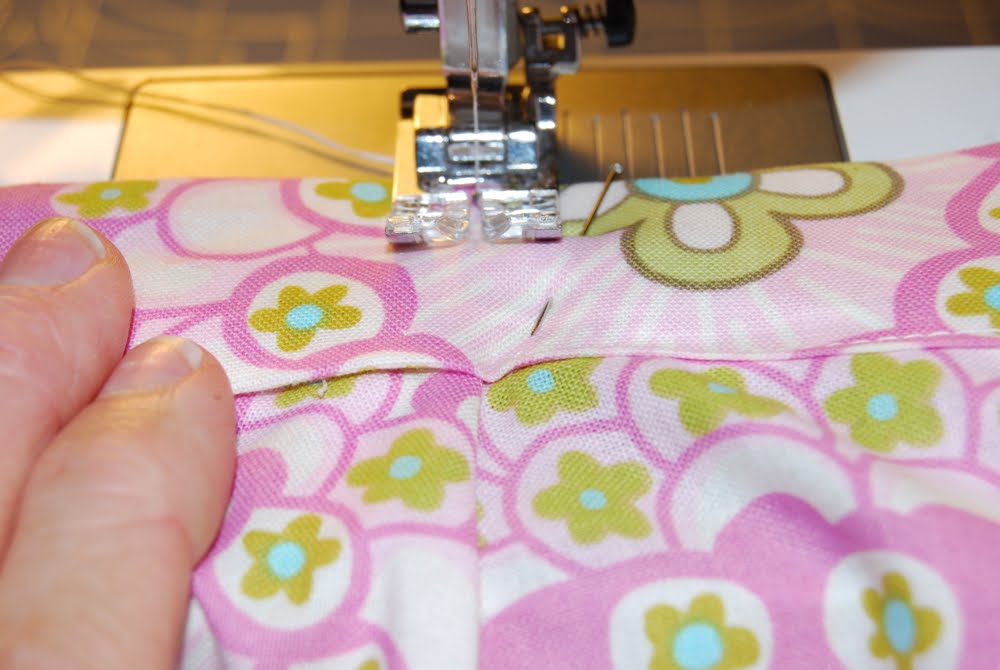
Hook a safety pin through one end of the elastic, and lay the other end over the bottom half of your folded waistband.  Pin in place.  Then, using a 1/2 inch seam allowance, sew the ends of the waistband and the elastic together.  You may want to go back and forth over the elastic to make sure it is good and in there.

Now you will have a circular waistband piece will some elastic dangling out.  Line up the seam in the waistband with one of the side seams of the skirt and fold the waistband over, sandwiching the skirt top.  Make sure the elastic is enclosed between the outer waistband and the outside of the back of the skirt.
Pin like crazy and use your same happy stitch setting to topstitch as close to the edge of the waistband as possible.  You will need to leave an opening on the skirt side seam so you can pull the elastic out.  This will be on the opposite side of the waistband seam.  It is ok to sew the elastic into the waistband casing because you still have your friendly little safety pin to guide it out.
Once you have sewn all the way around except for the small opening, find the safety pin and start pushing it through to the opposite side of the back of the skirt.  Pull it out and carefully unpin the safety pin without losing the elastic.  You will need to push the elastic back into the casing, making sure there is at least half an inch overlapping the side seam of the skirt.  If you value your time, don’t lose your elastic, or you’ll become intimate buddies with my other friend, the seam ripper.  Once the elastic is in place, use a straight pin to make sure it stays put.
Now, topstitch vertically down the waistband, catching the elastic inside, until you reach the side seam of the skirt.  Again, you may want to go over this seam a few times to make sure the elastic is secure.  Then close the small opening you left in the waistband.
Now, if you’ve decided to use the bias tape to hem, just attach the tape like you did to the pockets and sew around, finishing the same way you would when doing quilt binding (sewing right sides together on a diagonal).  I won’t reinvent the wheel, but if necessary, you can find a fabulous tutorial for this on Heather Bailey’s website (under “tutorials” – “bind a quilt”).  Otherwise, just hem the skirt as usual, and you are done!
Congrats on finishing the skirt and making it all the way through my very confusing amateur tutorial!

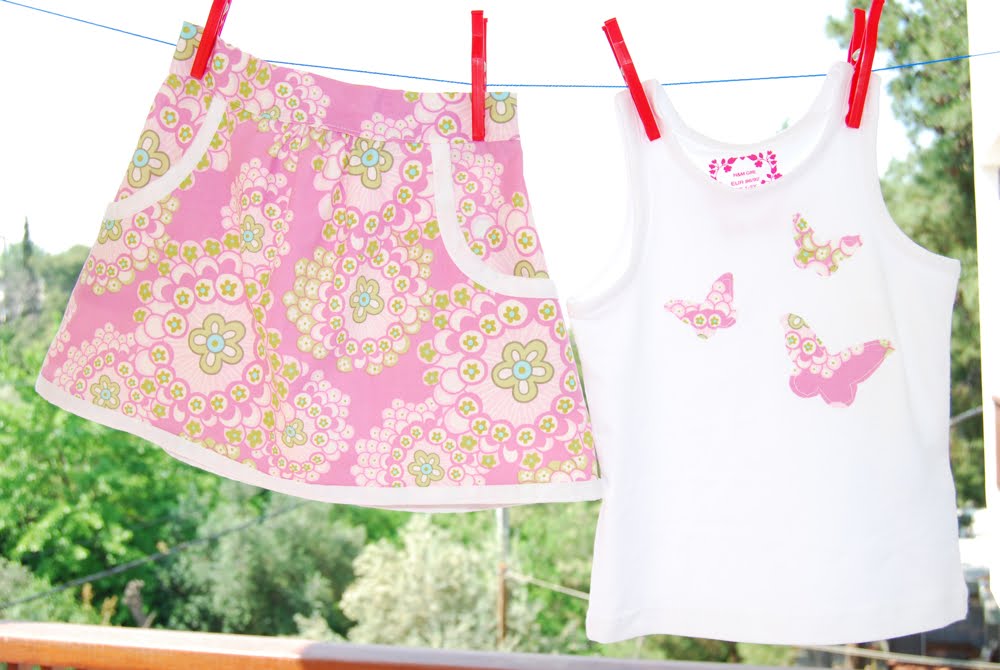
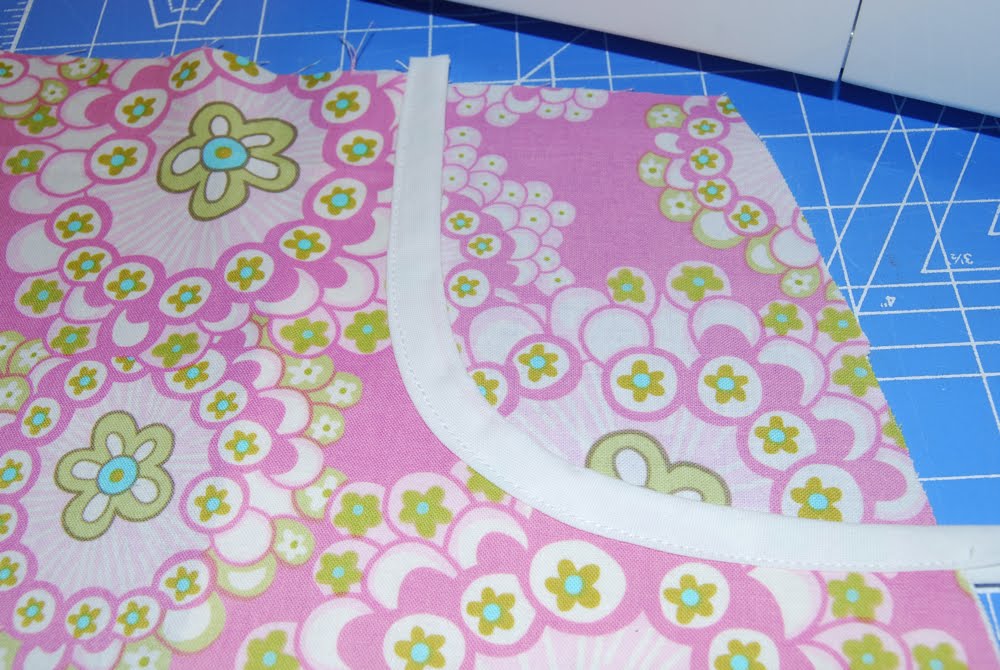
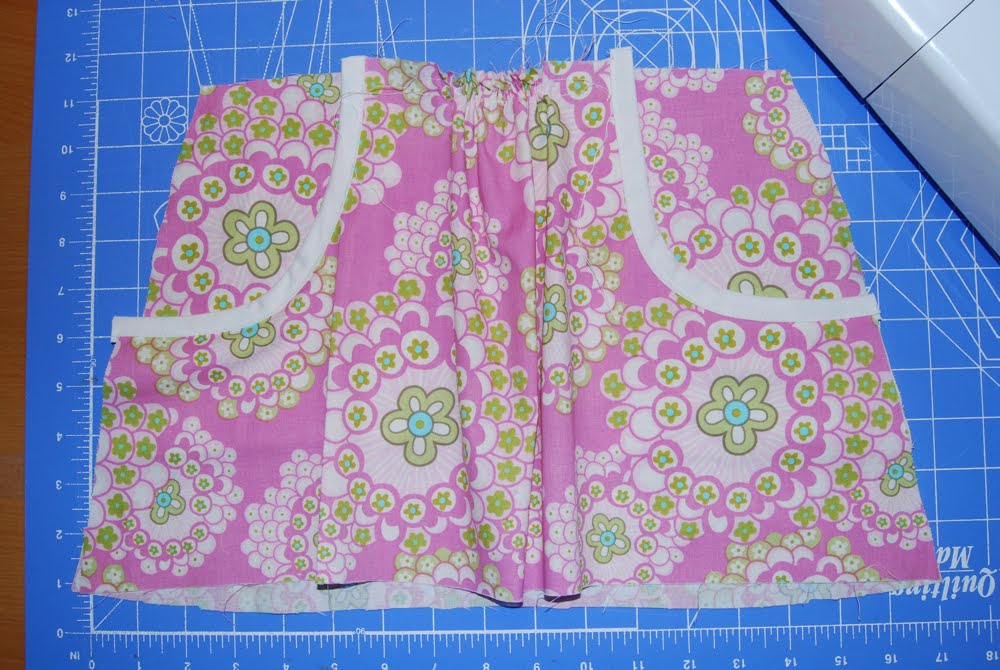
I used Amy Butler quilting cotton for this set, but I think this skirt would be even better with a lighter fabric like lawn or voile (just add a lining and skip the bias trim on the hem).  Or, make it winter-friendly by using corduroy, denim, or velveteen.  Use your imagination!  Have fun!  When you’re done, add pics of your finished product to our flickr site!

Adrianna

Related

Filed Under: skirt, tutorial Tagged With: clothing, skirt, tutorial

« Slipcover Clutch: A Tutorial
Dear readers, »

Comments

  1. Erin says

    November 8, 2009 at 10:08 pm

    i love this skirt! thanks for the tutorial. i can’t wait to make one for my little girl.

    Reply
  2. Lila Jo says

    November 8, 2009 at 10:20 pm

    Ooh – I will add this one on my list! Love how it turned out! Thanks for the tutorial.

    Reply
  3. Disney says

    November 9, 2009 at 12:33 am

    I can’t get over how cute that skirt is! I love the fabric!

    Reply
  4. the mama monster says

    November 9, 2009 at 12:38 am

    i love this skirt! to bad i have three little boys…maybe a mom version is in order!

    Reply
  5. Lila Jo says

    November 9, 2009 at 5:00 am

    It didn’t stay on my list very long… I have one completed!
    http://sewhappytocraft.blogspot.com/2009/11/new-skirt.html

    Reply
  6. star.originals.upcycling says

    November 9, 2009 at 10:17 am

    new to the crafting blogging world also… love your site – i love to craft when the babes are sleeping – and sometimes it spills over into the awake time and i get cranky –lol
    LOVE this skirt – i have stayed away from pockets because they scared me – seemed simple enough, but never worked out, I will try again – thanks for the inspiration!

    Reply
    • Agustov@Rumah Dijual Jakarta says

      May 4, 2012 at 1:17 am

      I agree with a lot of what you’re saying here but it could do with more detail. They stayed away in droves.

      Reply
  7. casserole says

    November 9, 2009 at 11:13 am

    This is so stinkin’ cute!!

    I posted a link to your skirt tutorial on Craft Gossip Sewing:
    http://grosgrainfabulous.blogspot.com/2009/11/milkmaid-skirt-tutorial.html

    –Anne

    Reply
  8. jenny says

    November 9, 2009 at 11:15 am

    Love this tutorial! Thanks, from one crafty mom to another!

    http://sidac.blogspot.com

    Reply
  9. ~linds says

    November 9, 2009 at 11:16 am

    My sister and I just started a crafting blog as well. I love yours. Thanks for this tutorial, it was great–even better, you made me laugh! And that, on an early Monday morning is priceless.

    Reply
  10. Melinda H. says

    November 9, 2009 at 11:34 am

    I found your site through CraftGossip and I love it!! There are so many tutes! :) Good luck with the blog ladies!

    Reply
  11. Vintage70dyo says

    November 9, 2009 at 12:38 pm

    Hi girls, your tutorial looks great, I will keep on following you.
    Thanks
    Anna

    Reply
  12. Jennifer Caudle says

    November 9, 2009 at 5:24 pm

    I love it! Thanks for posting. I found your site from Grosgrain and Ruffles and Stuff. I’m a mom of 3 kids, 2 girls and a boy (4 1/2, 3, 17 mos). I love your blog name and I can totally relate to it. Thanks for inspiring the creativity in all of us!

    Reply
  13. gret says

    November 9, 2009 at 10:24 pm

    What a gorgeous little skirt! I will try this one, thanks! And I do appreciate a tutorial that factors in some toddler taming!

    Reply
  14. Zura says

    November 10, 2009 at 11:34 pm

    Wow! Absolutely fabulous skirt! I love your tutorial here, thanks so much for sharing! :)

    Reply
  15. meisjesmama says

    November 11, 2009 at 11:11 am

    Loved it immediatly! Made one immediatly last night! My daughter is very happy with her new skirt. I skipped the gathering and made some pleats on the front. I posted some pictures on flickr.

    http://meisjesmama.blogspot.com/2009/11/milkmaid-skirt.html

    Reply
  16. Vintage70dyo says

    November 13, 2009 at 1:49 pm

    love your site. May I use the picture of the skirt tutorialed to show an example of how to do a bias binding? I am reviewing sewing machine feet. I will add a not identifying the source that means you and your site.
    Thanks
    Anna

    Reply
  17. Meridith says

    November 22, 2009 at 1:26 am

    What a darling skirt! I found your blog through Ruffles and Stuff…so glad she pointed you out. I made 2 of these skirts this evening for my daughters. They were so easy and I did not have to use my seam ripper once…must mean your directions were perfect!!! Thanks so much!

    Reply
  18. Shepherdsfold says

    February 5, 2010 at 10:53 pm

    Well we made our patterns and have finished 3 skirts today. I will be posting them on my blog, Shepherdsfold tomorrow as the girls are to tired to do photos tonight. I have a serger which made it come together so quickly. This was so simple and so cute, thank you does not seem adequat. I am very grateful to all my Sister in the Lord who sacrifice there time to share with all of us.
    Totally Blessed, Christie
    Wife to David, Mother of 11

    Reply
  19. kamielandodille@hotmail.com says

    March 2, 2010 at 3:10 pm

    Thanks for the tutorial. I’ll try it in a few days!

    Reply
  20. Rae says

    April 21, 2010 at 10:38 pm

    oh my goodness I just learned something. what a great tip about sewing w/ the needle all the way to the side for bias trim.
    *life is changed, probably forever*

    Reply
  21. Anonymous says

    April 23, 2010 at 10:58 am

    Great tutorial! Can these instructions be used for a mom size skirt too?

    Reply
  22. Cotton Kiwi says

    May 3, 2010 at 9:54 pm

    This is exactly the pattern I have been looking for everywhere so thank you so much for your tutorial!! We’re heading into winter in the Southern Hemisphere so I am going to make it in denim or courdoroy. I’ll let you know when I do it. Thanks again.

    Reply
  23. Sabra says

    May 10, 2010 at 11:34 pm

    little girl, shmittle shmirl! I want one for me! And yay for me having all boys so I don’t have to feel guilty about that.

    Reply
  24. sweet*things says

    September 1, 2010 at 1:50 pm

    I just need to attach the waistband and I will be finished with a skirt for my 10yo! This skirt is cool enough for a 5th grader to want to wear. :)

    Now that I’ve got the pattern drafted, my mind is busy thinking up new fabric combinations. Thanks for the great project!

    Reply
  25. Nikell says

    November 24, 2010 at 10:53 pm

    I think this is the cutest outfit ever. If I had a little girl, I would make this for her.

    Reply
  26. Sara says

    September 8, 2011 at 12:55 pm

    Is there anything you’d do differently for an adult skirt? I bought some material yesterday for myself (Walmart clearance!), and I think this skirt would be GREAT for it! I just wanted to check with you before I start cutting….

    Reply
  27. crafterhours says

    September 9, 2011 at 11:48 pm

    Hi Sara, I hope you see this, I couldn’t find another way to respond. If I personally were making an adult version, I think I’d make sure to use a fabric with a really good drape (ie: no quilting cottons or anything stiff like that). If you fabric is not very drape-y, maybe cut the side seams so the skirt is more straight than a-line so it doesn’t stick out weird. Also, I’d probably skip the bias tape around the pockets and hem, as that makes it look a bit childish, in my opinion. But that’s just me. If you’re comfortable with it, I’d probably make a zipper closure on the side or back instead of elastic too. I’ve had about 4 other people send me pics of their adult versions, and they were all great, so you should have luck. My favorite was the one made with a soft linen/cotton blend. It really hung nicely and looked store-bought. Just my 2 cents!

    Reply
  28. Adrienne Doherty says

    January 22, 2012 at 10:47 pm

    I have wanted to make this skirt since I first saw the tutorial right around when my daughter was born (I really hoped she’d want to collect rocks in her pockets). I finally did it today and I just love it. Thank you so much!

    Reply
  29. Just Trish says

    April 15, 2012 at 9:43 pm

    Thank you for your directions. i actually made this skirt in a mom size and it is perfect. i did my bottom width of the skirt +4 inches from the top width on the front and the back pattern piece. I am using a 1 1/4″ elastic and this skirt fits perfect.

    Reply
  30. Crafty Beth says

    August 11, 2012 at 4:49 pm

    How did I not know about moving my sewing machine needle over for sewing edges? Thank you so much for that tip! I just made the grown-up version of this skirt but I used the bias trim method from the little girls one, and I linked to you here:

    http://www.bethbeingcrafty.blogspot.com/2012/08/mom-skirts.html

    Reply
  31. mommy22001 says

    September 30, 2012 at 4:33 pm

    Do I add the 2 inches to the front or the back?

    Reply
    • MrsT says

      August 19, 2016 at 11:35 pm

      the tute said to the back but after I cut both pieces out and read on down step by step the additional 2″ should have been added to the FRONT where she put the gathers… I didn’t put 2 & 2 together till I … Put it together ? my back pattern is 4″ too wide and my front doesn’t have enough material to gather and still fit, thankfully I have a little more material though.

      Reply
  32. Crafty Beth says

    November 14, 2012 at 6:28 pm

    I just finished my little version! Hopefully I can get the girl to wear it for Thanksgiving.
    http://bethbeingcrafty.blogspot.com/2012/11/holiday-outfits-part-1-milkmaid-skirt.html

    Reply
  33. Melissa Ann says

    January 21, 2013 at 4:32 pm

    Would you give me a rough estimate on how much yardage this might use? My girls are 3 years and I’d want a shorter skirt. I’m trying to cheaply design a spring collection for my twins… need to order the correct amount ;-)

    Reply
  34. Tasronyola says

    March 31, 2013 at 7:04 pm

    Thankyou for the clear (and amusing) skirt tutorial – have made one for my 3 yo daughter this Easter :). Don’t know how to post links to photos but I made it in dark denim with printed lilac cord binding on pockets and hem and cord waistband too and it looks great (it’s autumn over here in Australia). I like your half elastic method – it worked well. Thanks very much :)!

    Reply
  35. becky says

    July 26, 2013 at 11:33 am

    You have been featured on a +30 little girls skirt round up- thanks for your great tutorial! http://www.patchworkposse.com/2013/07/30-elastic-waist-skirt-tutorials-little-girl-summer-skirts/

    Reply
  36. R says

    January 8, 2014 at 7:47 pm

    This looks good, thank you. May well try it for my 6 year old.

    Reply
  37. Sabine says

    May 13, 2014 at 4:32 pm

    The skirt looks great and i love the blue fabric from the first Picture. Could you tell me the name of this fabric? Thanks very much!

    Reply
    • Susan says

      May 14, 2014 at 11:00 am

      It’s Erin McMorris’ Park Slope!
      http://www.freespiritfabric.com/core-pages/gallery.php?gal_id=144&sw_id=1224

      Reply
  38. Carrie says

    August 28, 2014 at 11:21 pm

    What seam allowance do we use?

    Reply
  39. zillyjas says

    December 6, 2015 at 7:37 am

    Thanks so much for sharing! This has been on my “one day” list for a while now but I finally completed one. It was easy to make with clear instructions. Thanks again.

    Reply
  40. MrsT says

    August 19, 2016 at 11:10 pm

    I was thrown off by the inside outside pocket bit but after I began tracing and cutting out the pattern and scrolling up and down I figured it out (they are both inside the pocket, but one looks like Idaho and is the “front inside” and the other “rectangle” is the back of the pocket inside)?
    I’m in the process of making this for my 5 year old daughter! Be cut it all out now I’m pinning for sewing and we shall see where this new adventure takes us ;) thanks for posting!

    Reply

Leave a Reply Cancel reply

Search This Blog

Archives

Popular posts

  • Side Panel Shirt Refashion: A Tutorial
  • FREE Pattern: Monkey Bar Skirt
  • Racerback Dress: A Tutorial + PDF Pattern
  • T-Shirt to Tank: A Tutorial by Jen from Upcycled Education
  • A Note on Sewing Skirts for Girls
Visit Susan Yates's profile on Pinterest.

Want our posts in your inbox?

Enter your email address to subscribe to crafterhours and receive notifications of new posts by email!

Our Privacy Policy

Copyright © 2023 ·Foodie Child Theme · Genesis Framework by StudioPress · WordPress · Log in


Creative Commons License
This work is licensed under a Creative Commons Attribution-NonCommercial-ShareAlike 3.0 United States License.
»
«