You all know Anna, right? If you do, you know her as soon as we say Anna. If you don’t know her, there are lots of reasons you should. I’ll give you five. Firstly, she’s a doll. Secondly, she has style. Thirdly, her blog, Noodlehead, is full of inspiration. Color, pattern, clean lines, and adorable kids and kid ideas. Fourthly, should you decide to tackle a project via a tutorial, she’s got plenty. Fifth…ly(?).. she also has patterns for the folk who are ready to knuckle down and follow some instructions and pop out with exactly the thing they want. Because they’re the sorts of things that once you see them, you want them, exactly like that. Ready to hear from Anna herself, and specifically about her take on skirts for skirt week? Then you’re in luck. Today is her day. Wait, that’s six reasons… (Thank you, Anna!)
———————
Hey there Crafterhours fans, I’m really excited to be here today! And I’m really pumped that Susan and Adrianna are putting their trust in me to create my first ever clothing tutorial. Eeek! Lookie Mom, can you believe it?! I’ve really been finding great style inspiration with some pretty classic vintage pieces. I’ve fallen in love with danish modern furniture and all the great vintage housewares out there. My yellow skirt was inspired by vintage Cathrineholm enamelware:

Such an amazing design and I thought it would look amazing on a skirt!


And of course this skirt would be just as beautiful with any printed fabric you like as well.
Materials:
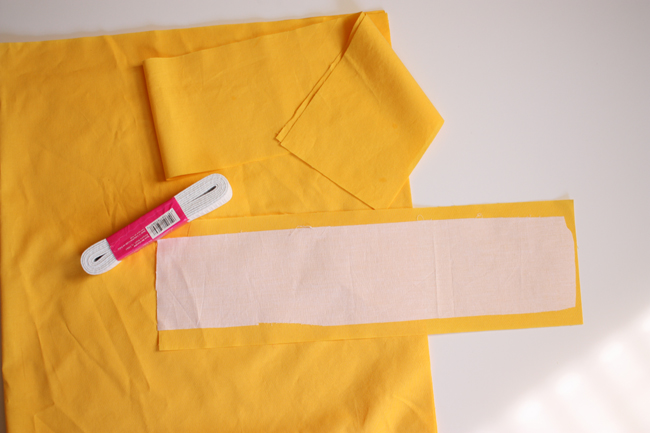
1 1/2 yards main fabric (I used Kona cotton)
1″ or 1/2″ elastic
small piece of fusible interfacing
if side pockets are desired, you’ll need about a fat quarter
thread, etc.
paint and freezer paper for freezer paper stencil
Take your waist measurement:
Measure where on your waist you’d like your skirt to sit. Be sure to measure next to your skin, not over top of clothing. That measurement will be W in our equation. [in brackets are the measurements I used]
Skirt pieces, cut two:
W + 1″ seam allowance by whatever length you’d like. I found 21 inches worked well for me, adjust as necessary depending on your desired skirt length. [33″ wide by 21″ tall]
For the front flat band piece, cut one:
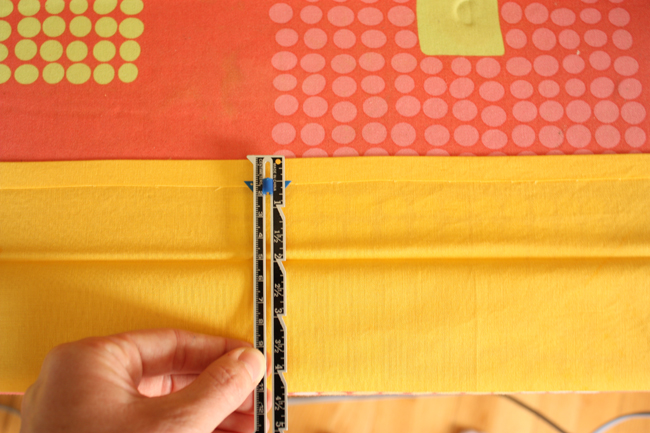
1/2 W + 1″ seam allowance = width of band by 5″ tall [17″ wide by 5″ tall]
Back band piece, cut 1:
Same width as skirt piece by 5″ tall [33″ wide by 5″ tall]
Cut elastic:
one piece of 1″ elastic: 1/2 W minus 2-3″
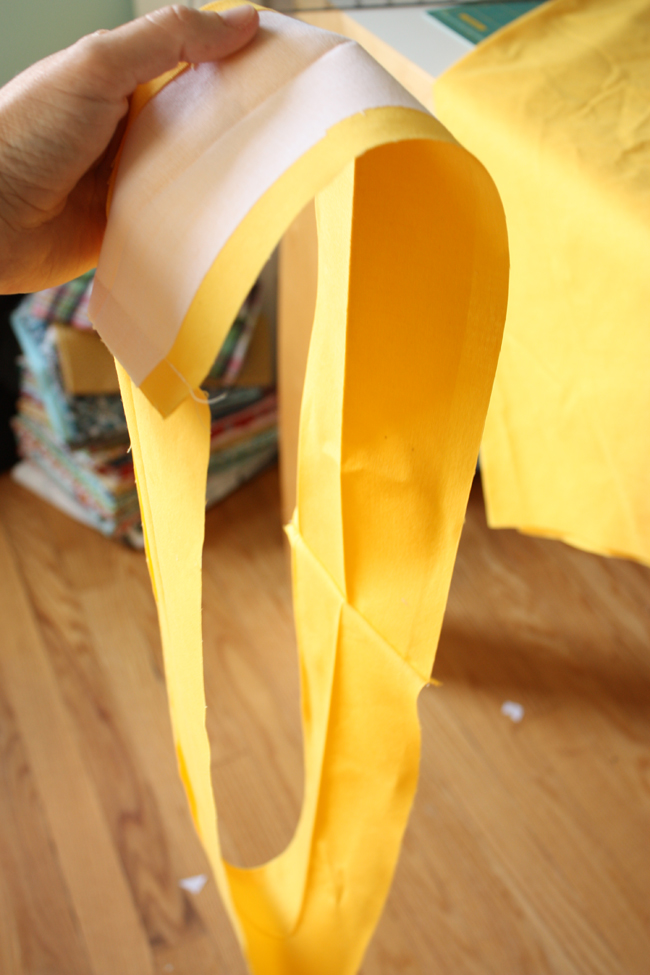
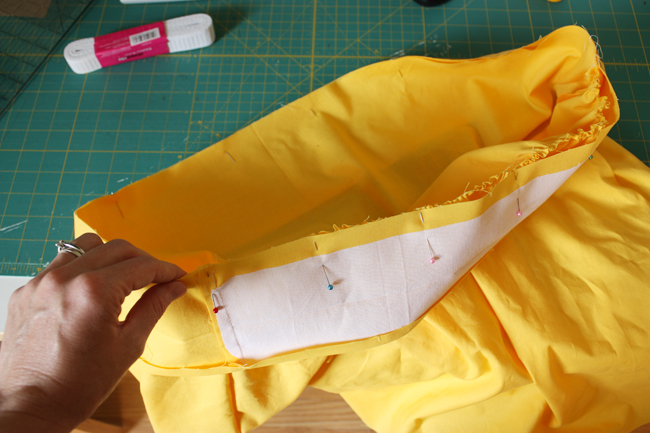
Make waist band:
Fuse interfacing to WRONG side of front band piece.
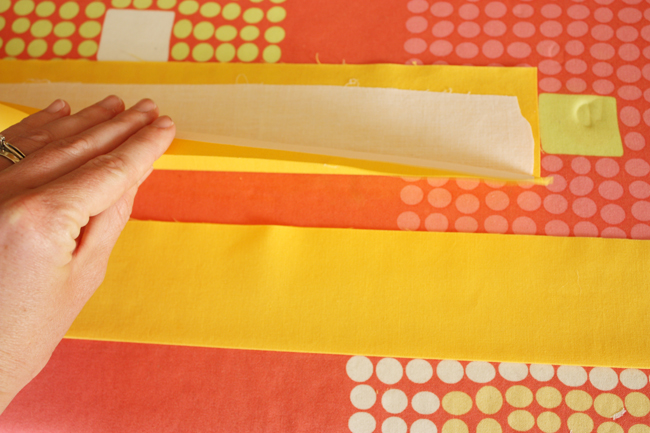
Iron both front and back band pieces in half lengthwise WRONG sides facing.
Unfold and iron one raw edge lengthwise WRONG sides facing by 1/2″. Repeat for remaining piece.
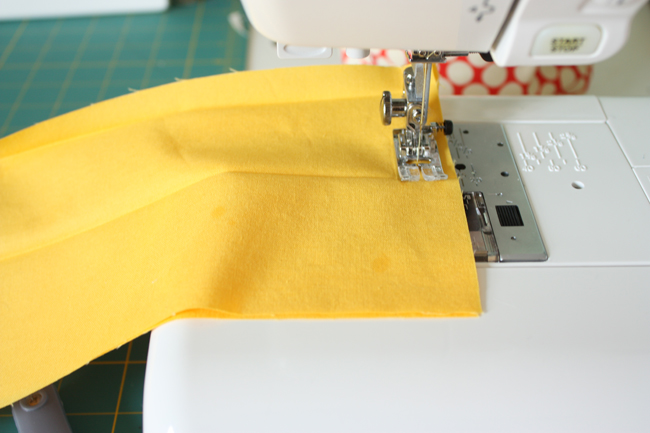
Sew short ends together using a 1/2″ seam allowance, RIGHT sides facing. Press.
After this step you’ll have a loop for the waistband. Set aside.
Sew skirt pieces:
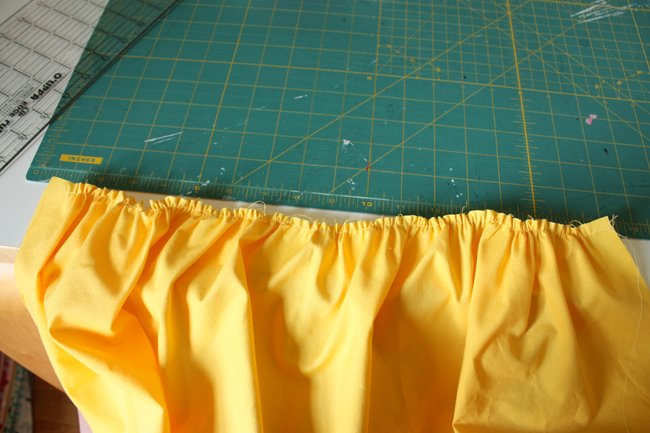
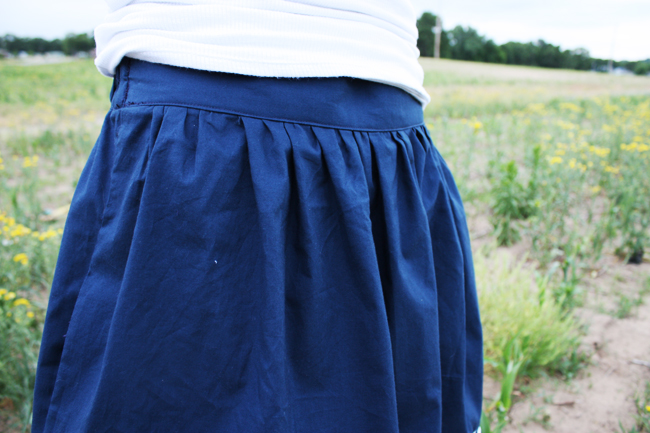
Gather one of the skirt pieces at the top using the longest stitch length on your machine, gather so it is the same length as your front band piece, in my case, 17″. This will be the front of your skirt.
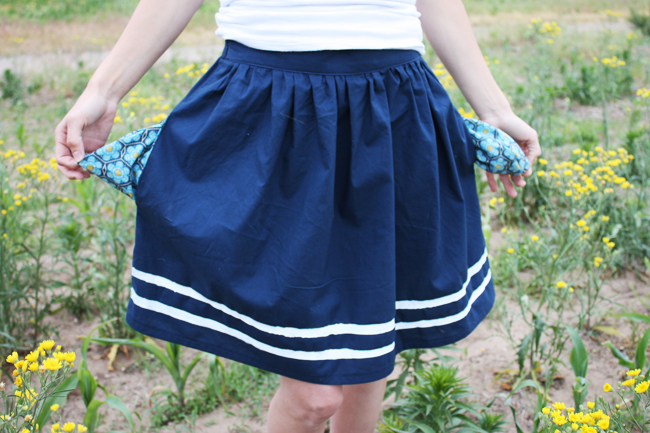
If sewing side pockets, cut 4 pocket pieces, it’s a pretty basic shape. You can quickly make your own by laying your hand down on a piece of paper and tracing around the general shape, giving plenty of wiggle room. About 2-3″ down from the top of the skirt piece pin pocket pieces on either side of both skirt pieces RIGHT sides facing. Sew pocket piece on, aligning raw edges, using a 1/2″ seam allowance.

Press away from skirt piece. Repeat for all pocket pieces.
Sew skirt:
If you’re omitting the side pockets, put skirt pieces RIGHT sides together and sew along each side using a 1/2″ seam allowance.
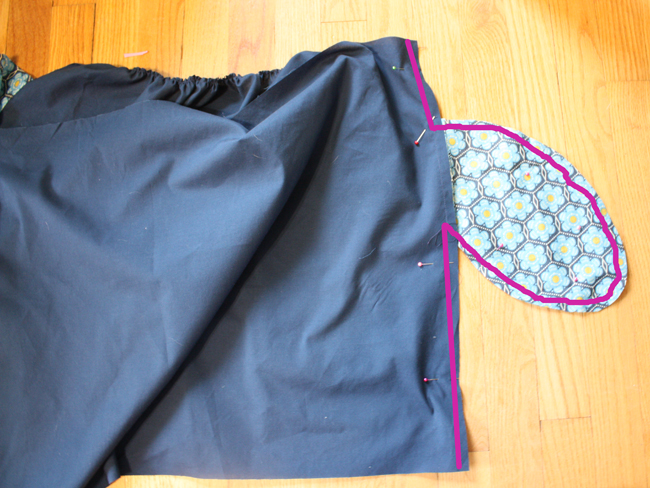
If using side pockets, sew using a 1/2 seam allowance as well, but sewing down the side, pivoting at the pocket, sew all around pocket, pivot and continue by finishing sewing down the remaining part of the skirt. Serge, zig zag or leave side seams raw.
Attaching band:
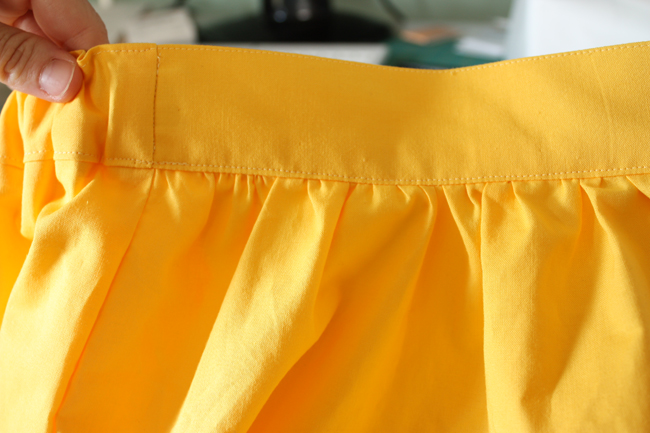
Pin band (which is now a loop) to skirt top RIGHT sides facing aligning raw edges – not the side of that band that you previously ironed under by 1/2″.

Sew together, aligning side seams, using a 5/8″ seam allowance.
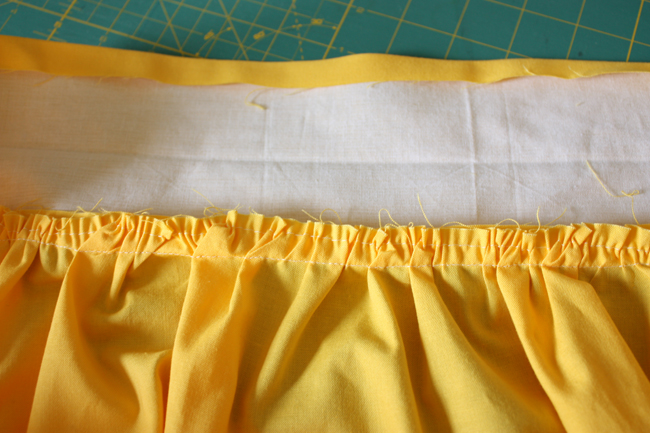
Press seam up towards band.
Sew in elastic:
**See alternate method below…
Otherwise you can continue on and sew it in the way I did.

Pin elastic at side seams so that the elastic runs along the back band piece, raw elastic edges pointing towards front band.

Fold waistband WRONG sides facing over elastic.

Sew down seam, making sure you’re using a thread color that will match your fabric since it will show. I back stitched along this seam several times to make sure the elastic would stay put. Repeat for other side of skirt being sure not to twist the elastic.

Folding remaining band over so that it covers the raw edges of the skirt etc, topstitch along bottom of both front and back bands.
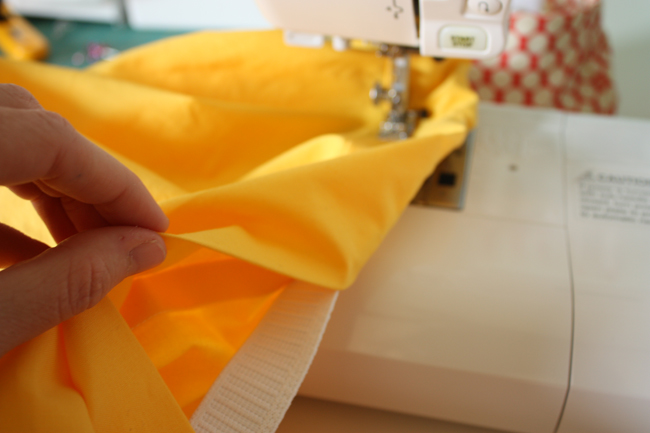
Making sure you tuck the elastic in towards the band as you go. It can be kind of tedious, but take your time and you can slide the band pieces along the elastic as you get to the other side.
*** There are many ways you can sew in the elastic, that way seemed most logical to me. You could alternately: just sew in one side seam with the elastic – making sure to attach a safety pin to the other end, then sew the back casing almost closed, leaving a 2-3″ opening. Reach into the casing, pull the elastic the rest of the way through, pinch it in between the remaining side seam, sew it in like you did the first side, then simply sew the opening you left shut (oh and don’t forget to take off the safety pin).
At this point you could also stitch right along the top folded edge of the band, it helps keep the elastic from twisting around in the waistband casing.
Hem the skirt by ironing over by 1/4 inch and again by 1/2″ and sew.
Try using a freezer paper stencil to make a vintage inspired design. Use your imagination and get creative! I though it would also be really classy to sew ribbon along the hem similar to how I freezer paper stenciled on the blue skirt.
P.S. this tutorial also works for little girls! You just might want to adjust the height of the waistband pieces.
Awesome tutorial! Can’t wait to try it!
I’m a big fan of Noodlehead and everything Anna does. These skirts are amazing and I’m going to have to make one of these ASAP. Thanks for the great tutorial!
Cute cute cute!
Wow! This is great! What is better than a skirt with pockets? A skirt with pretty pockets. I happen to have the perfect piece of fabric and a free afternoon! Thank you for sharing!
yay! thanks for having me you guys!
I can’t wait to make one! Thank you for the wonderful tutorial!!
I love Anna and this skirt is great! Thanks for the fun week, ladies!
What, no zipper??? This is not the Anna I know ;). Awesome skirt, Anna, and easy to follow tutorial as always! Thanks a million!!
Nice! On my list!
you’re so good, im a bit jealous!
xo
cassylately.blogspot.com
This looks like a great skirt. Thanks for the great (as always) tutorial!
Hi Anna! This tutorial comes at a great time because I have a skirt I want to recycle! :) One quick question to confirm: back of the skirt should not be gathered, right?
Thank you!
Ana
I like that waistband with the elastic! I always make it with a zipper in back and no elastic, but this would be so much faster!
Such a sweet skirt, I love that you were inspired by vintage enamelware of all things, Anna!
Cheers!
Hi, it’s me again with another question. Should the elastic be cut to the W size or 1/2? Please don’t hate me!! I know I’m a pain… :-P
Thank you!
Love the inspiration, and fab tutorial
Fantastic – a skirt that will suit my growing/disappearing waist over the coming months! Just one thing though – shouldn’t the waistband pieces be right sides together when you sew the short ends together?
Love this skirt! i’m your newest follower (2301) and found you on Craft Gossip! Love your blog!
Katie from Sew Woodsy
Hi! Thanks for this tutorial. I am having some problems with the back of my skirt, however. The back is MUCH to large, so the skirt is too big, as well as REALLY “bunchy” in the back from the elastic. Any help? Thanks!
I am adapting the tutorial for my 3 year old and I am having trouble getting the right size. When it comes to making the skirt pieces should you take 1/2 the W + 1 to get the appropriate skirt size? I am also having trouble sewing the back of the waist band with the elastic, do you have any tricks? Thanks!!
Do you have the measurements right for the elastic? I made this for my daughter following W – 2-3″ and it was way to big. I had to unpick and shorten the elastic a ton on one end. The skirt is very cute though.
I love Anna’s stuff – big fan of her fun blog! ;) This skirt looks great – so flattering and fun.
sorry folks for a couple of my mistakes (too much late night blogging I guess).
Here’s a couple of the answers – and boy you guys caught almost all of my mistakes – you’re good! :)
Yes, the skirt back is not gathered (after you insert the elastic it gathers itself)
Cut the elastic to half of the waist measurement minus 2-3″ (sorry about that typo!)
And correct, RIGHT sides facing on the waistband piece (sorry).
And there’s a couple ways of sewing the elastic in. The way I did it seemed most logical in my head. You’ll just have to pull elastic through the back casing as you sew, just let the fabric slide through to finish sewing the casing down. You could alternately just sew in one side seam with the elastic – making sure to attach a safety pin to the other end, then sew the back casing almost closed, leaving a 2-3″ opening. Pull the elastic the rest of the way through, pinch it in between the remaining side seam, sew it in like you did the first side, then simply sew the opening you left shut (oh and don’t forget to take off the safety pin).
if you have further questions or if this part doesn’t make sense email me at graham.anna@gmail.com
Thanks!
The post was just updated to reflect the couple of changes Anna noted. Thanks again, Anna, for a beautiful skirt tutorial!
I love your inspiration! Very cute skirt!
Awesome, I love the pockets! I think I might take this and turn it into a skort with pockets for my four year old. (we love skorts around here.)
Thanks for a great tutorial. I love this skirt. I sewed one this weekend without major problems. (I figured out the waist elastic length issue prior to seeing the update.) One thing is there’s no pix of the back of the skirt, and I don’t like how the gathers look from behind. To solve this, I sewed a 2″ wide tie belt, added 3 belt loops, and tie it in the front. Perfect! Now I’m hunting through my stash to make a summer skirt wardrobe! Thanks again.
I used your great tutorial, gathering both the front and back. I changed the waistband up a bit and put elastic in the entire waistband. My eyelet skirt looks fantastic thanks to you.
i did it! hahaha it took me a few hours but hey, no big deal :) check it out at my blog
http://colacolaisland.blogspot.com/2011/07/gathered-together.html
i hope you enjoy! have a great day everyone!
best,
nicole m.
Can’t wait to try this! I’m a newbie to sewing and everything takes three times as long as it should. I believe this skirt will be my next project. Thanks for the tutorial!
This is a great tutorial, I have a question if you don’t mind. On the front and back panel should they both be the measurement of your waist? That doesn’t sound right, what I mean is if your waist measures 36 inches should each panel be 36 inches wide?
I tried this on Sunday. I thought the instructions and pictures were great. Tutorial was fine to follow along with. But I did not like the end product. Way too bunched up…I should have trusted my gut and used less fabric though I followed the instructions. It was not flattering at all once on.
thank you so much :)
I made the skirt using 3/4W for the skirt pieces so it wouldn’t be too ruffled and bunched on the back, looks great. the waistband pieces have to be adjusted to that measurement as well of course (-; great tutorial!