crafterhours

sleeping babes. crafting moms.

  • Tutorials
  • Patterns
  • Shop
  • Contact
  • Follow

Military Hat: A Tutorial (Part 1)

January 17, 2011 By crafterhours 18 Comments

Last week I mentioned that my daughter needed a bunch of things for her new preschool.  Well, one of the required items was a hat.  This country has weird rules.  But as we’re often yelled at by other moms at the playground for not wearing hats, it wasn’t totally unexpected.  I’d never made a real hat before, so I decided to give it a go.  After a few hours, 1 hat, and many lessons learned, I decided to make her a second hat.  This is a tutorial for my 2nd version :)

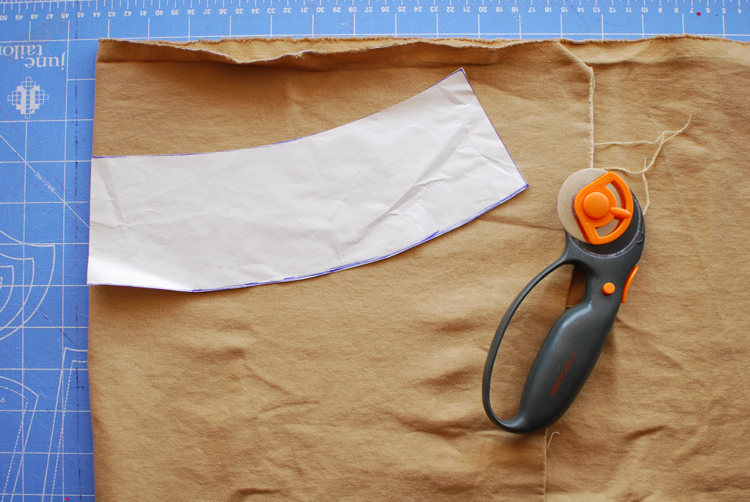
Now, you could make a super simple hat by cutting a rectangle, sewing it into a tube, and slapping a circle on top, but that would give you a shape that looks like the mayor from Monopoly.  To make a nicely fitted cap, it’s necessary to cut an angled strip, more like a quarter circle, and to use an oval for the top.  (unless you’re a fictional Parker Brothers character.)

But to construct this nicely fitted cap, we unfortunately have to do some boring math-related pattern making first.  So I’m breaking this tutorial up into 3 parts.  I promise the next 2 are more exciting.
First, let’s make the hat band (that’s the part that wraps around your head).  I’m going to be inputing my daughter’s measurements so this doesn’t turn into a big algebraic mess of x’s and y’s.  But feel free to make a hat that fits your own kid’s head.
Measure head circumference around the middle of the forehead.  For Z, that was 20″.
Add .5″ to 1″ of ease, depending on how long you want them to be able to grow into it.  For an adult hat, .5″ is fine, unless you plan on getting really smart in the near future.
Add 1″ seam allowance.
Total so far = 21.5″
Divide your total by 2 = 10.75″
This will be your “A” measurement.  Go write it down, I’ll wait.
Now we’re going to find our “B” measurement, which will be the rise of the hat.  The rise is the height of your hat band.  Now, here’s a little advice about rise that I learned the really hard way:  it doesn’t change much.  My 4 yr old ended up having the same rise as my adult hat.  Maybe take a little bit off if you’re making a hat for Barbie or a newborn, or add a bit for a grown man, but otherwise, don’t mess with it.  Apparently as we grow our heads get larger in circumference, but not taller.
The magic number I came up with for rise is 3.25″.
Add 1″ for seam allowances.
This will be your “B” measurement (4.25″).  Yep, write it down.
Now we’ll plot the pattern.
Well, after one more math problem.  Take your “A” measurement and multiply it by .85.  For me, that is 9.15″.
Now find a piece of wide paper, your bendy ruler (or a string and straight ruler), and a pencil.
First draw a vertical line that equals your “B” measurement.  From the top of that line, draw a curved line that equals your Ax.85 measurement (9.15″).  This is the tricky part, because I don’t have a definite angle to tell you for the curve.  It’s a fairly gentle curve.  Here’s a picture of my final pattern so you can get an idea:

Now use a ruler to plot the lower curve by marking points that are “B measurement” below your upper curved line.  Make lots of marks and then connect them with another curved line.  Make sure this line equals your “A” measurement.  Cap off the end of your curve with another line, making sure it equals “B”.  Also, make sure all four corners are right angles.  Another picture to make sense of all that mumbo jumbo:

Now it’s time to make the top of the hat.

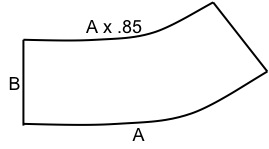
First, find the circumference of the top of your hat.  To do that, multiply your Ax.85 measurement (9.15) by 2.  For me, that’s 18.3.  Now subtract the 1″ that was added for seam allowances (because you’ll be sewing the top of the hat to the band after the band is sewn into a circle, you with me?  No?  Well, do it anyway.)  Now you’ll have your circumference measurement (for me, 17.3)

Use that measurement to find your diameter (D = C/? , and ? ? 3.1415, just fyi)
My diameter is 5.5.
You could use that measurement to draw a circle, but since we want a slight oval, you’ll need to alter it a bit. I simply added .5″ to the height and subtracted it from the width.  So my final oval shape had a height of 6″ and a width of 5″.

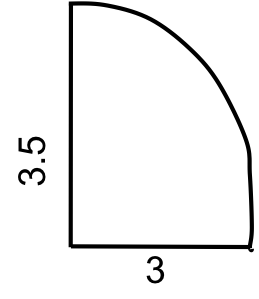
Take your oval height and width measurements and add an inch to both for seam allowances (7″ x 6″)

Now divide each of those measurements by 2 (3.5″ x 3″)

Now get your paper, ruler, and pencil again.  Draw a vertical line equal to your higher number from above (3.5″ for me) and, making an “L” shape, draw a second line equal to your lower number (3″)

Now connect the ends of the two lines using a curve to form a quarter oval.  A visual using my measurements:

Whew!  You’re done with the boring and tedious part.  Now set aside your new pattern pieces and go take a nap and meet me back here tomorrow for Part 2!

Part 2
Part 3

Related

Filed Under: tutorial Tagged With: accessory, hat, tutorial

« Goodies in my mailbox!
Military Hat: A Tutorial (Part 2) »

Comments

  1. Corinnea says

    January 17, 2011 at 8:28 am

    Cute hat! You made me remember why I hate math. So necessary, so vile. Looking forward to the rest.

    Reply
  2. Fabric Deals Club says

    January 17, 2011 at 9:01 am

    I’ve been looking for a tutorial on these. THANKS! Nice job!

    Reply
  3. Jamie says

    January 17, 2011 at 10:04 am

    Nice tutorial! I can’t wait for the next two parts! I can do this!! (Even with all of that math!) My head is a bit bigger than the average hat. It will be nice to make a stylish hat that will fit my big noggin!

    Reply
  4. Cold Oatmeal and Purple Cows says

    January 17, 2011 at 10:38 am

    What a cute hat! Just what we needed!

    Reply
  5. lorchick @ ON{thelaundry}LINE says

    January 17, 2011 at 1:36 pm

    my eyes glazed over when you said ‘math.’ Can I just come steal your hat instead? That’d be super.
    Would I be hateful if I made the husband do the math for me? I am perfectly capable. I am perfectly lazy as well. with MATH.

    Reply
  6. Beverly @ FlamingoToes.com says

    January 17, 2011 at 3:17 pm

    Super cute hat!! I love it and so does my daughter. Thanks for the instructions – though I’m with the others and hate this part. ;)
    I can’t wait to see the rest!

    Reply
  7. Little Treasures says

    January 17, 2011 at 4:51 pm

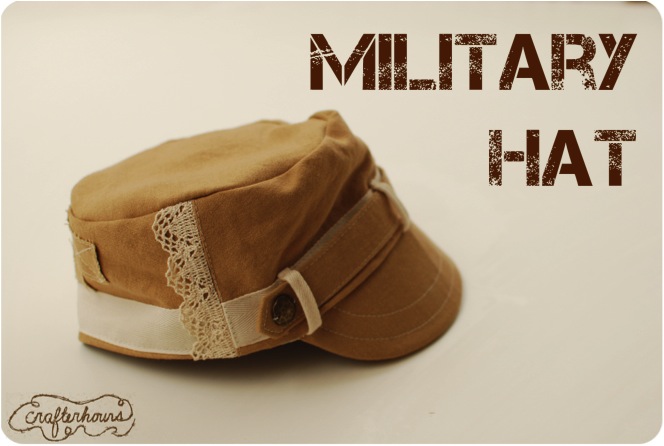
    A military hat with a romantic twist!
    Thanks for sharing!

    Reply
  8. mrsc1345 says

    January 17, 2011 at 4:58 pm

    So Cute! But I am dying to know, what is the deal with hats? Do people actually yell at you at the playground? I must know more!

    Reply
  9. Kelly's Korner says

    January 17, 2011 at 5:22 pm

    The hat is darling!

    Reply
  10. viento says

    January 17, 2011 at 7:03 pm

    that is a wonderful spin on a military hat! I love it! I have never heard of such an odd rule (hats on the playground), what is the deal?

    Reply
  11. taidyeoriginal says

    January 17, 2011 at 7:12 pm

    I cannot wait to see part 2 tomorrow. This is simply adorable! tai @ taidye original

    taimbender@gmail.com

    Reply
  12. Anna says

    January 17, 2011 at 10:30 pm

    what a super cute hat!!! love all the details, so fun! and hats, that’s a strange rule. oh well, right?! :)

    Reply
  13. Jo says

    January 18, 2011 at 5:15 pm

    Great hat! Here in Australia, hat wearing is compulsory at school as well because the sun can burn in an instant. Your daughter’s lucky she doesn’t have to wear a broad-brim hat!

    Reply
  14. Ginger says

    January 20, 2011 at 12:01 pm

    Can’t wait to try your wonderful tutorial.
    Thank you for sharing it with all of us!

    Reply
  15. Miss Sews-it-all says

    January 31, 2011 at 3:34 pm

    Hey there crafterhours! We think your crafty Military Hat project is great, and we want to share it with other sewers and quilters by featuring a link on http://www.WeAllSew.com! We’ll be featuring a link to your project all next week. Please let me know if you have any questions about being featured at WeAllSew.com. Thanks so much-Erika

    Reply
  16. PeaceLoveApplesauce says

    February 15, 2011 at 10:38 pm

    This is so cute!!

    Reply
  17. Upsicle Girl! says

    March 19, 2011 at 5:44 am

    This was such a great tutorial. I have made one which I have displayed on my blog (upsicle@blogspot.com). I’m only just starting out, and have given you credit with a link to this tutorial… I hope you do not mind. xXxXx

    Reply
  18. MetalMommy says

    August 13, 2013 at 2:29 pm

    Now I haven’t tried making the hat just yet so I haven’t tried out my theory. I think to find the curve of the side it would be “better” (more accurate) to cut out the pattern for the TOP of the hat and go with the curve running from the height of the oval (in your case 7″) then you can plot the lower curve the way you did! Like I said it’s a theory but I’m going to attempt it in the next day or so. I can let you know what happens! Wish me luck!

    Reply

Leave a Reply Cancel reply

Search This Blog

Archives

Popular posts

  • Side Panel Shirt Refashion: A Tutorial
  • FREE Pattern: Monkey Bar Skirt
  • Racerback Dress: A Tutorial + PDF Pattern
  • T-Shirt to Tank: A Tutorial by Jen from Upcycled Education
  • A Note on Sewing Skirts for Girls
Visit Susan Yates's profile on Pinterest.

Want our posts in your inbox?

Enter your email address to subscribe to crafterhours and receive notifications of new posts by email!

Our Privacy Policy

Copyright © 2023 ·Foodie Child Theme · Genesis Framework by StudioPress · WordPress · Log in


Creative Commons License
This work is licensed under a Creative Commons Attribution-NonCommercial-ShareAlike 3.0 United States License.
»
«