My very first ever tutorial for this here blog was the Milkmaid Skirt.
2 years later, it remained our number 1 most visited post. It’s been pushed down in the ranks a little since then due to some other tutorials that have gone viral on pinterest, but it still remains a favorite.
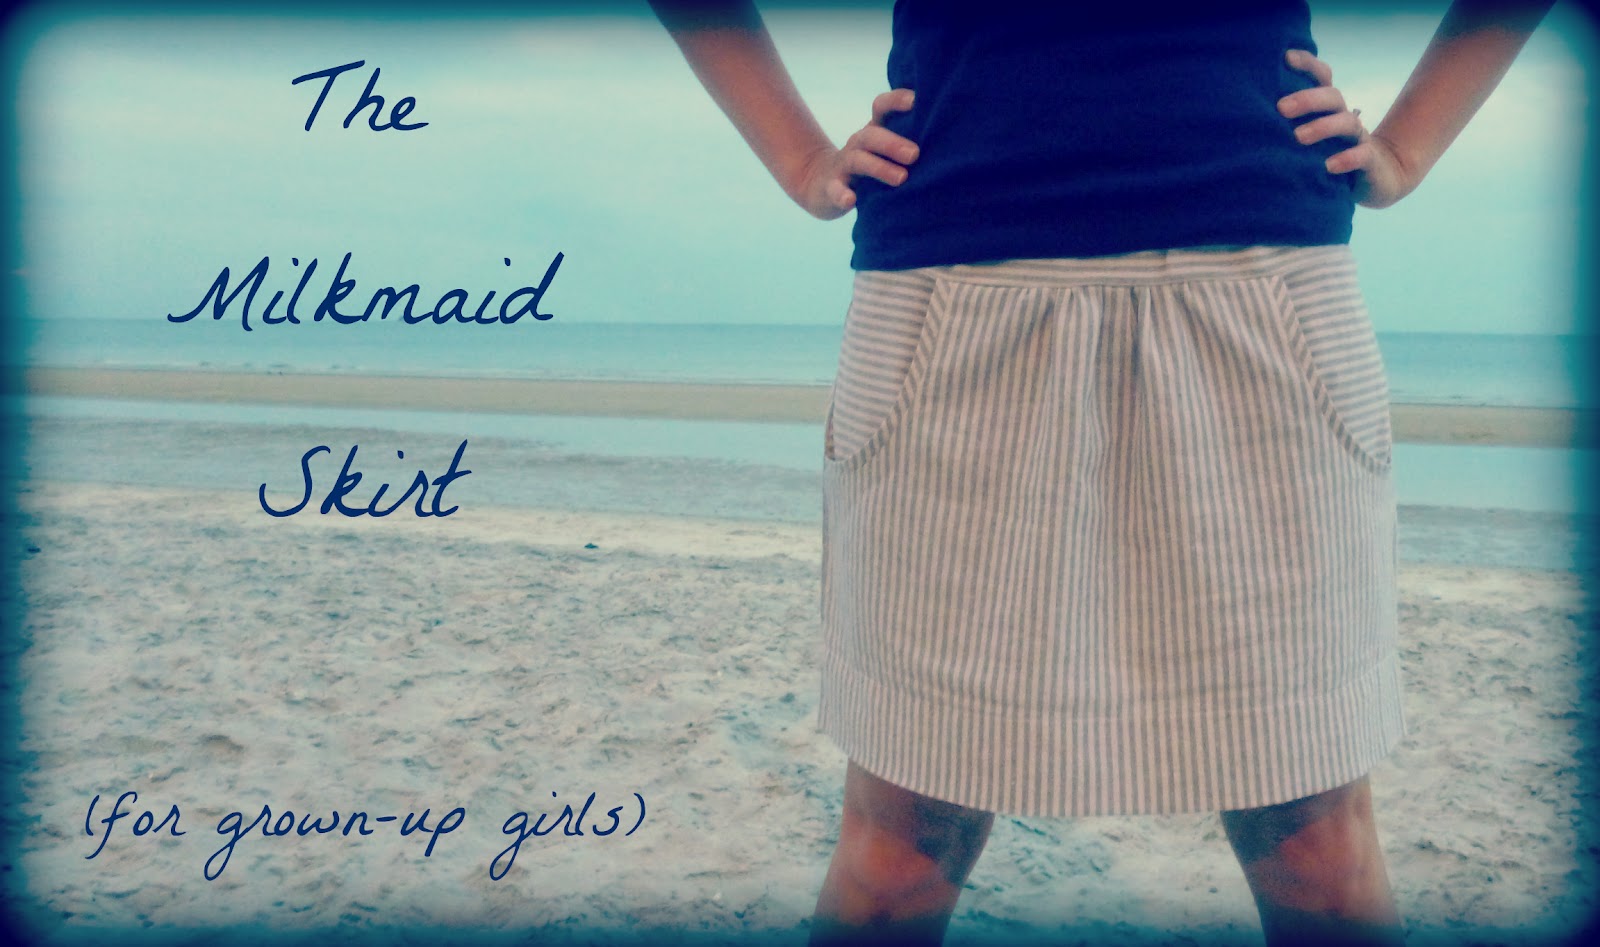
Since it has been so popular, and because I am so very grateful to the many people who have taken the time to read and use that tutorial, I thought it needed a little update. I’ve always wanted my own, so I decided it was high time for a Milkmaid Skirt for Grown-up Girls tutorial.
Here are a couple tips if you want to alter the milkmaid skirt for your very own adult self. My main thought during construction was to keep the skirt as simple and unadorned as possible for maximum wearability. It’s definitely fun to sew and occasionally wear statement pieces, but I needed something that would blend with my store-bought wardrobe and be suitable for every-other-day wear this summer.
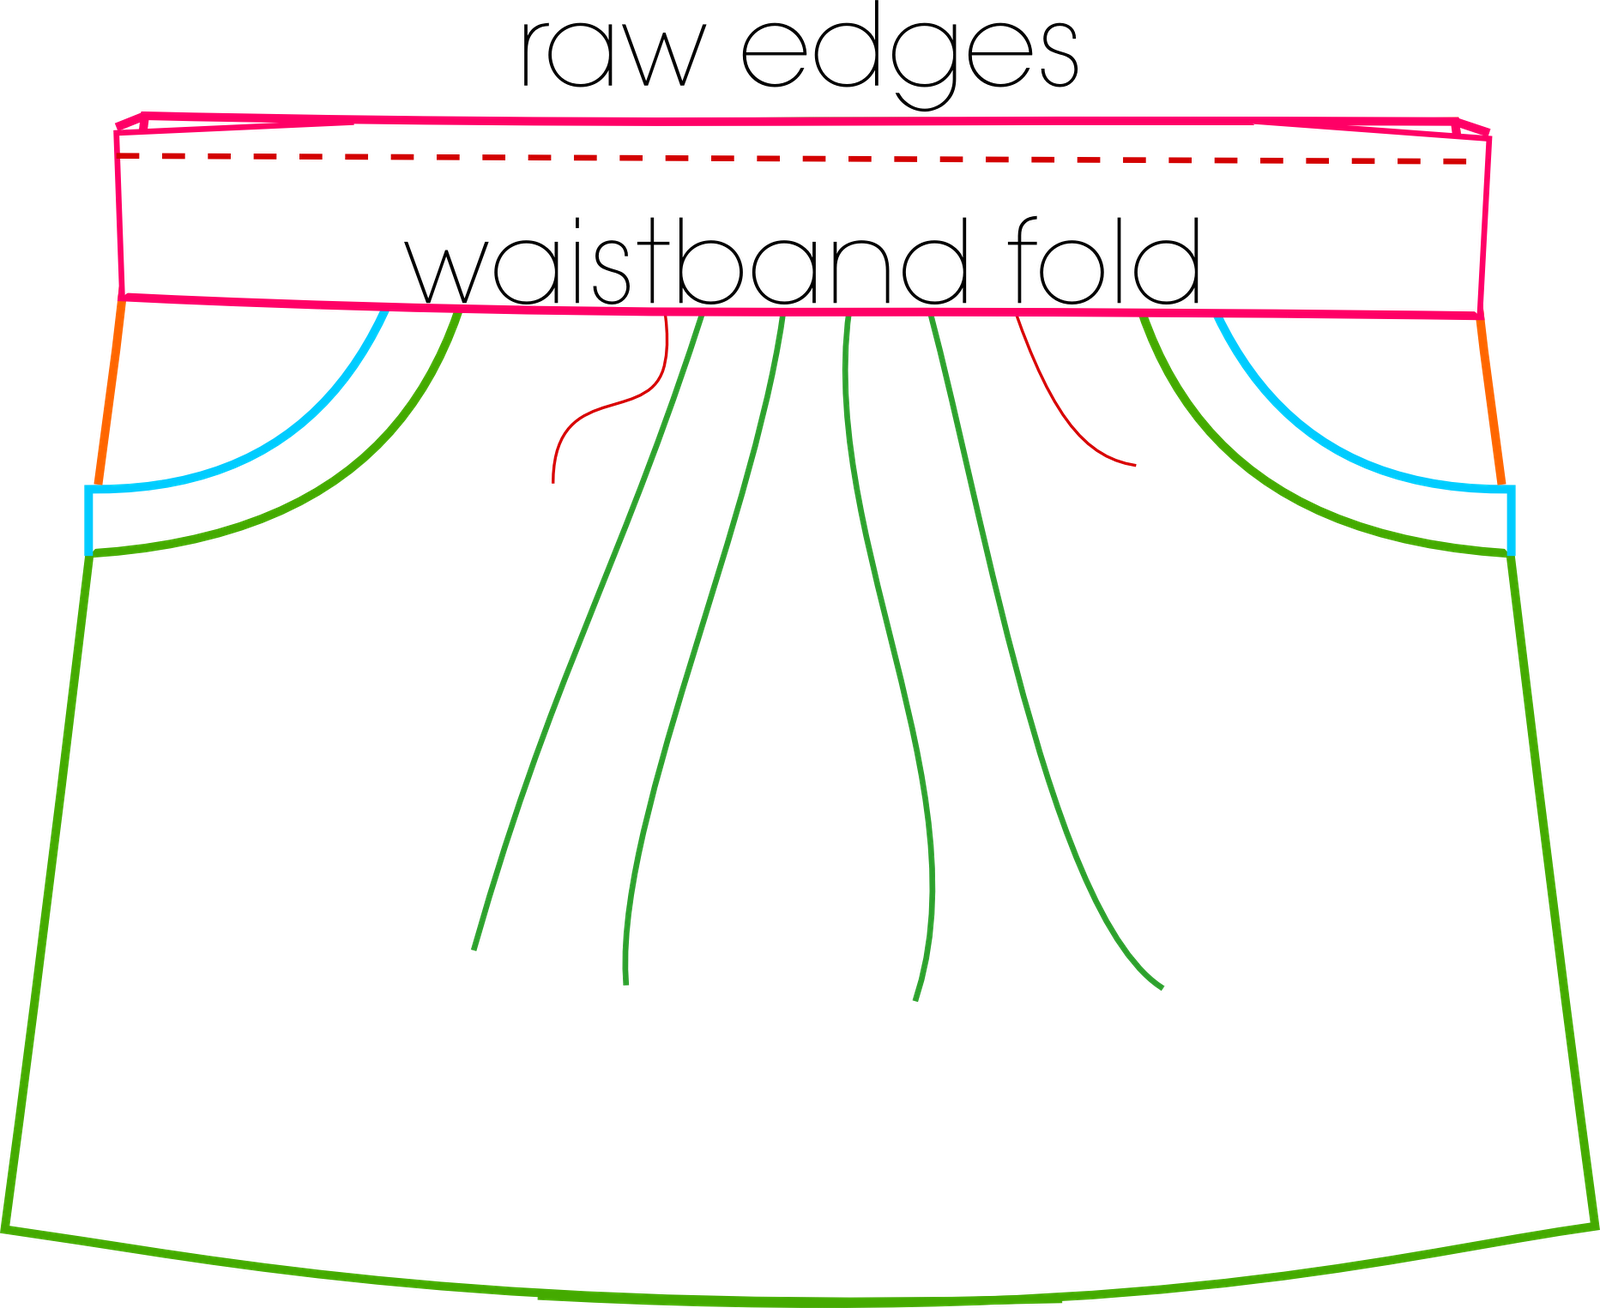
– The children’s version has a flat front waistband with elastic in the back. This is fine for adults, but I noticed that all of my store-bought skirts that used elastic had it all the way around. They also usually use a wide elastic, instead of the 1″ or so that is used for children. I used 2 1/4 inch elastic. The main reason I wanted to use a full elastic waistline was to eliminate the need for a zip-up curved waistband. They can be a little trickier, and I don’t know about you, but zip-up waistbands tend to cut into my fat. I like my clothes to rest precariously on top of my fat, thankyouverymuch. Also, when and if that fat (at least the portion of it that is baby-related) decides to go away, it’ll be really easy to take in the elastic at the waist.
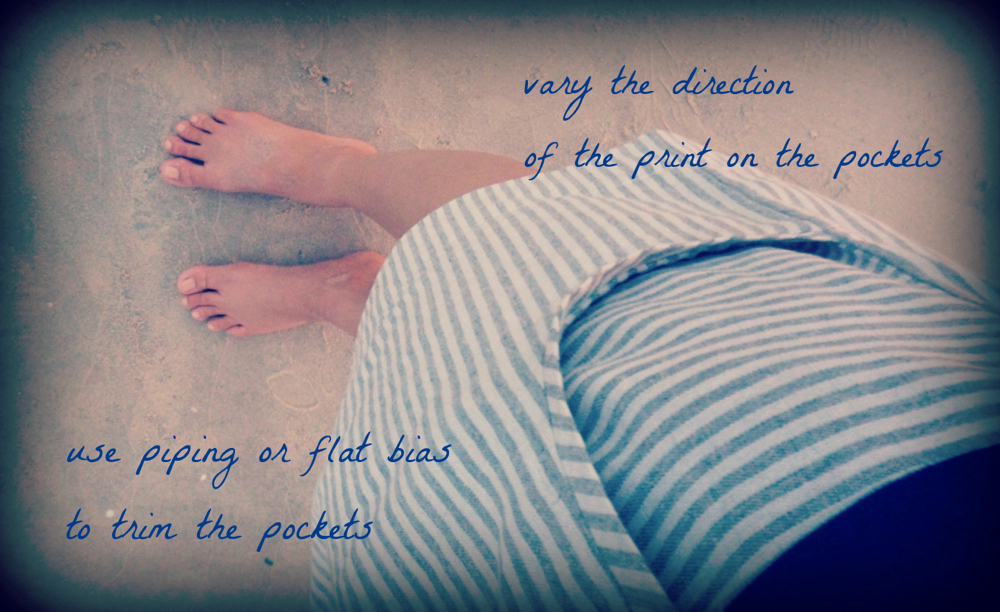
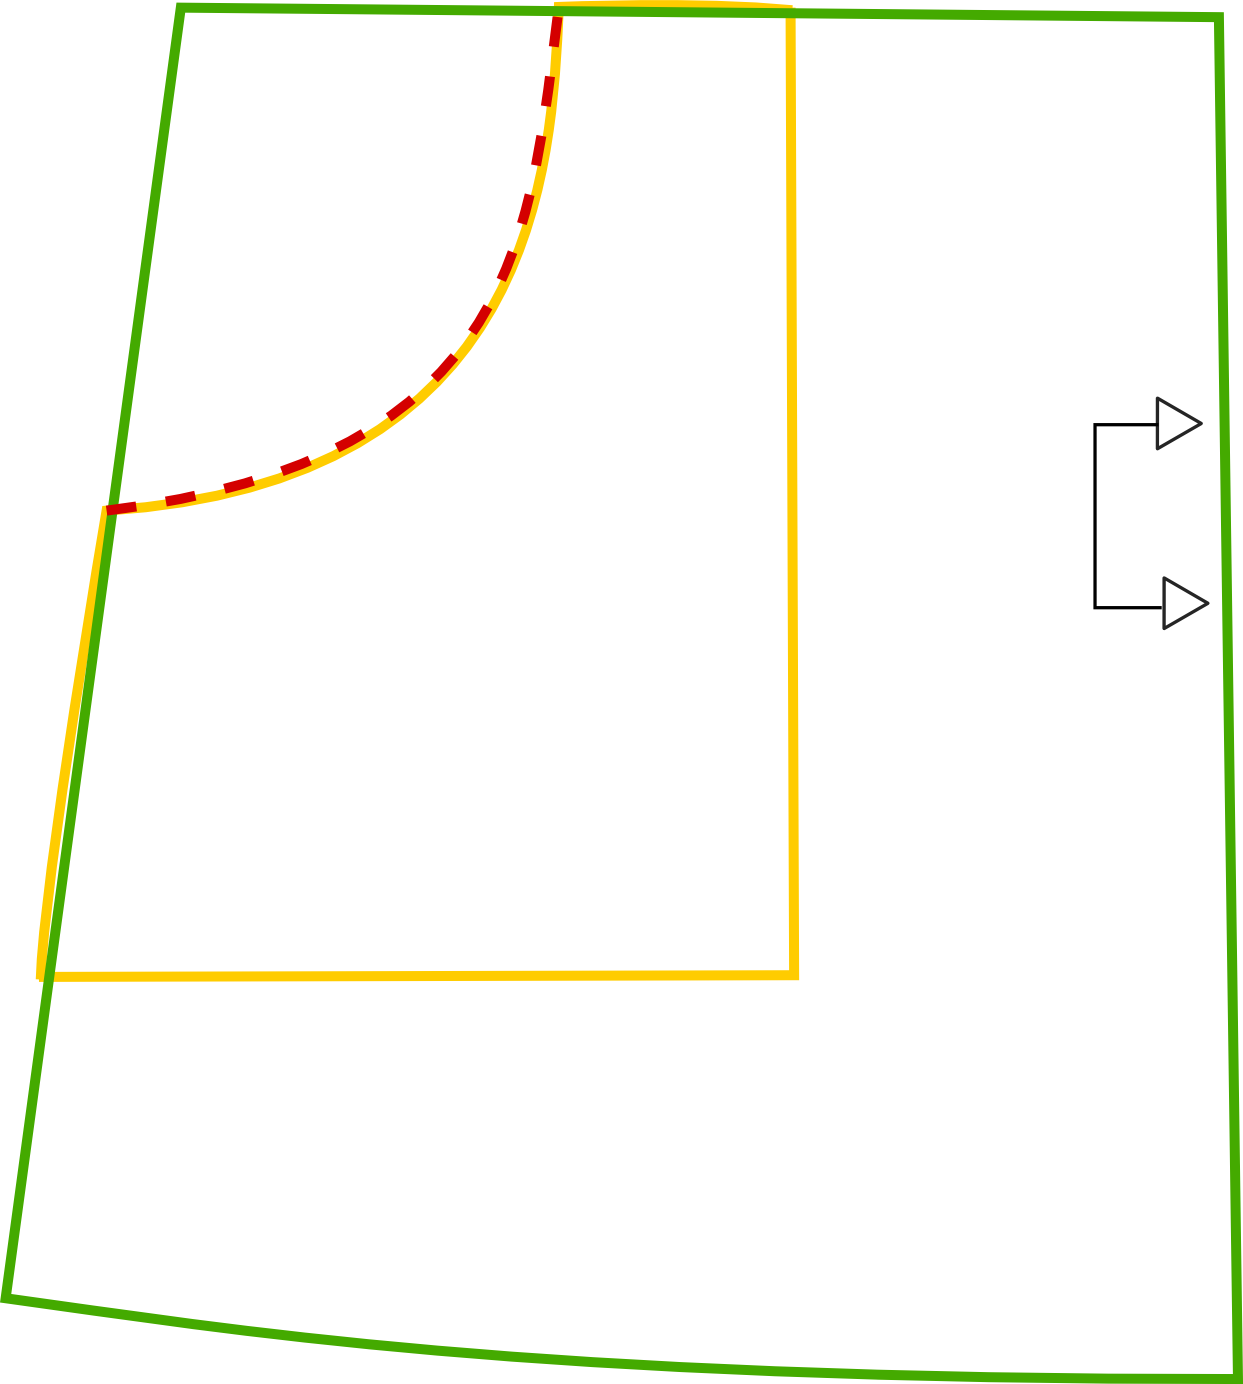
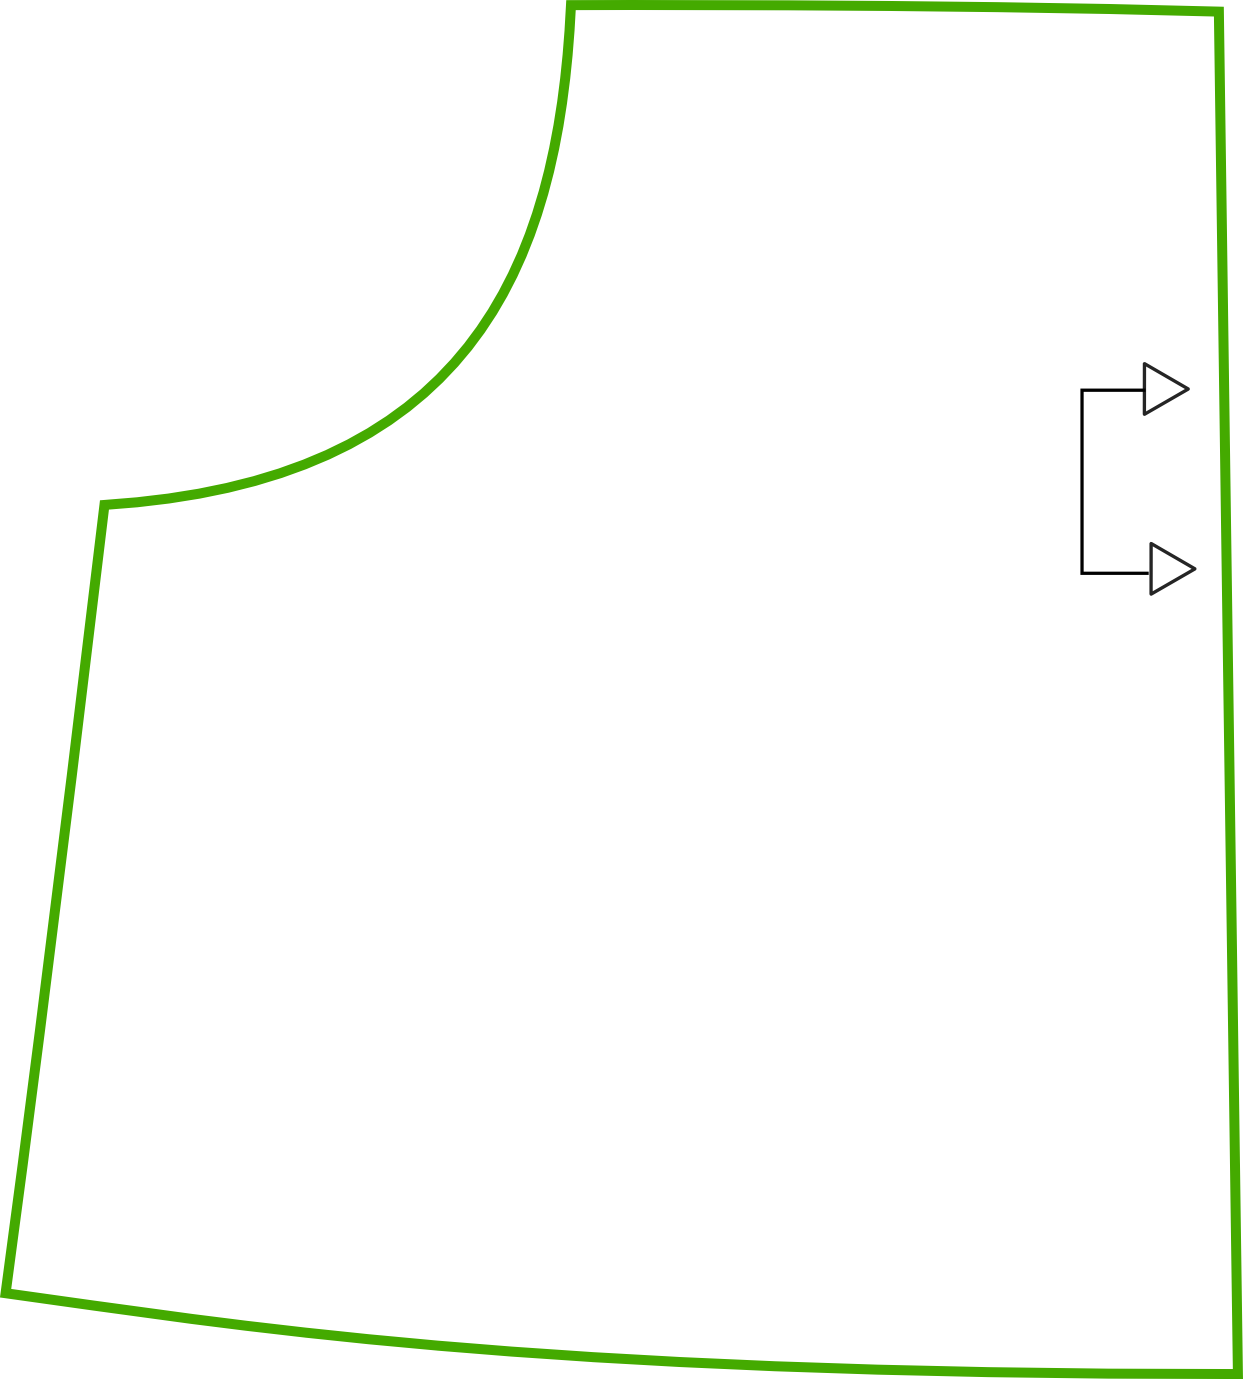
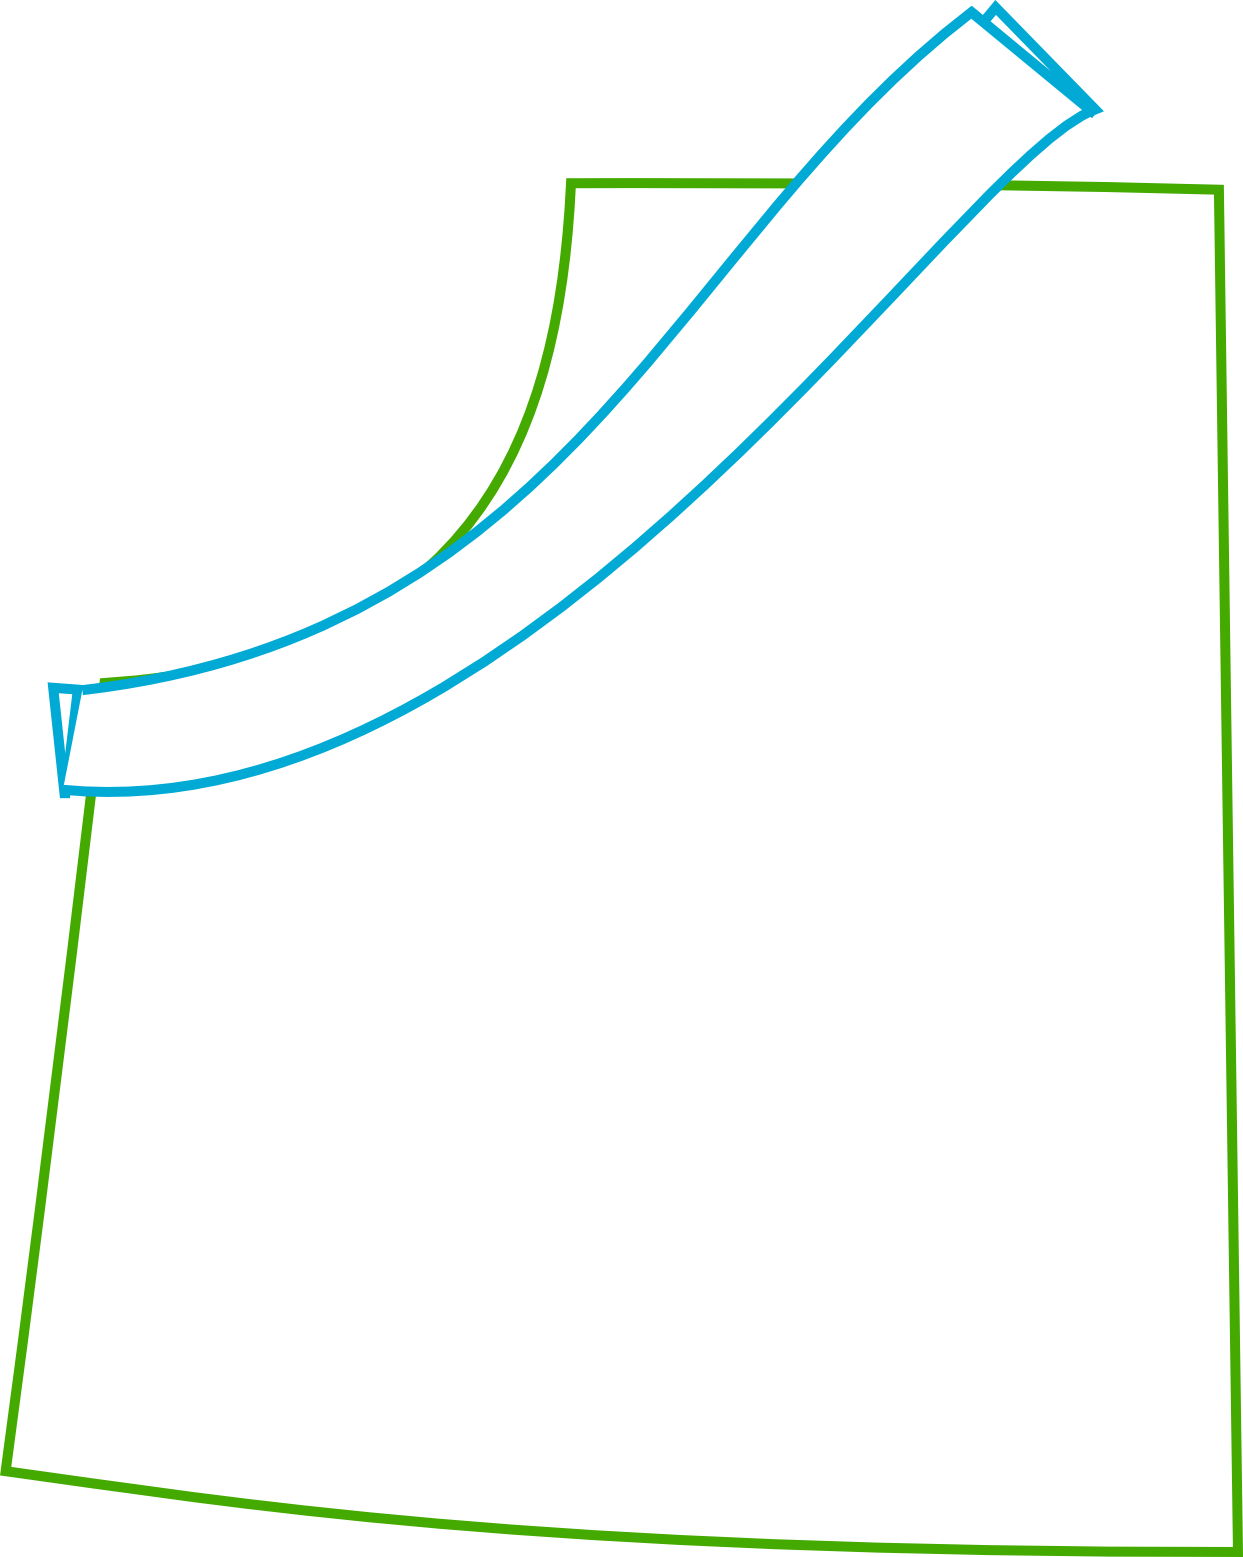
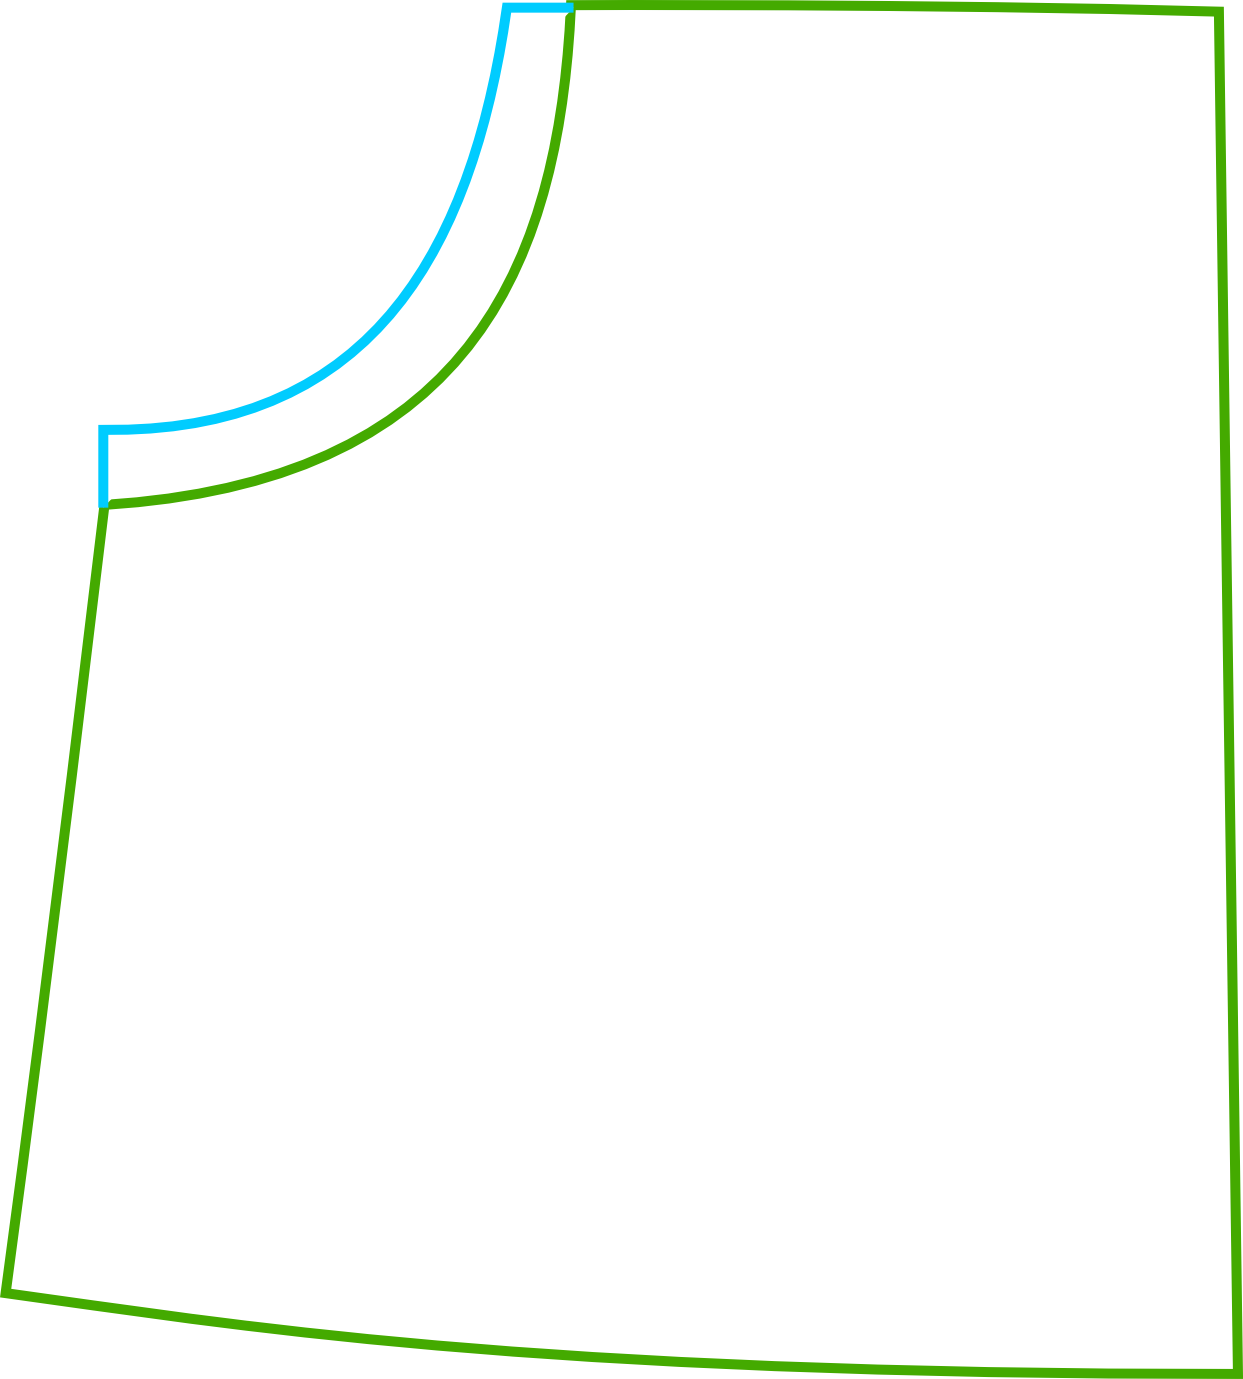
– The children’s version uses bias binding to close off the pocket curve. Again, this is fine for grown ups depending on the look you’re going for, but I find that high-contrast trim can make a skirt look more whimsical, which also makes it look more childish. I wanted something a bit more subdued, so I opted for bias trim sewn into the seam, and I made the trim using my main fabric so it would blend. You could also do a narrow piping using the same fabric to give it a little polish.
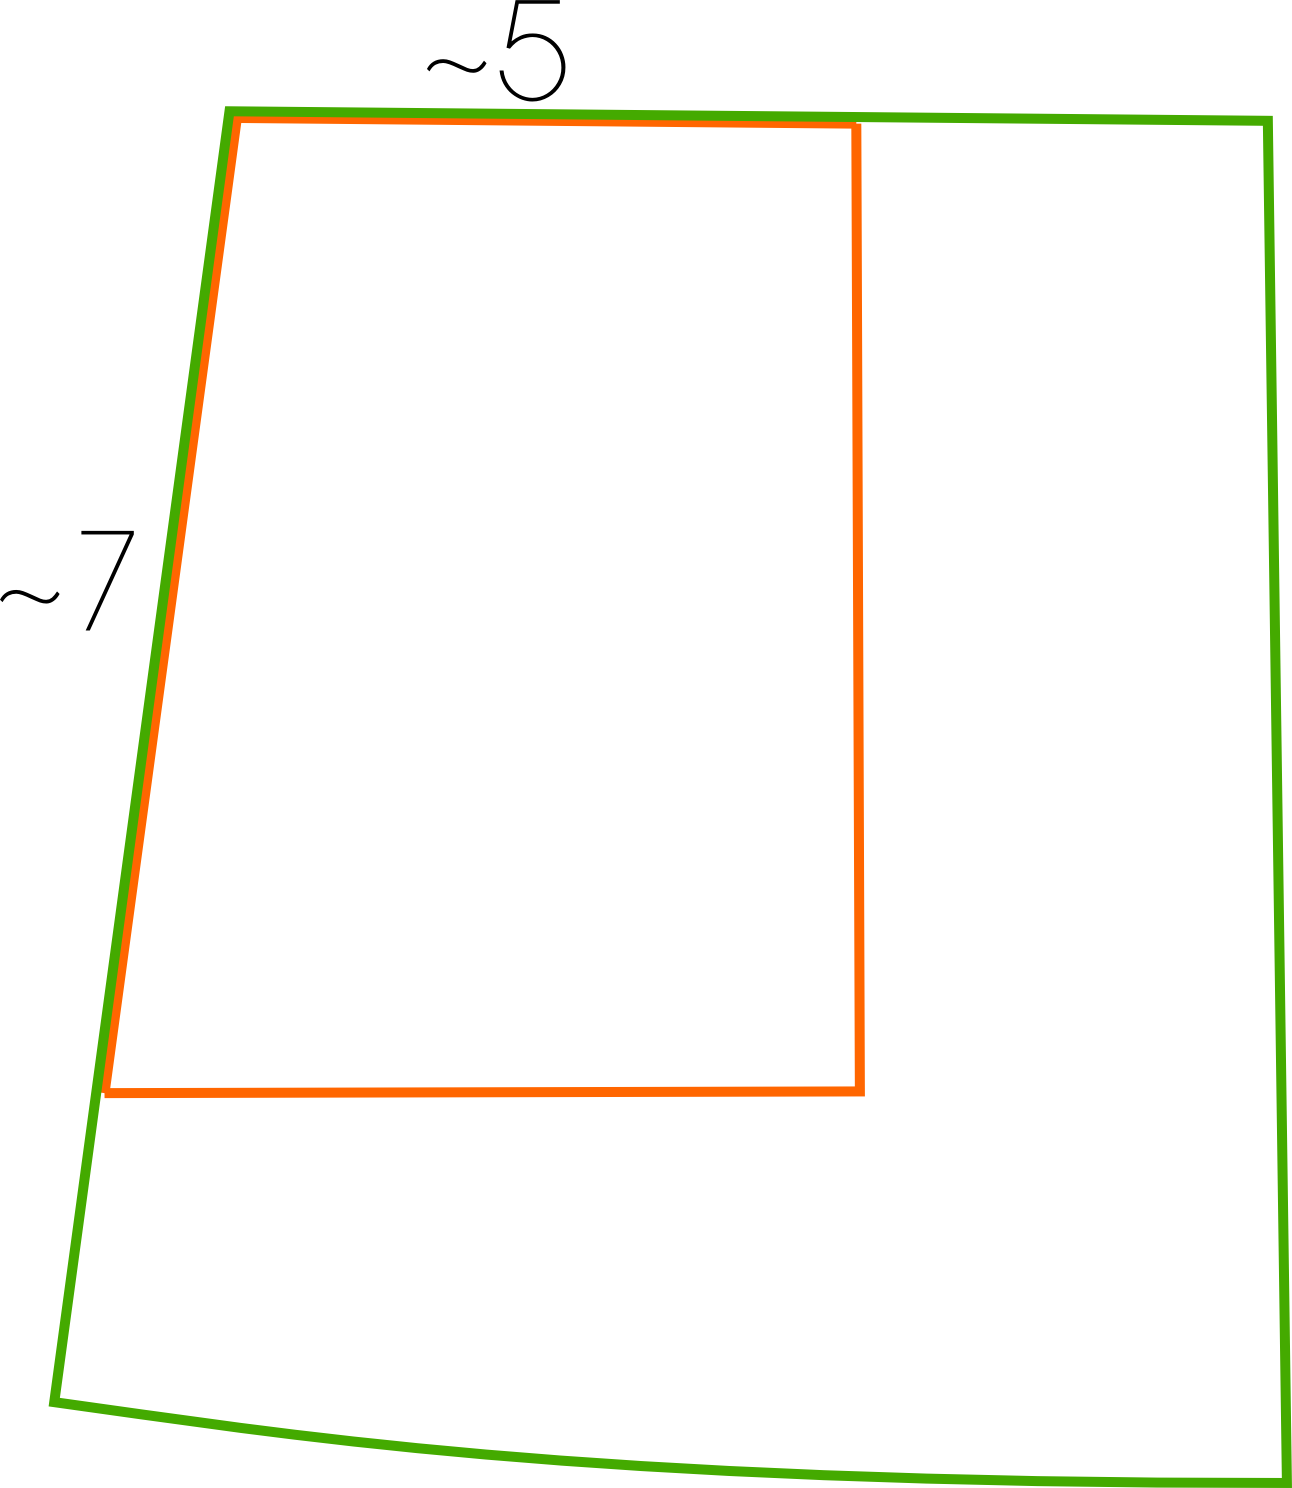
– To add a little visual interest without making a big statement, I altered the direction of the print for my pocket pieces. It’s a subtle but special little touch.
– Instead of hemming the skirt using bias binding, I did a traditional hem. I made mine 2 inches wide because I like the look and weight of a deep hem, but a narrow hem is fine too.
– And finally, remember that you have a ton of options when it comes to nice adult-worthy fabrics! Save the cupcake and fox prints for the kiddos. Just remember that you might have to line it if you use a nice lighter weight or semi-sheer fabric.

Ok, on to the tutorial!
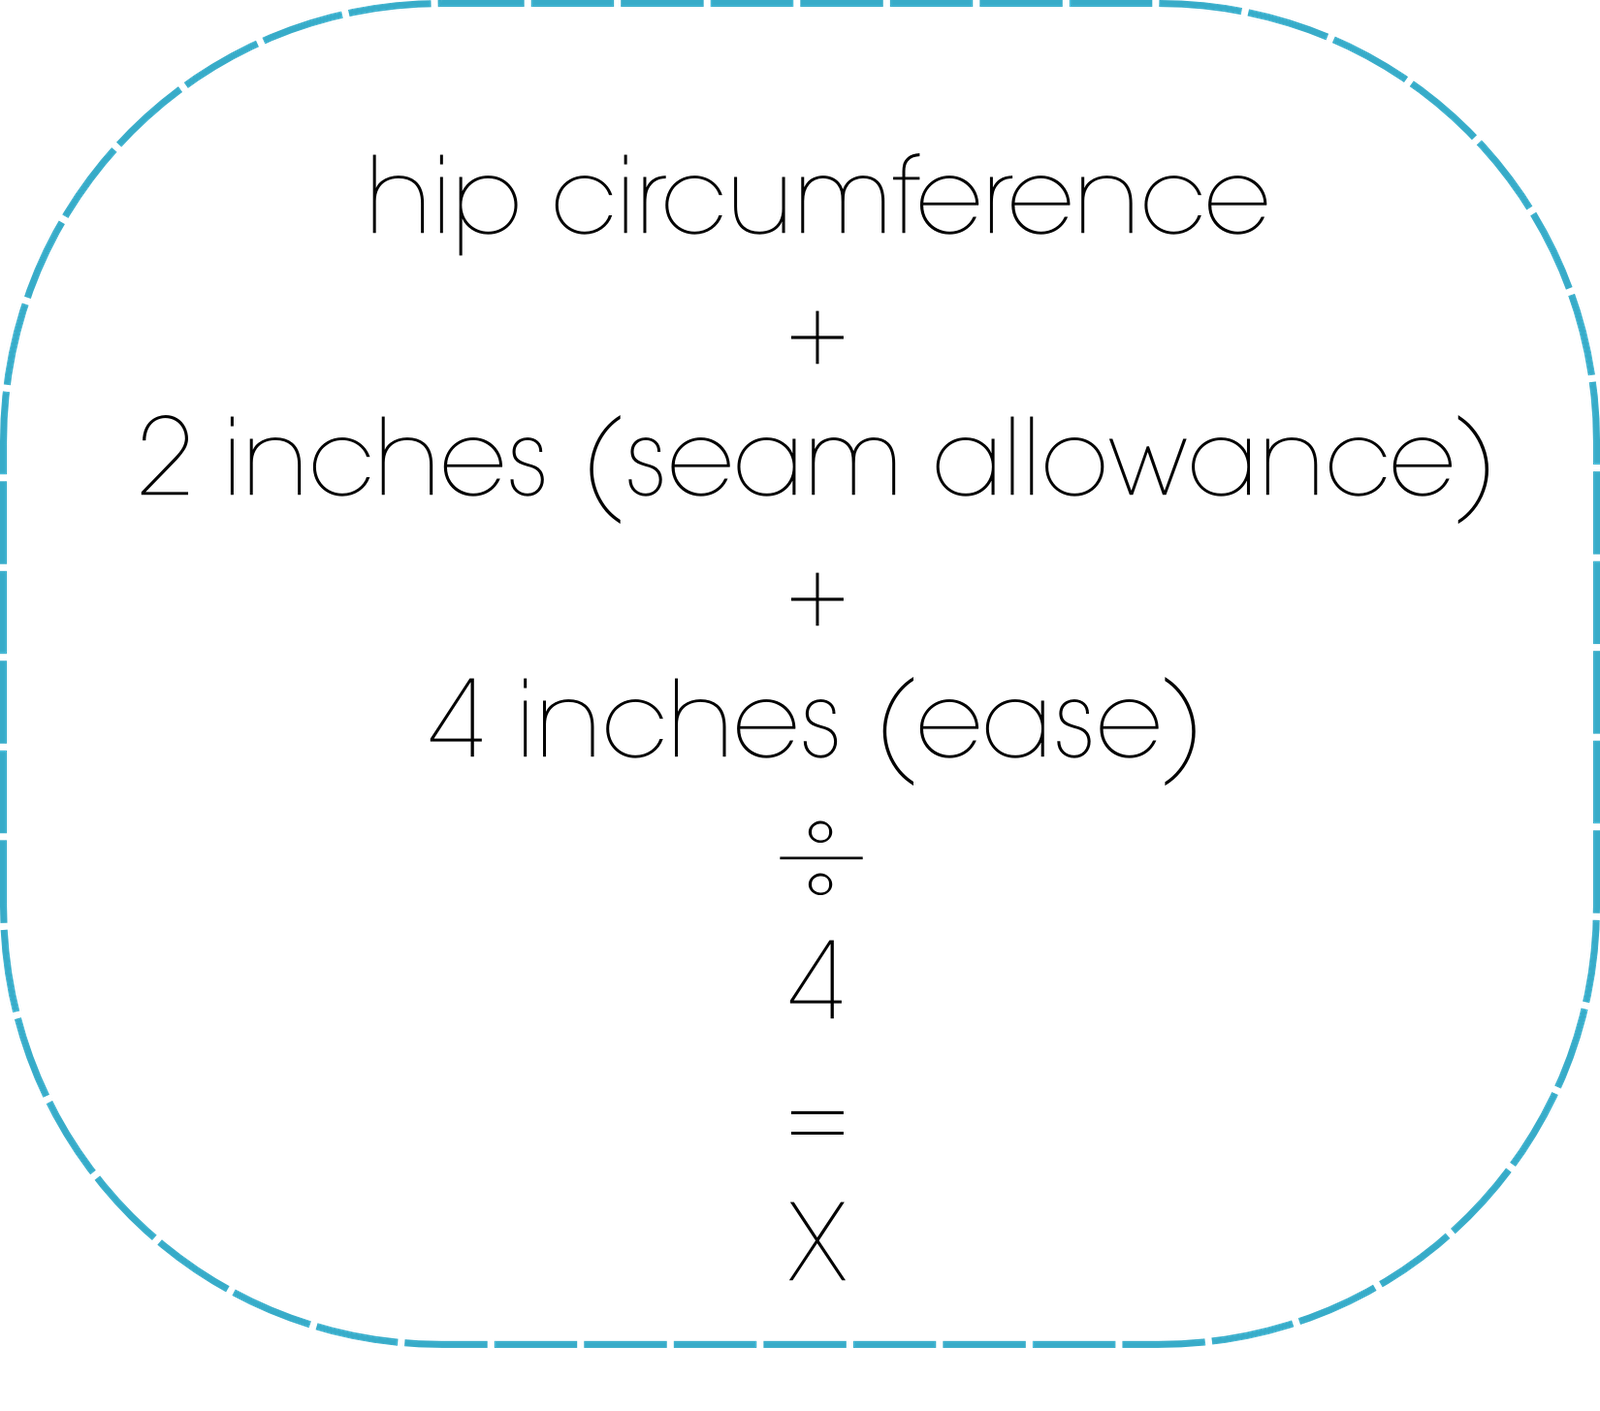
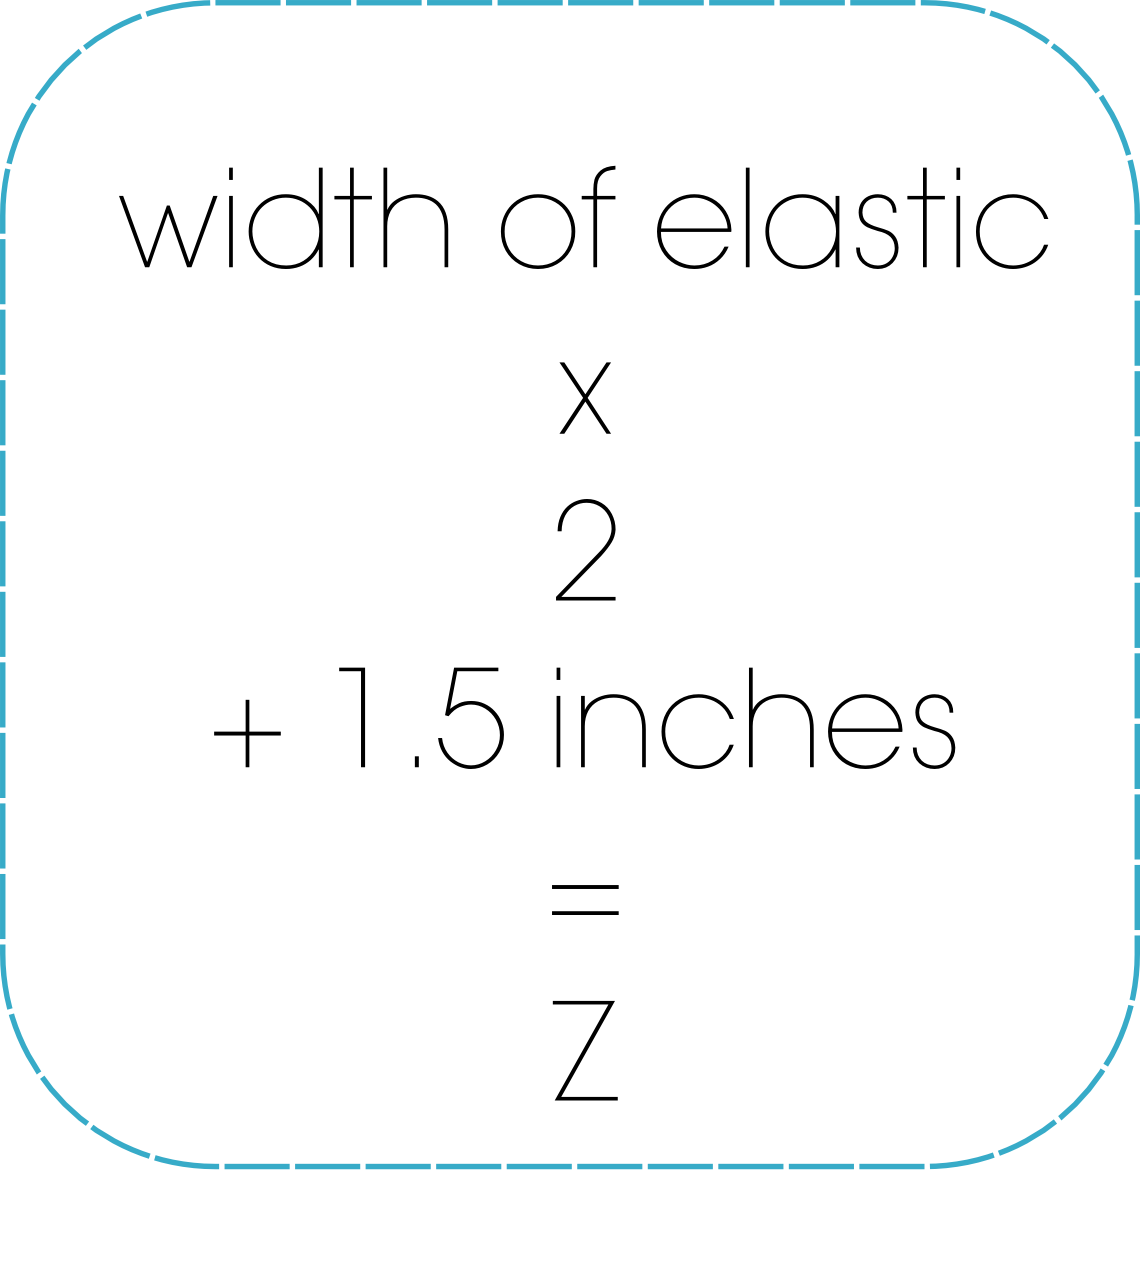
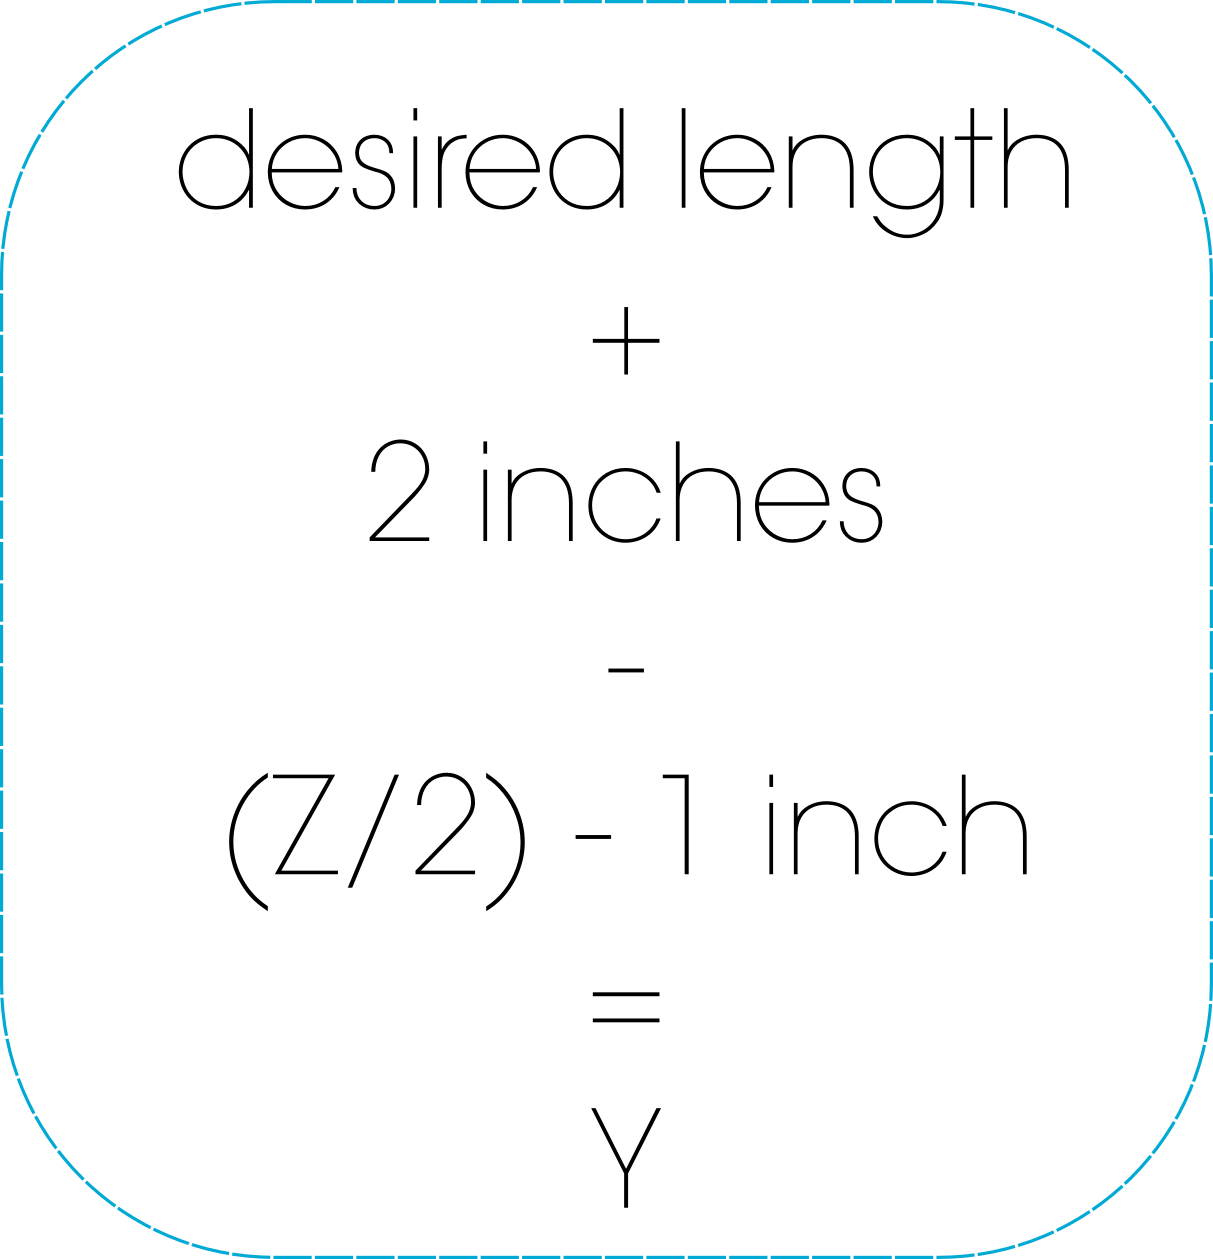
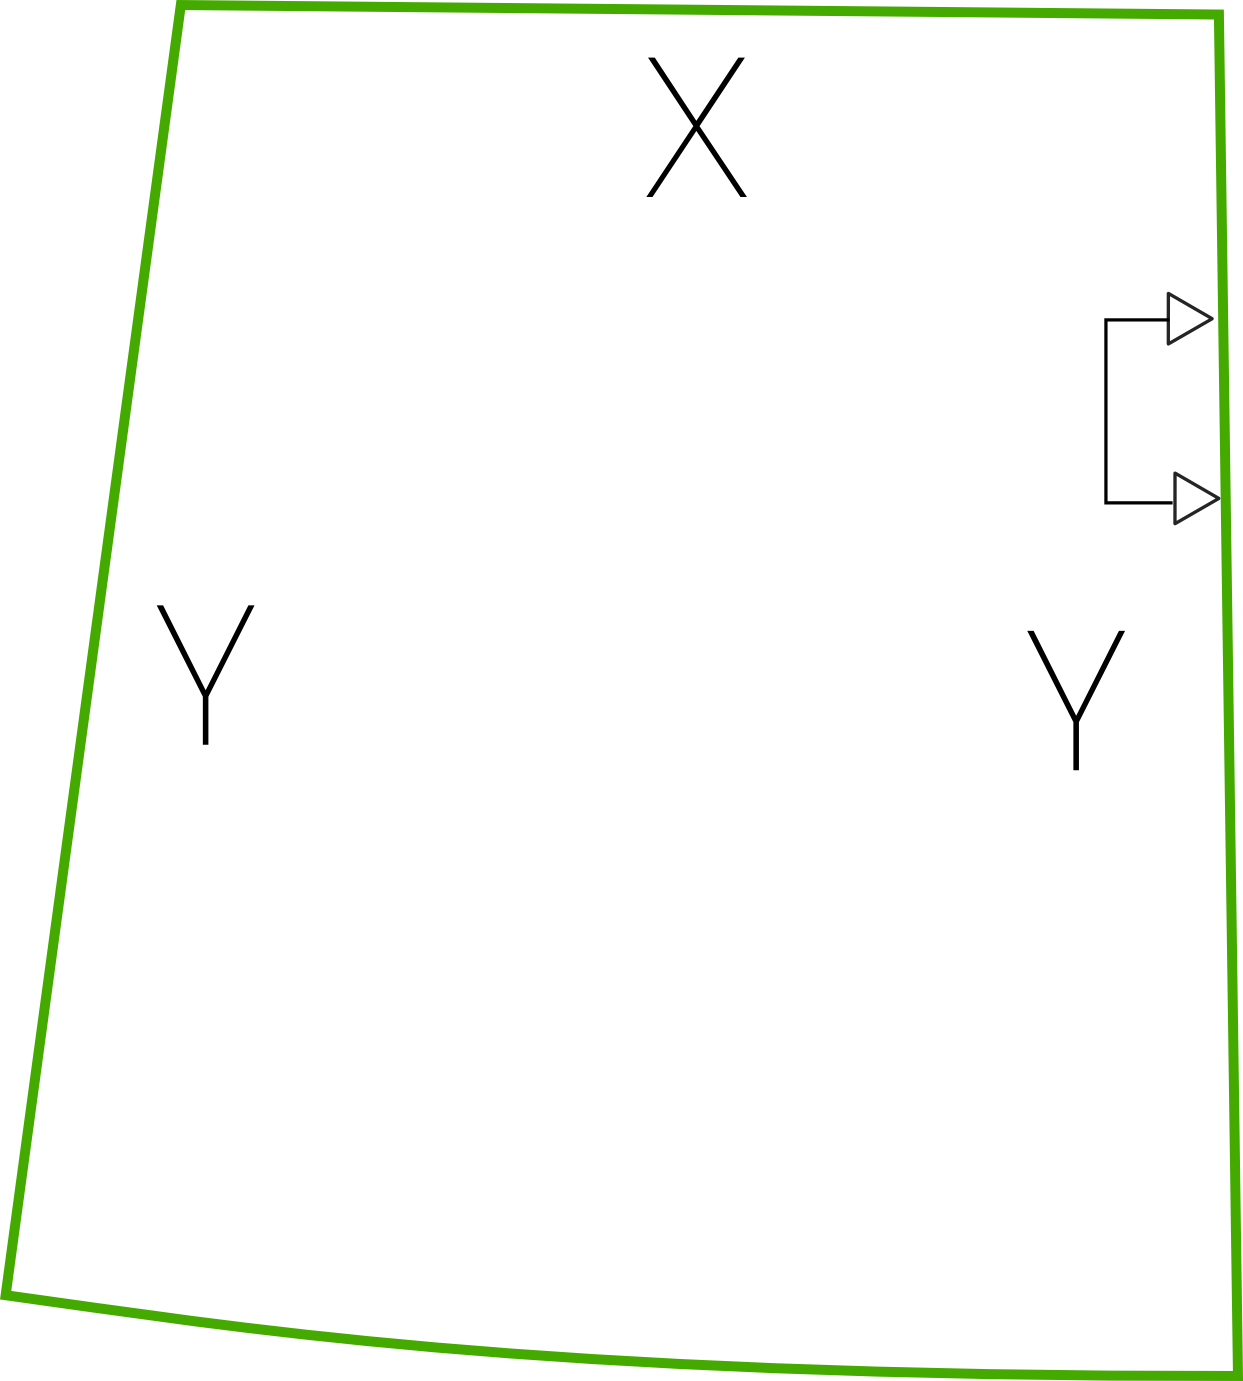
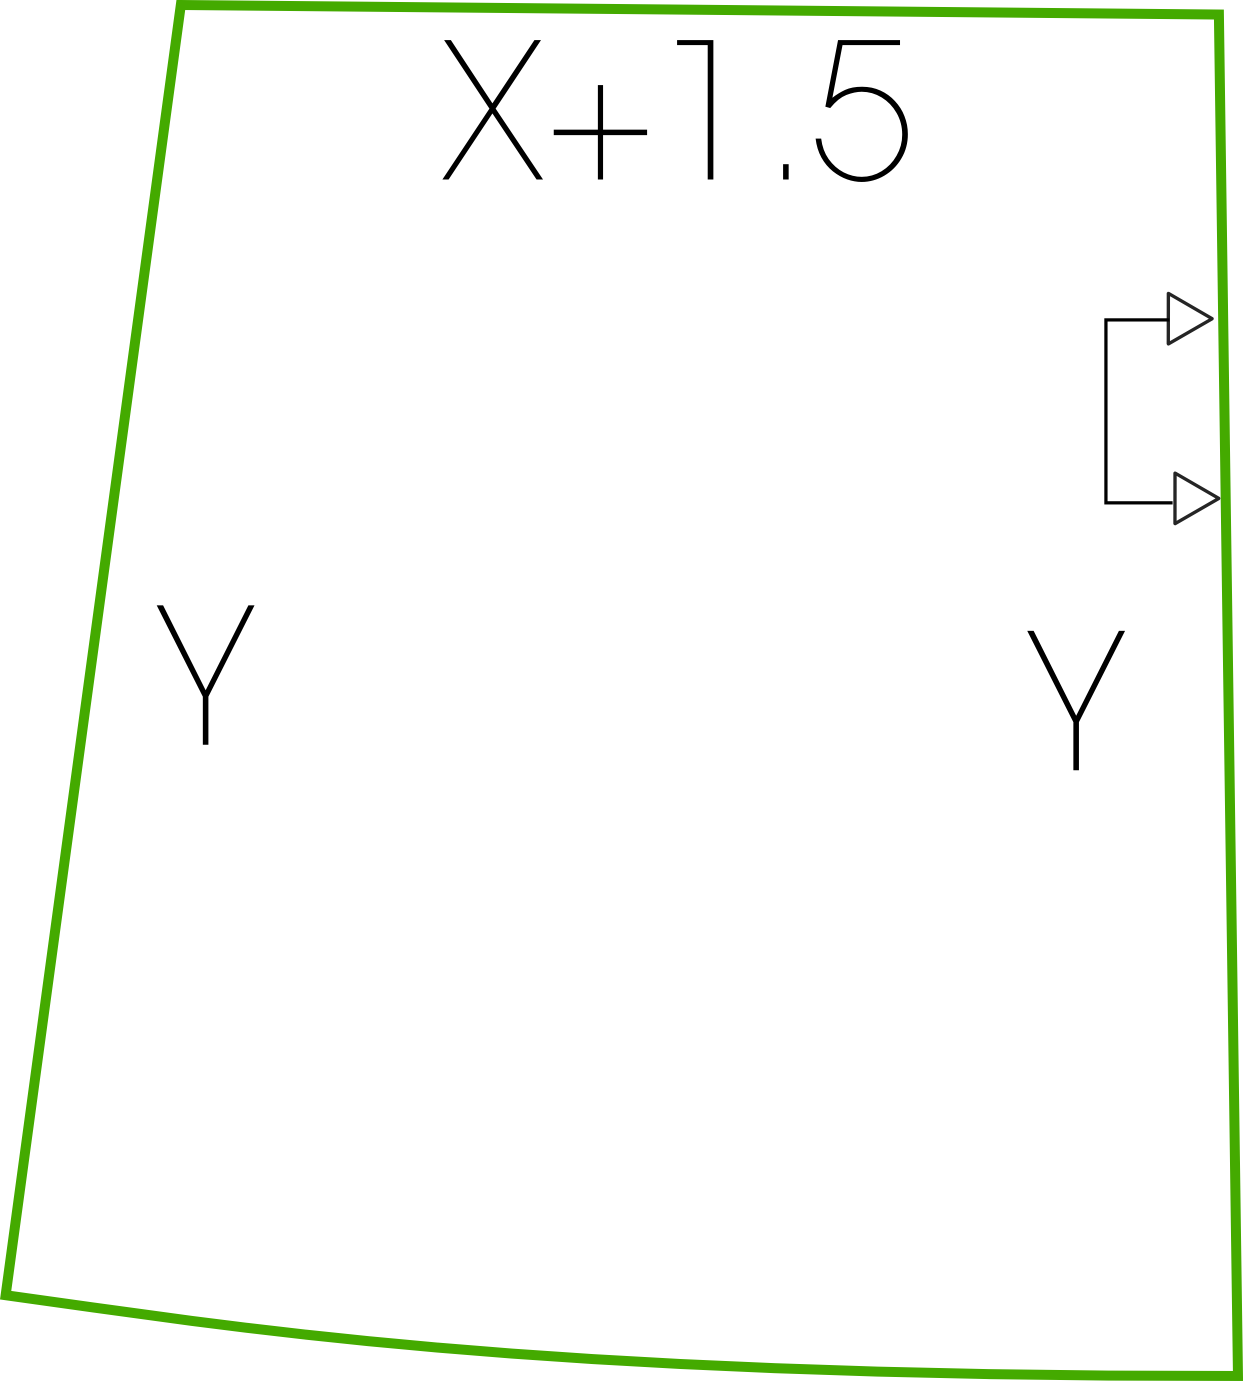
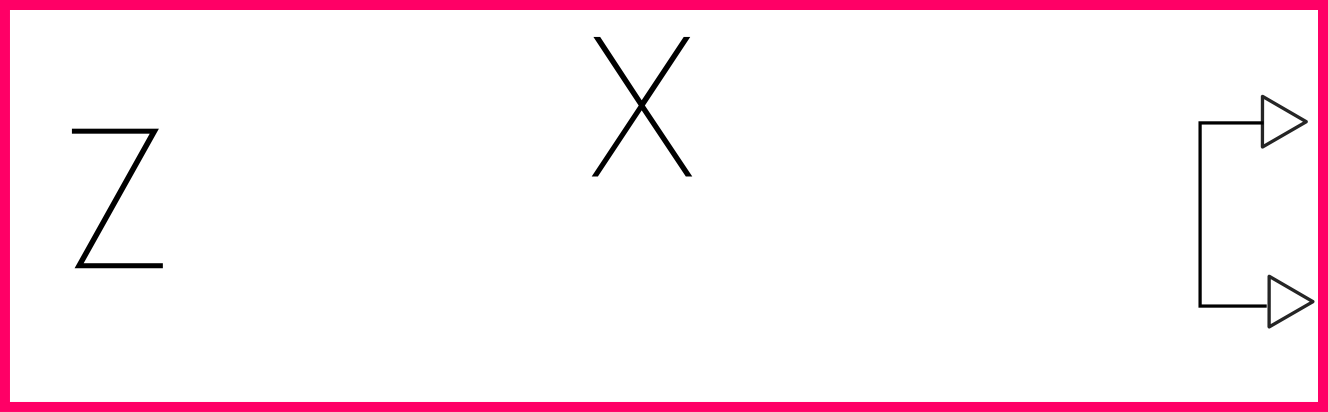
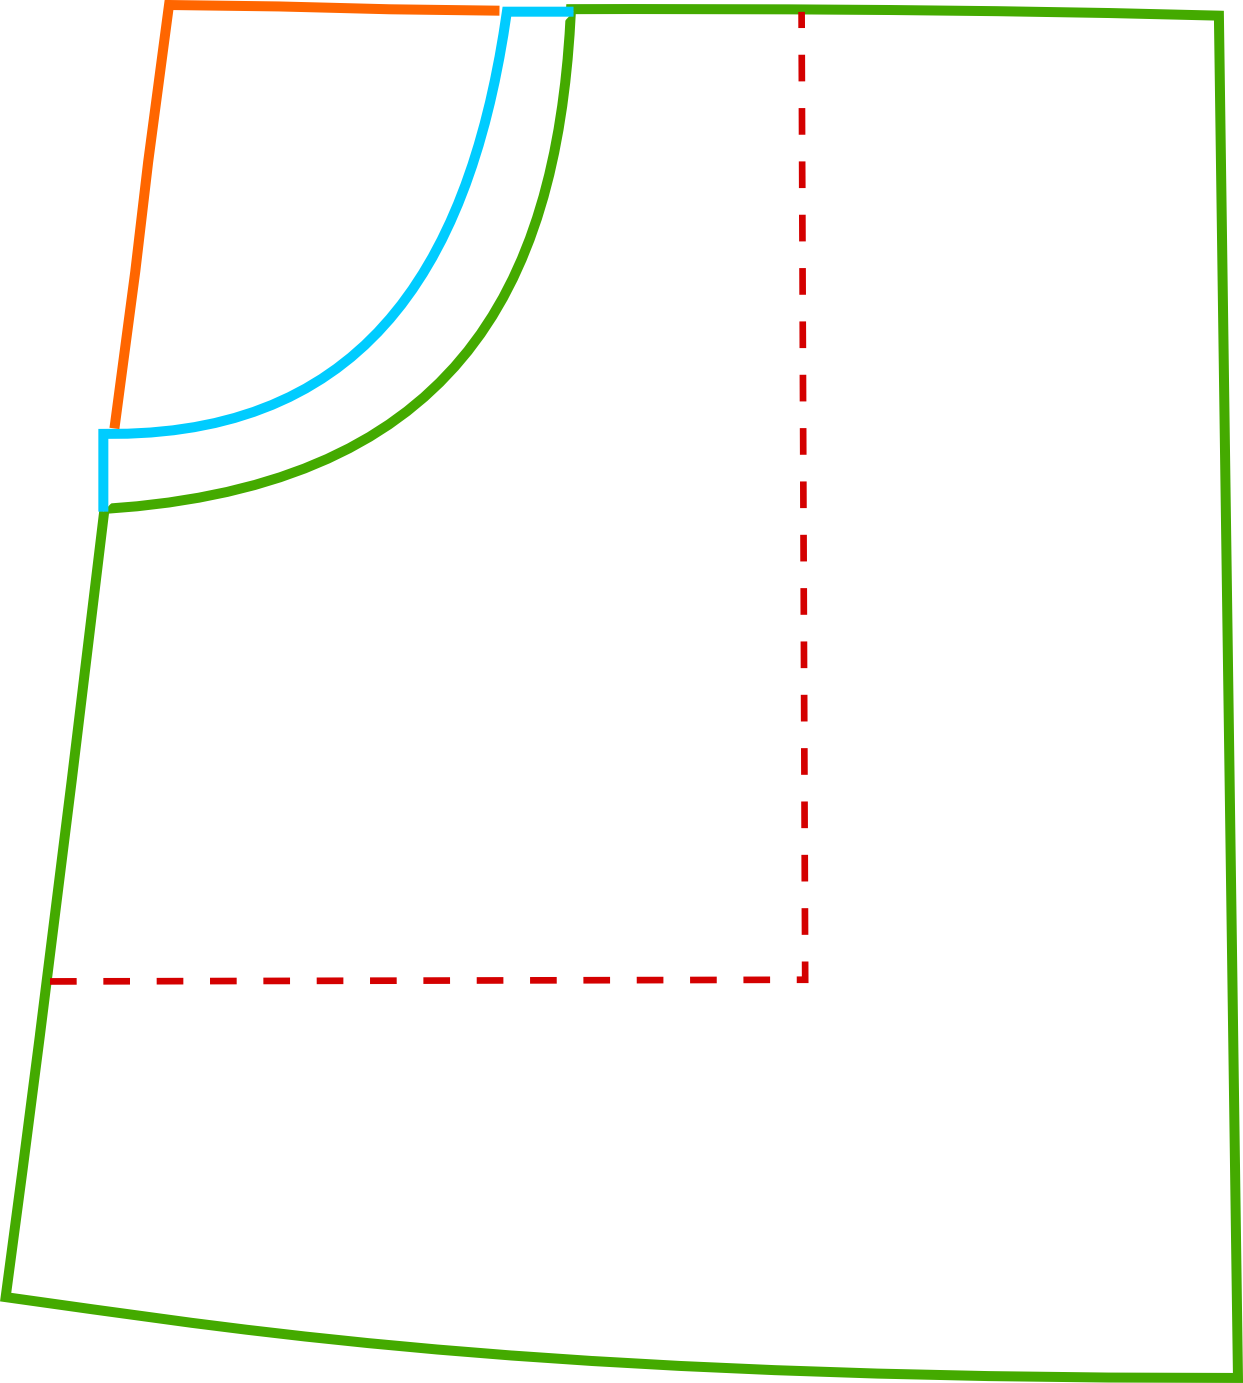
First you’ll need to obtain 3 numbers, X, Y, & Z to help construct your pattern pieces.
The only thing to note is that in the first box below the part marked 4 inches for ease can be altered to your taste. If you want a fuller skirt, or are using slinky fabric and want lots of gathers and draping, add some inches. 4 is just the minimum and will produce a straighter skirt like mine, where the waistband has very little gathering despite the elastic.


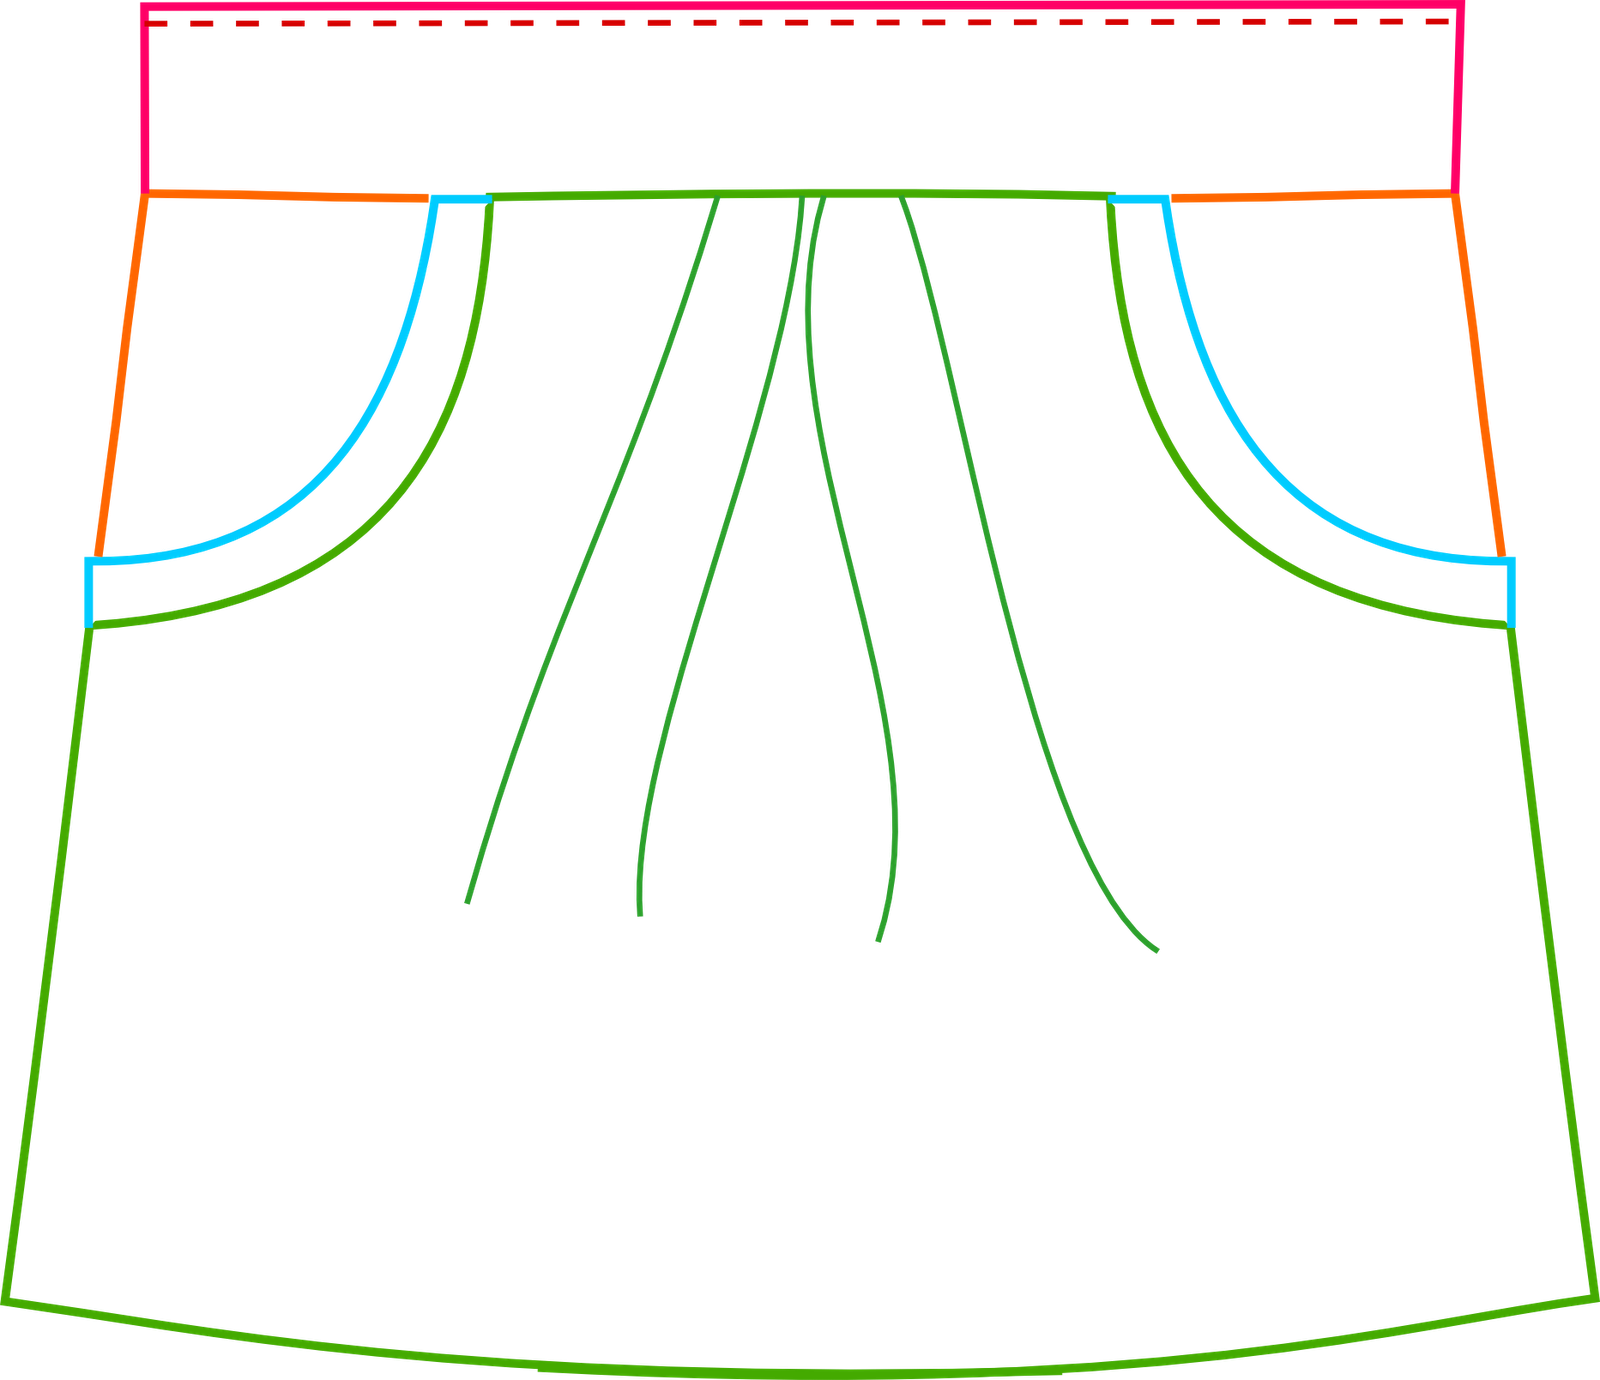

That’s it! Stick your hands in your brand spanking new pockets and enjoy your skirt!

Oh thank you! I’ve made the “little girls” version twice for my daughter and simply love it. Now there’s one for me to enjoy just as much! Thank you!!
I LOVE the skirt and the directional fabric changer-ooo. Ooo, and the fancy, techy, computer graphics.
Not only is the skirt adorable, but the tutorial is beautiful! How’d you do those illustrations?
I was thinking the exact same thing as Disney! It’s a lovely skirt and tutorial! :)
that’s lovely! i want to do it in the same stripy fabric as you as i love the changing stripe direction. another one to add to my sewing queue!
Great skirt! I hope I can make one for myself.
This is beautiful. Changing directions of the stripes looks great. I agree about the illustrations. How did you do that? :)
inkscape! it’s free open source software similar to illustrator. you can download it online and get started right away!
Yay!! I love this skirt!! The pockets are just adorable – I can’t wait to make it!
Oh, I am so excited! Thanks so much for the tutorial!
Love the updates for big girls! I may have to make one, cause you can never have too many skirts. Your tutorial is very well done and really intimadating.
There are tears falling out of my eyes b/c I’m laughing so hard. I totally relate to the virtues of elastic waistbands. Anyway, love the pockets in different directions and the grown up version. :)
your post is so funny! I can’t wait to try it out. I too like my clothes to rest precariously on top of my fat.
Color-coded instructions?! You rock! This is wonderful:) Can’t wait to try it. Thank you!
so cute! i can’t wait to try it! (your illustrations are great!)
I am really impressed with your illustrations, very well done. =)
I love it and I can’t wait to try it! Thanks so much for the tutorial!
Wow, love these pictures!! Great way to show that’s going on, and cute at the same time! =)
This looks awesome! I’m excited to try it — yay for skirt week! :)
This looks great! How do you know how much fabric to buy for your skirt?
good question! I made mine from a yard of 58-60″ fabric. Depending on the size and length you want, I think a yard and a half of regular width fabric would be enough, but do a little measuring just to make sure. You can also cut out the pocket linings from a different fabric if you need to – they won’t show. Another trick if you’re running low is to hem it with a hem lining in a different fabric. That way instead of the 2″ I recommend, you could just leave 1/4 – 1/2 inch at the bottom of your skirt.
I’m so excited to make this for myself – it’s been on the list for the kids but I just haven’t gotten to it for them yet! And I was just making my pattern and I’m thinking that the formula for Y may be off… should it be length plus two inches less HALF of Z?? I’ll shortly be cutting, so I’ll let you know :) Thank you for the awesome tutorial!
yes, you are totally right! Thank you so much for catching that. I’ve updated it. Actually you will have to take off another inch in addition to the Z/2 because that includes the waistband seam allowances. yikes – big mistake!
Thanks. My skirt is done and it turned out great! I didn’t take off that last inch in the waistband (didn’t see your reply in time!), so the only issue I have is that the casing is a bit loose and slips up a bit, kind of rotating around the elastic, but I think if I sew down the elastic at the side seams (like I’d normally do to prevent rolling and keep the gathering even), it should help. I’ll try to take a pic and post it to my flickr account soon – let me know if you’ve got a flickr pool for milkmaid skirts and I’ll share it there.
Thanks this looks like it will be a super fun addition to the wardrobe!
Really want to make this skirt! And I have to say your comment on liking clothes to “lay on top of your fat” made me laugh out loud! That is EXACTLY how I feel! :)
I have been feeling the need to make a little something for myself and this seems to be just right. And after 4 kids, I am with you all on clothes not cutting into my fat! :)
What a great skirt–I just coopted fabrics that I had bought for two separate projects for my kids and made them into milkmaid skirts for myself instead :) I’m wearing one now! Here’s my blog post about them–I linked to you there. Thanks for the tutorial!
http://bethbeingcrafty.blogspot.com/2012/08/mom-skirts.html
I couldn’t resist–I made myself another milkmaid skirt. I’m working on one for my daughter next :) This is seriously the best skirt ever. Thank you, thank you, thank you.
http://bethbeingcrafty.blogspot.com/2012/11/making-skirts-on-election-night.html
Hi! I am completely in love with this skirt – I pinned it a while back and finally think that I am going to make it – what fabric did you use for the on in the picture? I completely adore it!
Rebecca
http://www.heronscrafts.blogspot.com
Hi, thanks for the tutorial, I finally got to make my first milkmaid skirt and I am sure I will do it again. First attempt was with a medium weight spotty fabric, next time I try some canvas or denim. If you fancy having a look, I blogged about the skirt here: http://lacreatureandyou.wordpress.com/2013/05/13/may-dress-its-a-skirt/
hi! i just started making this skirt and i realized my fabric was a little sheer. do you have suggestions or a tutorial you use for making a lining?
Thanks for the tutorial! Once I had my measurements it was easy to follow. :)
My new skirt is blogged here: http://sarahdudik.wordpress.com/2013/06/07/blue-milkmaid-skirt/
Ahh I’m so excited! Thanks so much for making a big girl tutorial! I saw a girl at church wearing one today, and had to ask her about it. She said it was called the milk maid, and I googled it and found you! I can’t wait to make it!
Daft question – what kind of angle are we talking about? 30 degree?
I love my milkmaid skirt pattern–I just made it into a dress using knit fabric, and I LOVE it! This is by far my favorite skirt pattern–thanks again for the tutorial! Here’s my blog post about it: http://www.bethbeingcrafty.blogspot.com/2013/07/jersey-dress-with-pockets.html
I love this skirt and tutorial and can’t wait to try making it myself. I love skirts but often find it difficult buying bc I have extra long legs. :) Thanks for sharing!!
I love this! I haven’t created my own patterns yet but this may be the one I do first!
I love this tutorial I have now made two of these – you can see them on my blog if you would like :)
http://60degreesofinspiration.blogspot.co.uk/2015/04/milkmaid-skirts-and-pattern-matching.html