crafterhours

sleeping babes. crafting moms.

  • Tutorials
  • Patterns
  • Shop
  • Contact
  • Follow

Pretty Pleats? Tank: A Tutorial

February 14, 2011 By crafterhours 25 Comments

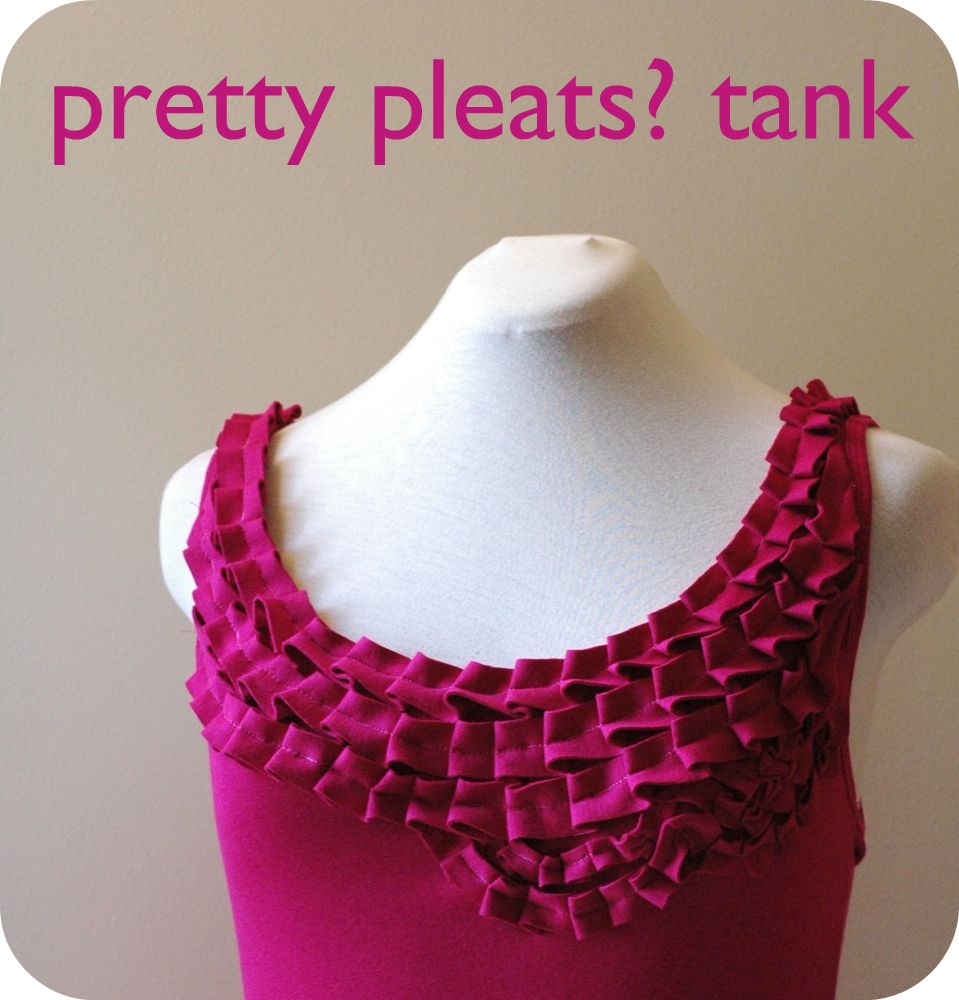
It all started with an e-mail. From Stacey. A question. A straightforward question. How, she asked, do Adrianna and I think this was made? And then we discussed. And I think I discussed enough that I convinced poor Stacey that it was too complicated. Boo. But I did think it was complicated. Until I tried it. Not so complicated. And I documented the process so that you can try it too. Not that mine is an exact copy. No, we’ll call this an “inspired by.” I still have a few other ideas to try to make it more like the original piece. But I’m liking this for now, and I hope Stacey likes it too.

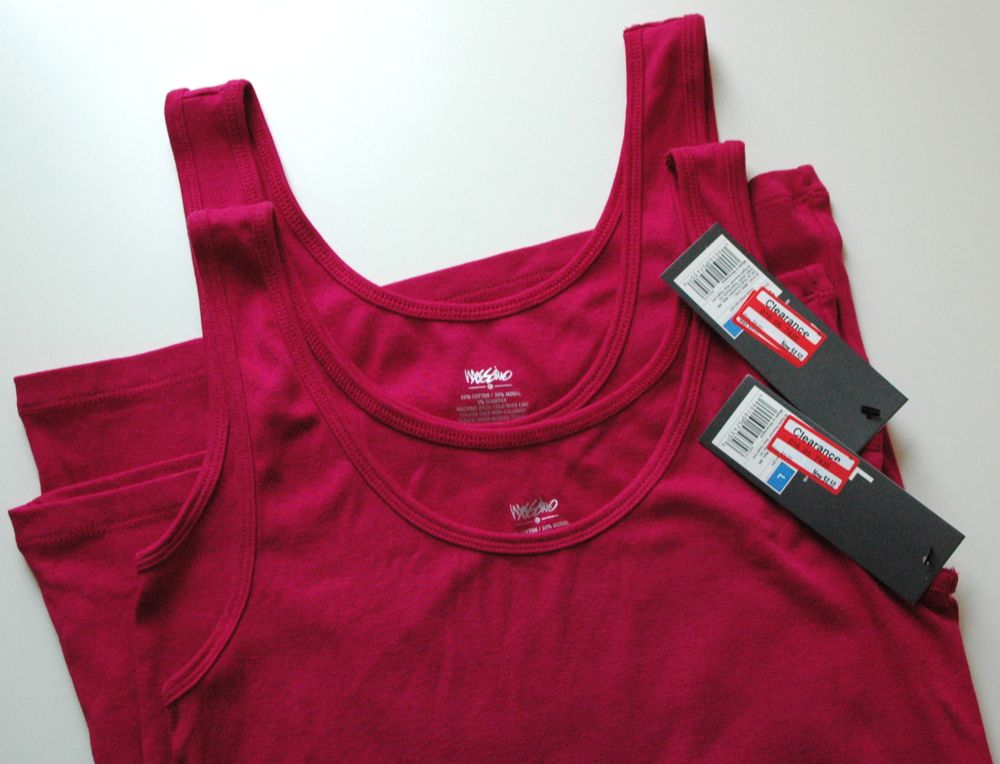
Now, if it were Adrianna making this one, she’d make a tank from scratch. Not only because the inexpensive-tank-buying-options are few in her ‘hood, but because she can make a tank in about twelve minutes, including a break for a mint milano. She’s the sew-er and I’m the embellish-er. So I got to shopping. Two tanks for $4.50 each. I chose these because I thought that the knit was lightweight enough to make ruffle-y pleats but not so lightweight that it couldn’t possibly flatter a mommy body. A critical consideration.

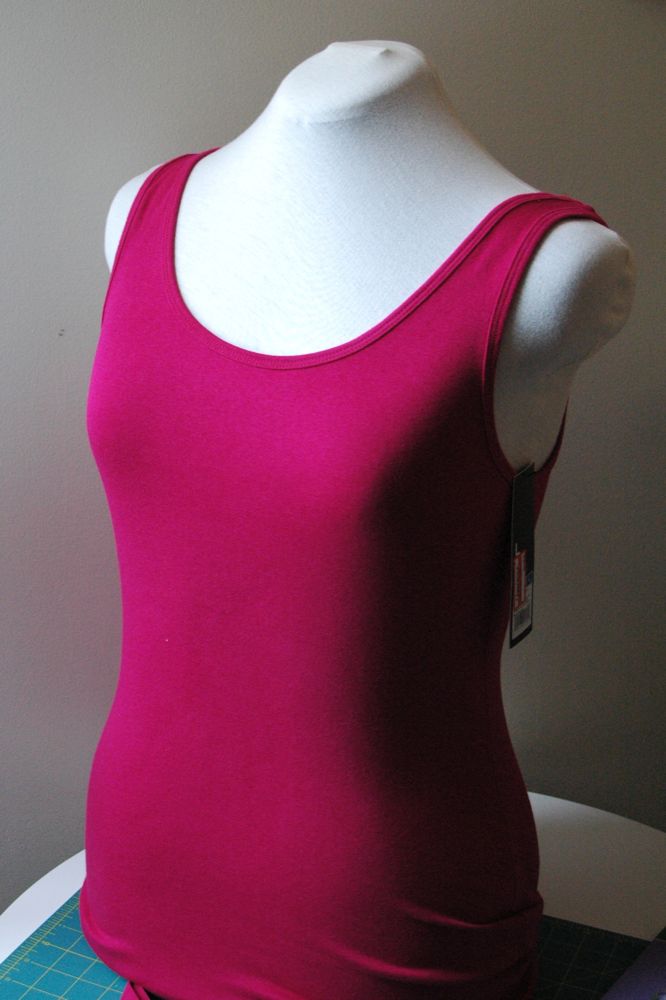
I put one aside and laid out the other to chop it up. Down the side seams, across the top and bottom so that I have two clean rectangles.

I laid “Lite” Heat-n-Bond in-between the two rectangles and ironed them together. Knit doesn’t fray anyway, but the interfacing should help keep it from curling and bunching. A yummy little knit sandwich. “Lite” fusible interfacing because I wanted to add as little weight and as little stickiness to sew through as possible. At the thickest spots, I was sewing through 7 layers of knit and 3 layers of interfacing.
Once my sandwich was assembled, I trimmed it into one inch strips, and then cut some 1/2″ strips, too.
At this point I needed Marjorie on-scene. And K was so excited to see her down from her perch she had to come and hug her.
So here we are. A blank canvas. Ready to make a masterpeice. Or a mess.
Starting at the shoulder seam, pinning a ruffle every inch and a half or so. Wait, is it a ruffle or a pleat? It feels ruffly. But it’s folded more pleat-y. And by the time it’s stitched down, I’d say it’s a pleat. But the inspiration piece calls it a ruffled tank. 
I was concerned early on about how I’d end one strip and begin another, since none of my strips would be long enough to reach all the way across. Ended up being no problem at all. Just start a ruffle/pleat right on top of the tail of the last piece.
Stitching the first row down with a stretch stitch, I removed the pins just as each ruffle/pleat was headed under the presser foot. The volume headed for the needle was too much with the pin making it bow in the middle. Then I started pinning the second row.
Just tucked the ends under on the diagonal.
All those pins look a bit menacing. Not a dancing top at this moment.
And then the third row across. Like how I still have the tag on it here? As if I’m still thinking I’m going to run this back to Target for a refund?
To start the asymmetric little doo-flahtchies on the bottom, which I considered leaving out and decided to suck it up and continue, I pinned at my starting point and marked my desired endpoint with another pin so that I could try to aim for it as I worked on the smaller ruffle/pleats with a 1/2″ wide strip. Tiny and a bit tricky. I had to lay Marjorie down to work on it, which felt a bit odd. But we’re closer now. We’ve bonded.
This part has two sections. Each has two strips.

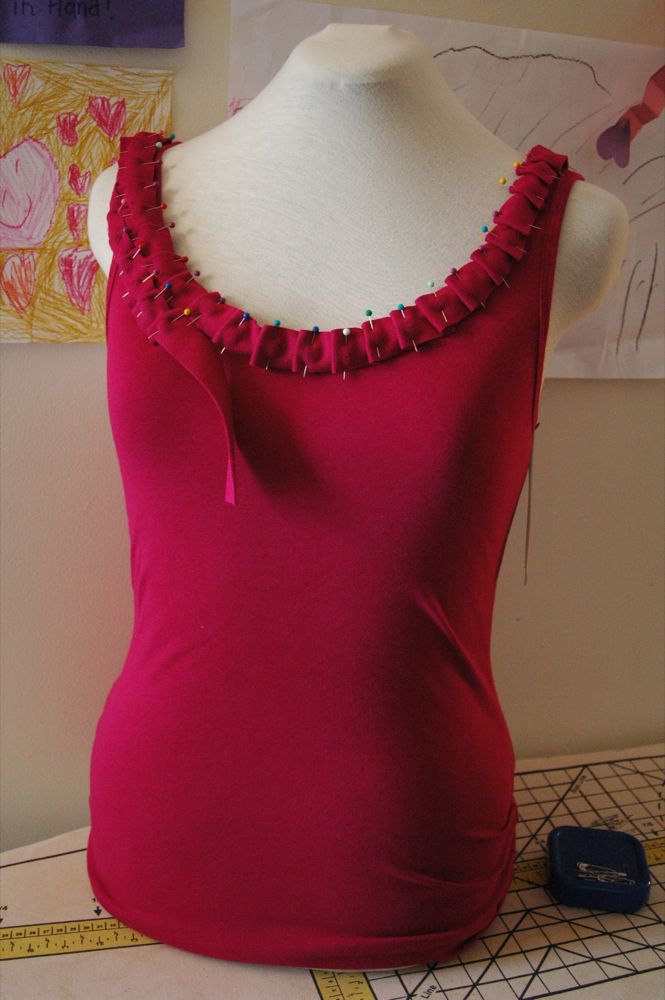
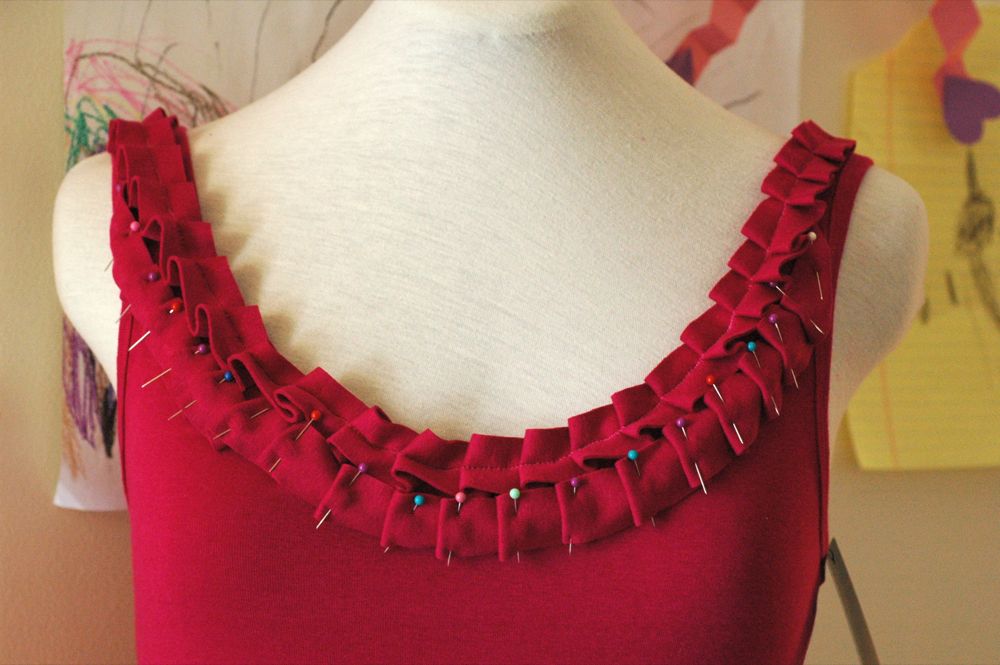
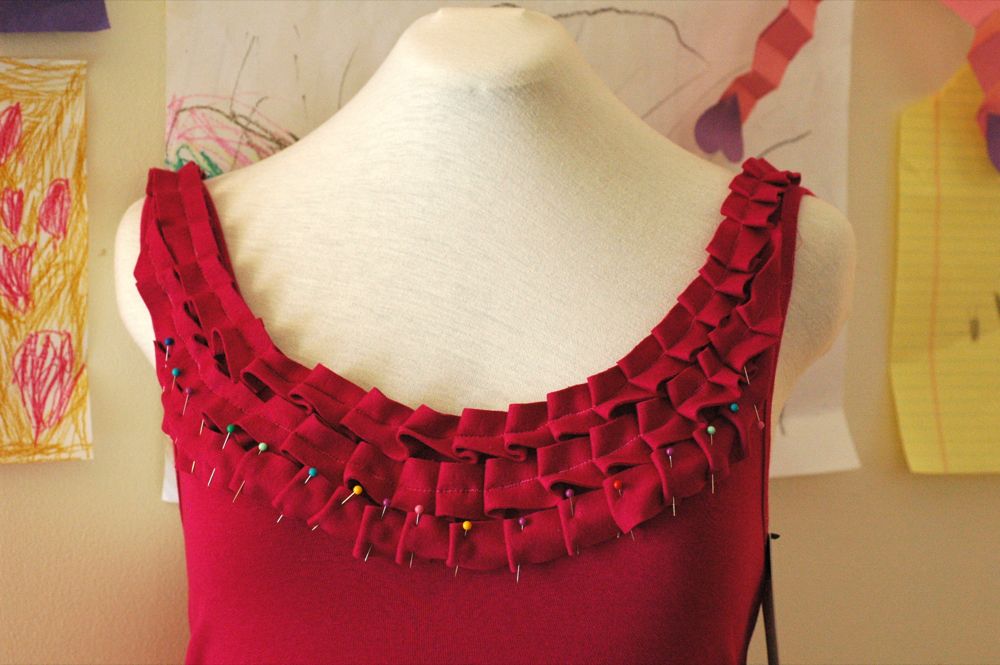
A lotta pins in a small space. Tucking ends underneath the upper ruffle/pleat wherever possible.

Allllmost done. I’ve used 1/2″ strips in the top row of the doo-flahtchies and 3/4″ strips for the bottom. The sacrificial tank eeeked out just enough to work with.

Aaaahhhhhhh. In the end, so much less painful than I made it out to be.

And now it’s off to Stacey, (Happy Valentine’s Day!) so that she can put it in her closet to wait the five months left before she gets to enjoy anything approximating sleeveless weather. Oy.
I’m still pondering how the inspiration piece is made. I’m still planning to try this a few other ways. So you may find more ruffle/pleat tanks ’round here soon. 
Note: This top would not be flattering on me. As per every other episode of What Not to Wear, the ruffles on top are not for busty girls so much. Stacey, if you decide the ruffles are too much for you… I know another crafty blogger who has expressed interest. And would be one of the people on What Not to Wear for whom the ruffles are perfect. Ahem.

Related

Filed Under: t-shirt, tutorial Tagged With: refashion, t-shirt, tutorial

« Glittered Cupcake Toppers for Laura
Happy Valentines Day(ish)! »

Comments

  1. Dominique @ Craft Couture says

    February 14, 2011 at 12:11 pm

    So adorable! Nice tutorial too! I would love it if you linked up to my party :).

    dominiquescraftcouture.blogspot.com

    Reply
  2. Katie says

    February 14, 2011 at 12:13 pm

    Super cute!

    Reply
  3. Kim @ seven thirty three says

    February 14, 2011 at 12:21 pm

    I LOVE ruffled, er, pleated? tanks. Looking at this I TOTALLY think I could do it! I have a store bought one that I wear a lot with a cardi and get so many compliments… hmmmm – wish I had a Target near by!

    Reply
  4. Kyra says

    February 14, 2011 at 12:43 pm

    I like it. Good job!

    Reply
  5. Care says

    February 14, 2011 at 12:43 pm

    Oh, it is gorgeous!!

    Reply
  6. Kyra says

    February 14, 2011 at 12:44 pm

    insert a round of little Aubrey hand claps!

    Reply
  7. Taylor {Sew Much Love} says

    February 14, 2011 at 1:04 pm

    Gorgeous! I actually likes yours better! That’s awesome! Thanks so much for the tutorial!

    Reply
  8. houseonhilltop says

    February 14, 2011 at 1:28 pm

    So Cute and creative. Great way to re-purpose. Thanks for sharing.

    Reply
  9. Ana says

    February 14, 2011 at 1:44 pm

    This is great!

    Reply
  10. Jen Lara says

    February 14, 2011 at 1:58 pm

    Super cute tank and perfect for us less-endowed gals.

    Thanks for the helpful tutorial.

    Reply
  11. Stacey says

    February 14, 2011 at 2:17 pm

    Ahhhhhh! You so ROCK. I can’t believe you made one. And it looks perfect. Is it seriously coming my way? You are the B-E-S-T, especially since I was definitely chickening out. Why am I writing here, I’m calling. right. now.

    Reply
  12. Larissa says

    February 14, 2011 at 3:03 pm

    This entire tutorial had me giggling but when I got to you laying Marjorie down and how close the two of you are now, I literally spewed Dr. Pepper out of my nose. And the tank is awesome too :)

    Reply
  13. Corinnea says

    February 14, 2011 at 3:16 pm

    Very cute!

    Reply
  14. Lesley says

    February 14, 2011 at 4:14 pm

    This is amazing! Wonderful work!

    Reply
  15. Sarah Faith says

    February 14, 2011 at 11:55 pm

    love it! thanks so much! i will be using this idea.

    Reply
  16. Rissa @ Hazel and Honeysuckle says

    February 16, 2011 at 5:26 am

    This looks fantastic! *adds it to the things-to-try list* Very nice!

    Reply
  17. Anna says

    February 16, 2011 at 9:40 am

    beautiful! for some reason I always feel guilty about cutting into a perfectly usable piece of clothing, gotta get over that. hehehe

    Reply
    • MARYAM says

      October 20, 2014 at 8:58 pm

      JUST USE ONE INCH WIDE RIBBON THAT MATCHES OR COORDINATES TO YOUR COLOR AND FABRIC, AND PLEAT YOURSELF AWAY !

      Reply
  18. twobutterflies says

    February 19, 2011 at 12:33 pm

    I am sooo making one of these!!

    Reply
  19. Melanie Jade says

    February 19, 2011 at 4:35 pm

    So cute! I love your tip about adding the interfacing – I don’t know enough about sewing to think of things like that, but I do know enough to completely botch a job! Ha! I saw this top in the Garnet Hill catalog as well and wondered if it could be easily made. Great tutorial!!

    Reply
  20. la casa della sarta says

    May 9, 2011 at 3:33 am

    mi piace molto la tua idea, molto bello il top lacasadellasarta.blogspot.com ….. lili venite a trovarmi e se vi piace rimanete

    Reply
  21. allison @ itstoilegood.blogspot.com says

    June 22, 2011 at 12:23 pm

    Completely LOVE this refashion! Having a quick Tank Refashion Party (inspired by Old Navy’s sale this weekend) and would LOVE it if you linked up this awesome idea!
    http://itstoilegood.blogspot.com/2011/06/2-tanks-mean-tank-refashions.html

    Reply
  22. Kristal says

    July 29, 2011 at 1:25 pm

    I love this SOOOOO much!!! Thanks for breaking it down and making it not so scary. I think I’ll have to try it!

    Reply
  23. Delicious Shots says

    September 3, 2011 at 8:30 am

    I love it!! great idea!

    Reply
  24. tank top dress says

    May 22, 2012 at 12:32 pm

    This is adorable! I love ruffle dress!

    Reply

Leave a Reply Cancel reply

Search This Blog

Archives

Popular posts

  • Side Panel Shirt Refashion: A Tutorial
  • Racerback Dress: A Tutorial + PDF Pattern
  • FREE Pattern: Monkey Bar Skirt
  • T-Shirt to Tank: A Tutorial by Jen from Upcycled Education
  • Slipcover Your Dress Form: A Tutorial
Visit Susan Yates's profile on Pinterest.

Want our posts in your inbox?

Enter your email address to subscribe to crafterhours and receive notifications of new posts by email!

Our Privacy Policy

Copyright © 2021 ·Foodie Child Theme · Genesis Framework by StudioPress · WordPress · Log in


Creative Commons License
This work is licensed under a Creative Commons Attribution-NonCommercial-ShareAlike 3.0 United States License.
»
«